
8 Ways to Improve Your Landscape Photography Workflow

One lesson I learned early in my landscape photography career is that a little preparation goes a long way, and having a good landscape photography workflow is paramount. It will increase your chances of coming home with some beautiful images.
I am a big believer in planning the details of my excursions as much as possible, especially when I am travelling a long way from home.


With a wealth of free information and technology at our fingertips today, there is no reason for you to show up unprepared on a dedicated photo trip.
We can control almost every aspect of our time in the field except for the weather, and even if that turns bad, having alternative image ideas in your mind can help save the day.
This article will explore a few of the things that you can do ahead of time to maximize your efficiency, make your trips more enjoyable, and improve your workflow in the field.
1. Research your location
As a landscape photographer, I often pre-visualise my images long before I try to capture them, and I highly recommend doing this before your own shoots.
With thousands of photographs on the internet of almost any location on the planet, and tools specifically designed for photo planning, this process has never been easier.
Below I will show the details of a weekend trip I made to Dinosaur Provincial Park in Alberta, Canada as an example of how I used technology to plan my trip. I hope it may inspire your pre-planning methods!

On my desktop at home, I started location research using Google Earth to zoom in on the park and get a feel for the lay of the land.
The program also shows photos that other people had taken and uploaded, which gave me an idea of what to expect when I arrived.
Next, a search of ‘Dinosaur Provincial Park’ in Google Images was another great way to see photographs from these unique Badlands to give me inspiration. I found a few prominent subjects that looked interesting, enabling me to visualise some possibilities that I could focus on during my visit.
Read more: How to Find Great Locations for Landscape Photography
2. Study the light
Capturing your subjects in beautiful light is often what makes or breaks your photographs, so being on location at the right time of day is critical.
In conjunction with your research of photographs, learning to know when sunrise or sunset will occur, and how it relates to the direction your subject faces is invaluable information for your planning.
A great photo planning program that I use to study light direction is The Photographer’s Ephemeris. You can create a free account to use this app on your desktop with limited features, while a paid subscription is available for desktop and mobile devices with better graphics and additional features.

Above is a screenshot of Dinosaur Provincial Park that I used for planning my trip.
Step 1. Click and hold on the red pin at the top right of the screen, and drag it onto your map where you intend to be on location, then release. The thick coloured lines radiating from the centre of your pin position will remain stationary and indicate the exact times of things like moon rise, moon set, sunrise, and sunset.
Step 2. On the top left of the screen, I set the date when I intend to be at the park.
Step 3. The bottom of the page shows the time slider. Click and hold the blue button, then drag it back and forth. The thin coloured lines radiating from your red pin will turn like hands on a clock as you move the slider, indicating the exact direction of the sun and moon at your chosen time of day.
Step 4. View the colour-coded index which shows the exact times of specific lighting events, including the golden hour.
As you can see, researching images and using programs like the Photographer’s Ephemeris are great tools to help you pre-visualise your destination. Utilising these tools as part of your location research will put you ahead of the game, with a far better chance of capturing the images you had hoped for.
Read more: How to Find and Use Light in Landscape Photography
3. Arrive early
Once I am familiar with a location through research of photographs and light planning, I always make an effort to show up on location early.
This allows me to scout the area and find compositions that I can be ready to shoot when the good light occurs at the golden hours of sunrise or sunset.

The photo above shows an interesting composition that I found while scouting during the afternoon in the Badlands.
I loved how the erosion grooves in the earth acted like leading lines into the centre of the scene. I imagined that once the sun set low to the horizon, the backlight and shadow interplay would accentuate the amazing textures.
My research with the Ephemeris told me exactly in which direction the sun would be setting, and also the exact time. This made choosing my composition and getting ready for the beautiful light a lot easier than it would have been if I had shown up with no plan.

Above is the final image from that evening, with a huge bonus of some amazing clouds that lit up with the setting sun. I was ecstatic with the result as the efforts I put in ahead of time definitely paid off.
We have all experienced the panic of running around frantically at a beautiful location as the light is fading, desperately searching for a composition because we arrived late or didn’t study our subjects beforehand.
Remember that with a little effort put into research and arriving early to scout compositions, you will dramatically increase your chances of bagging that epic shot you had hoped for.
4. Know your gear
It should go without saying that knowing your gear inside out is critical to improving your workflow in the field. When a fleeting photo opportunity arises, the last thing you want to do is fumble with your camera menus while that special moment fades away.
Being intimately familiar with your camera, tripod, and accessories takes away a lot of the stress of capturing images quickly when the need presents itself.
Being comfortable with everything in your bag will diminish your anxieties, so you can focus on important things like scouting, finding creative compositional opportunities, and capturing images quickly when you need to.

This an example of how my lack of familiarity with some seldom-used camera settings almost turned a once-in-a-lifetime opportunity into an expensive disaster:
A few years ago, I booked a helicopter in Hawaii to photograph flowing lava.
My guide said “We’ll be shooting in shutter priority because of the vibration, so don’t forget to set your auto-ISO high point to about 6400, and your shutter to about 1/1600 of a second or so.
“Once the sun starts to rise, you can just bump your exposure compensation to adjust as we go.”
I went into panic mode as we were lifting off, fumbling through my camera menus trying to figure out how to set my auto-ISO high and low points, switch to shutter priority, and continuous shooting modes.
After a stressful 40 minutes of hovering over the hot lava and rattling off over 1,200 frames between my two cameras, we landed back at the airport.
Upon review of some of the images, I wanted to cry when I realized that I had unknowingly set BOTH my low and high ISO settings to 6400, therefore my ISO never dropped below that point.
Every image I captured would have significant digital noise, which is not great when your goal is to make large prints.

Although I was able to salvage some keepers from the flight and control the image noise somewhat in post-processing, it was still an error caused by a lack of familiarity with settings that I rarely use.
So, remember to get to know your camera before a shoot, especially if you’re using gear that’s unfamiliar to you!
Read more: 15 Best Cameras for Landscape Photography
5. Check your settings
Every time you shoot in the field, your priority should be to double-check your camera settings. This is because your camera will be set to whatever you were shooting yesterday, and if that was the Milky Way last night, you don’t want to be shooting sunrise at ISO 6400.
Here is a list of the most important settings for landscape photography.
1. Always shoot in RAW format, combined with the largest image area size and quality settings. This will take full advantage of your camera’s sensor, giving you the best image files with the most amount of information and flexibility for post-processing later on.

For landscapes, shooting in JPEG is usually a big mistake, as the camera will automatically compress your photos by deleting most of your pixel information. The resulting files are very small, with very little flexibility in processing.
2. Set your ISO as low as possible. This will render the cleanest images with little to no digital noise. Most cameras have a native low ISO setting, such as ISO 100 or 64; however, it is possible to pull it down even lower.
My Nikon Z7II allows me to drop it down as far as “Lo1.0”, which is equivalent to ISO 32.
There is no disadvantage to this, and it will not harm your files in any way. If you are shooting moving subject matter such as flowers blowing in the wind, it may be necessary to raise your ISO to achieve a fast enough shutter speed to capture them without blur.
Otherwise, keep it as low as you can, especially when shooting things like skies where digital noise becomes very apparent.
3. Shoot at your sharpest aperture. Every lens in your bag has a ‘sweet spot’, or best aperture which will give you the sharpest images.
Sometimes photographers will stop down to f16 or f22 to achieve a better depth of field, but the problem is that these tiny apertures often cause a phenomenon called ‘lens diffraction’, which causes your images to be soft.

The sharpest aperture of any lens is usually 2-3 stops down from wide open, meaning an f2.8 lens is often sharpest at f8 or f11 maximum.
To find your sweet spot, a home test you can do is to set up your camera on a tripod in your yard, switch to aperture priority, and focus on a subject with fine details such as a tree.
Starting at your widest aperture (like f2.8 or f4), shoot one frame of your subject at each aperture on your lens, from the widest to the narrowest. Don’t forget to use shutter delay or a remote release to be sure there is no camera shake when you are capturing the images.
Upload your files into your software and zoom in to 100% or closer on each file, comparing them for sharpness. Find your sharpest photo and take note of the aperture that was used for it – that is the sweet spot of your lens.
I shoot almost exclusively at f8 and focus stack most of the time. There are many tutorials where you can learn how to focus stack, so I won’t go into detail here.
4. Shoot in manual mode. This gives you the maximum amount of creative control without letting the camera decide it for you.
With your aperture set to the sharpest f-stop, the only thing you need to adjust is the shutter speed and ISO to achieve well-exposed images with your desired effect – such as a slow shutter speed for a silky-looking waterfall.

The image above shows my basic settings while capturing Castle Butte on the Saskatchewan prairie. I used f8 to keep my images as sharp as possible while pulling my ISO down as far as I could for noise-free files.
The butte and the sky were recorded with these settings, while the foreground was captured using a higher ISO and shutter speed to keep the blowing grasses nice and sharp. The resulting files were blended in Photoshop for the finished image.
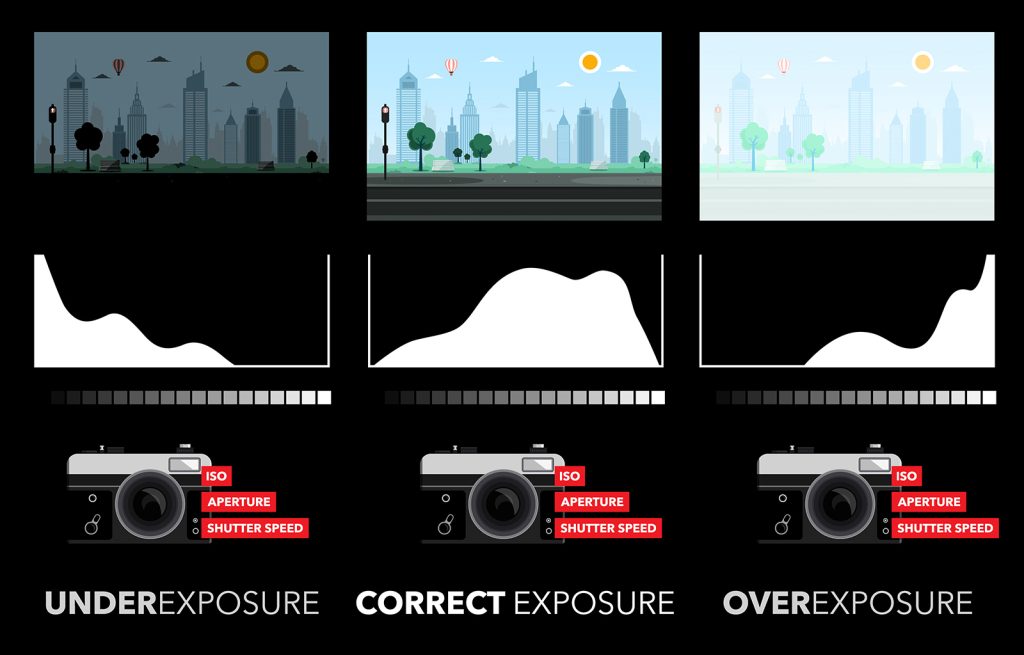
Next, set up your camera’s image playback so you can quickly view your histogram and highlight warning feature after each shot. The histogram illustrated above is a valuable tool to help make sure that your images are not over or underexposed.
Your highlight warning screen (commonly called the “blinkies”) will flash on and off where any part of your image is overexposed, so you can change your settings and re-shoot for correct exposure.
Finally, some cameras have an ‘exposure delay’ function, which allows you to set a number of seconds that will elapse between pressing the shutter button and taking the image. This allows any camera shake to dissipate which results in sharper images.
Vibration reduction or image stabilization is also a feature of many lenses and camera bodies that allows you to shoot handheld at lower shutter speeds.
But if you are using a tripod, you don’t need it, so I recommend turning this feature off. It has been known to have the opposite effect of introducing camera shake on a tripod.
Read more: The Best Settings for Landscape Photography
6. Practice good field technique
To avoid wasting time and good light in the outdoors, I prefer to approach my subjects by moving around and taking a few snapshots handheld to find my favourite compositions. My tripod tends to come out only after I have decided on my preferred vertical or horizontal orientation and lens choice.

Above, I walked around this Japanese maple tree for a few minutes, studying its form and snapping a few images handheld. I decided on two different compositions: one from 20 feet away with a 24-70mm lens, and one close up and low to the ground with a 14-24mm wide angle.
Once I had the compositions in my mind, I was able to capture both images on my tripod very quickly.
Pulling out your tripod too early often wastes time if you get too wrapped up in making an image ‘work’ at the first spot you plonk it down. This forces you to keep moving around and resetting your tripod legs if the composition isn’t working.
Shooting handheld when approaching a scene is usually more efficient, allowing you to find and capture compositions quickly so you have extra time to find other possibilities before the light fades.

Next, if you like to focus stack and your camera has a ‘focus shift’ feature, learning how to use it will save valuable time.
The camera can rapidly shoot several frames, focusing deeper into the scene with each successive shot, until it has covered the entire focal range. Each of the images can then be blended in post-processing.
At the end of the day, efficient field techniques and skilfully utilizing your camera’s features will save time and increase productivity. When you are proficient with your camera through practice and repetition, everything becomes easier and more enjoyable.
This allows you to spend more time tapping into your creative side rather than stressing about your camera settings.
Read more: Hyperfocal Distance: Focusing in Landscape Photos
7. Back up after the shoot
It should go without saying that once you return home from a photo trip, a priority should be to back up your images as soon as you can.
While everything is fresh in my mind, I like to upload my RAW images into Adobe Lightroom, which simultaneously creates folders of my photos in the pictures file on my computer’s internal hard drive.
I will then copy and paste each of these folders into my two external hard drives, and label those new folders with the dates and locations of the images.
You can customize your folders any way that you wish to make them easy to access later. I then take one of my hard drives and store it at a different location in case of a disaster.

It is also very wise to consider subscribing to a cloud service and uploading all of your images there as well. This way, you will have peace of mind that in the event of an external hard drive failure, flood, or fire you can still access your precious files later on.
Another benefit of the cloud is that you can download your files from anywhere, not just from your home.
Once you have safely backed up all of your images, you can format all of your cards and place them back in your bag, clean and ready for your next outing.
Read more: How to Safely Back Up Your Photos
8. Maximize Your Efficiency: Bonus pro tips!
No tutorial is complete without sharing a couple of little tricks that I use in the field to make life easier!
1. Carry a big plastic garbage bag in your backpack. How often have you encountered wet conditions in the field? Having to remove your pack to access your gear is a fact of life, and no one wants to set it down in the snow or mud.
Just throw a garbage bag flat on the ground first, then place your pack on top of it. When you’re done, fold the garbage bag inwards to contain the grime, and pop it back into your bag.

2. Mark your used memory cards. On long trips where you are shooting thousands of frames on multiple memory cards, it’s easy to get them mixed up.
Swapping cards in and out of your camera to see if they are full wastes time, so once I have filled a card, I just place a tiny sticker on the back of it. Then I put it back into my foldable card caddy sticker side up, so I can quickly identify an empty card next time.
In conclusion
Whether you are photographing close to home or across the planet, doing location research beforehand and knowing your gear will always make your excursions more enjoyable, less stressful, and more productive.
In nature, opportunities can arise quickly and fade just as fast, so in landscape photography being prepared is the name of the game. By incorporating some of these tips into your routine, you are sure to greatly improve your workflow in the field.


