
How to Dodge and Burn Wildlife Photos
When photographers talk about dodge and burn, or dodging and burning, they are referring to post-production tools that are commonly used to enhance and manipulate the brightness and contrast in specific areas of an image.

‘Dodging’ involves selectively brightening specific areas. ‘Burning’ involves selectively darkening or increasing the shadow in specific areas.


This article outlines why dodging and burning are an important part of post-processing, specifically in wildlife photography, and how best to apply them in your workflow.
We will look at how you can use these techniques to enhance your wildlife images and allow your shots to stand out from the crowd!
Read more: 6 Wildlife Photo Editing Tips for Beginners
Dodge and burn
Dodging and burning can enhance the visual impact of your photos in many ways, but here are some key things to think about when deciding when and where to use dodge and burn techniques in your images:
Emphasize and de-emphasize selective elements
By brightening or darkening certain elements, you can draw a viewer’s gaze away from distracting elements toward the subject or key focal points.
Create depth and dimension
By darkening shadows and lightening highlights, photographers can make objects appear more three-dimensional, providing a sense of depth.
Create mood
Increasing shadows and darkening certain areas can make an image feel more dramatic, mysterious, or moody.

More specifically, for wildlife photographers, dodging and burning may most commonly be used to draw attention to specific parts of an animal subject.
For example, this could be done by brightening (dodging) the catchlight in eyes and darkening (burning) their edges or centers, or in highlighting texture in fur or feathers.
It could also be used to lighten or darken their surroundings, thus maximising the impact of the portrait.
Read more: 12 Ways to Evoke Emotion in Your Wildlife Photos
How to dodge and burn
You can dodge and burn with most image editing programs. If you’re new to post-processing, it’s best to start with simple editing tools.
Pick a tool that you can easily incorporate into your workflow. I use the following tools for dodging and burning, and both are a key part of my post-processing workflow.
Adobe Photoshop: Adjustments are made using layer masks – specifically Curves and Brightness/Contrast layers. I use this type of adjustment in nearly all my images.
DxO NIK Collection: Adjustments are made using NIK Viveza and Color Efex. I use these tools with many of my images. The collection is a plug-in within Adobe Photoshop.
How to dodge and burn in Photoshop
There are several tools you can use in Photoshop to dodge and burn.
Dodge and burn tools
Within Photoshop, the easiest way to apply dodging and burning is to use the Dodge and Burn tools. Using these tools, you can selectively brighten and darken areas of the photo.

The photo above shows where to find the Dodge and Burn tools in Photoshop (you may need to have a look around on your version – tools can easily be hidden from sight! Not everyone’s layout will look the same).
Curves layer adjustment
Alternatively, you can use the Curves and Brightness/Contrast adjustment layers for dodging and burning.
The reason I choose to use these layers more often, instead of the Dodge and Burn tools, is so that I can go back and delete or change adjustments later, which I do periodically. I prefer the flexibility.
The photo below shows where I select the Curves adjustment layer. I like using the Curves tool because the adjustment is nicely blended with similar tones in the image.

Within the Curves adjustment layer, I select the “on-image adjustment tool” (looks like a little hand with a finger pointing), enabling me to use an eyedropper on the image to select a specific tone. I click on the tone I want to burn or dodge.
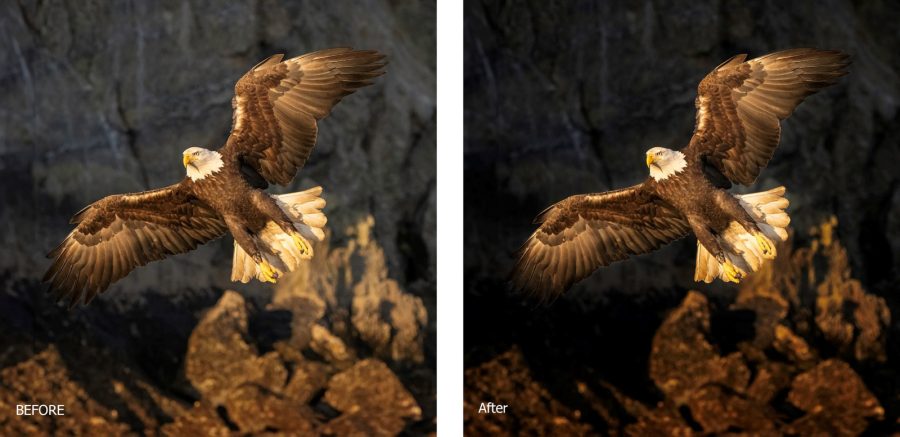
In this image, I want to ‘burn’ or darken the bright areas on the rock behind the eagle’s tail feathers, so I clicked on the brightest tone in the rocks (red dot in the image below).
That tone is then preselected on the curve, and I press the down arrows to darken that tone. You’ll see in the second photo below how the curve bends as the down arrow is pressed, darkening similar tones as well.

Lastly, I press Ctrl+Delete (Windows) / Cmd+Delete (MacOS) to hide the adjustment as a mask, then paint the adjustment on the rocks and only minimally on the eagle.

Read more: Keyboard Shortcuts for Photoshop & Lightroom CC
Enhancing animal eyes
I use a similar approach with the Brightness/Contrast adjustment layer within Photoshop. An important usage of this tool is specifically for increasing the impact of wildlife eyes.

An example is shown above in the “before” and “after” images of an American Badger. The horizon catchlight and lower lid line are the areas of the eyes that are brightened.
It is a small but very impactful step in enhancing your wildlife photos and can be applied to nearly every wildlife portrait image.
Read more: Editing Your Photos – How Far Should You Go?
Before and after examples
Here are three further examples of the effects of dodging and burning. Each example includes a before and after image.
Example 1: In the first example below, the bald eagle is illuminated beautifully, but there are rocks in the background that are a bit too bright and take attention away from the subject.
Using a Curves layer mask in Adobe Photoshop, the rocks can be darkened to keep the viewer’s eye on the subject.

Example 2: In the second example below, the African lion is partially illuminated. I wanted to put more emphasis on the lion’s face and mane without losing the image’s moodiness.
Using multiple Brightness/Contrast layer masks, selective areas on the face and mane were very subtly lightened, and the surrounding foliage darkened.

Example 3: In the third example below, there isn’t much difference in the illumination of the subject versus any other elements.
Using multiple Brightness/Contrast layer masks, the Canada lynx was very subtly lightened, and the surrounding foliage darkened.

Dodging and burning using DxO Nik Collection
The DxO Nik Collection is a Photoshop plug-in, and adjustments are made using NIK Viveza and Color Efex tools.
Viveza
The Viveza collection is one of nine filter collections within the DxO Nik Collection. You can create selective control points within Viveza to apply adjustments to grouped control points.

In the example above, I created selective control points around the lynx (shown as circles around the lynx), grouped them, and then increased the brightness of only the grouped points. I can then do the same around the areas of the image I want to darken.
After the changes are made within Viveza, I click “Brush” to bring the adjustments back into Photoshop as a mask, enabling me to further refine and complete the adjustment.
Dodging and burning using DxO Nik Collection – Color Efex
Within Color Efex, I use the Darken/Lighten filter. It is simply a preset vignette, which can be easily customized and applied.
The tool allows you to select the center or focal point of the image, the size of the center, the amount of center luminosity (brightness), the amount of border luminosity (darkness), and the overall shape of the vignette.

The preset is a bit heavy-handed with the center and border luminosities, so I usually reduce the amount of both before applying it.
This can be very useful when you want to draw the viewer’s focus into your subject and darken the edges of your image.
In conclusion
Here are some top tips to send you off on your dodge and burn journey.
Start with an image that’s worth your time and attention, one that has good exposure, composition, and sharpness, and have an idea of the changes you would like to make before implementing them.
Then, decide which areas of an image should be adjusted and to what extent before you start dodging and burning. The adjustments should enhance the key focal points of your photo.

Dodging and burning can significantly enhance the visual impact of a photograph, but be mindful to make small, subtle adjustments – a little at a time.
Continuously toggle the visibility of the dodging and burning adjustment on and off to check your progress. And don’t forget to zoom out to look at the overall photo.
You can build up the changes through multiple adjustments. You’ll know you’ve gone too far if the photo looks unnatural.
It’s helpful to use a dodging and burning tool that you can easily incorporate into your post-processing workflow. Choose whichever one works best for you!


