
How to Get Sharper Images with Selective Sharpening
It is no surprise that every photographer wants their images to be as sharp as possible, because crisp images full of detail can be very beautiful. The sharpness of your photo is largely determined by your technique while taking the image, so it is worth reading “The Secret to Getting Sharp Photographs” too.
Every professional photographer will edit their images, and many of them (especially in wildlife photography) will selectively sharpen their images to give them a little extra punch. Good glass and technique renders images to already be sharp, but post production can sharpen them even further.


Sharpening the whole image at once can degrade the quality of backgrounds which have no detail in them. Selective sharpening allows you to sharpen only the subject of your photograph, leaving the background unaltered. Remember, you should make all other editing adjustments before sharpening your image.
For this tutorial, I’ll be using Photoshop CC.
Step 1: Select the Subject of the Photo
Before you do anything, you should make sure your image is all flattened into one layer. If you’ve broken it into other layers while editing, just right-click the layer window and choose “Flatten Image”. If you haven’t intentionally created new layers, then don’t worry about this bit.
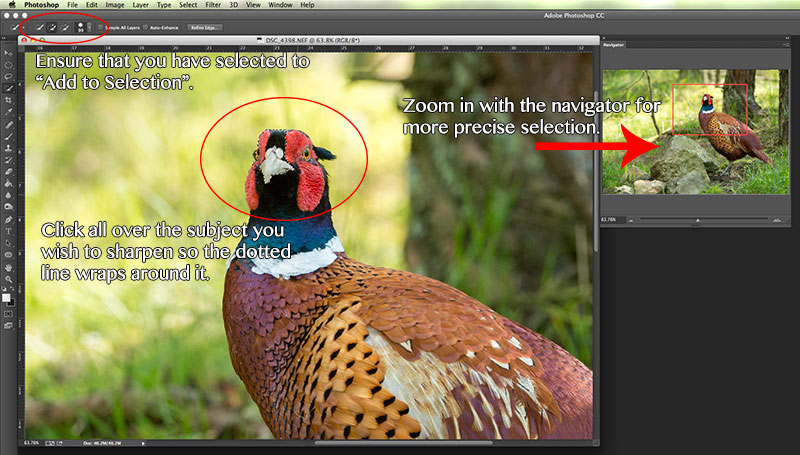
Then, you need to choose your weapon for selecting the element in your image you want to sharpen. The “Quick Selection Tool” is great for this, and makes outlining an area very quick to do. Right-click the menu item, as shown in the image, and choose “Quick Selection Tool”.

Now you’ve got the tool selected, make sure that the brush size is sufficient. This will be relative to the size of your image, but for this I am using 90px. You can adjust the brush size in the top bar.
Next, all you need to do is start clicking around your subject. After your first click, make sure “Add to Selection” is chosen, otherwise you won’t be able to select the whole subject. Use the navigator to zoom in for a more accurate selection. As you select, you’ll see black and white dashed start to wrap around your subject. The tool intelligently determines the border to your subject, and selects it as best it can.
Remember, be careful not to click over the outline of the subject, otherwise the tool will select areas of the background too. To select right up to the outer edges, just click very near to, but not on the border.
If you make a mistake while you are selecting, just click “Edit > Undo Selection”. This will take you back a step, so you don’t need to start all over again.
Step 2: Fine-tune Your Selection
If you zoom in, you will inevitably see that some areas are selected that shouldn’t be, or bits aren’t selected which should be. Decrease the size of the tool again, and click on the smaller areas which should be in your selection. For the bits that shouldn’t be there, swap to “Subtract from Selection” (in the top bar for the tool settings), and click on them.

If you’re finding it tough to remove or add those final bits to the selection, try using the “Magnetic Lasso Tool”. This tool selects and follows the outline of an area. Click on the edge once, and then follow it with your mouse (no need to click again, unless you want to “anchor” a point in a tricky area).
Remember that you’ll need to create a closed selection with this tool. Once you’ve followed enough of the edge of your subject, move your mouse into the selection (if adding), and create a looping circle. Click on your starting point, and the selection will be added.

Step 3: Split into Layers
Now you have selected the subject of your photo, you need to break it up into layers for sharpening. All you need to do, is right-click the selected area and choose “Select Inverse” from the menu.

Next, look at the layers panel. Click and drag the background layer onto the new layer icon. You can see this illustrated in the image below.

After that, you just need to create a new layer that contains only the area to be sharpened. To do this, you need to cut and paste the selection. Keyboard shortcuts make this very simple.
For Mac users, press Command + C on your keyboard, followed by Command + V.
For Windows users, press Control + C on your keyboard, followed by Control + V.
Step 4: Sharpen the Selection
You’ll now see the image broken up into three layers. Select the layer with just the area to be sharpened in (this should be the middle one, if you haven’t reordered them). Navigate to “Filter > Sharpen > Unsharp Mask…” in the top menu.

A pop-up window will appear. Click over the main focus area of your photo (the eyes, if your image is of an animal), to see a close-up preview of your changes. Then, move the sliders to achieve the desired sharpness. Be careful to not over-sharpen an image – too much can look bad. 60-100% for the amount should be sufficient. The radius should be between 0.5 and 1.5, depending on the size of your file. If you are shooting with a huge file, then maybe increase this further. Leave the threshold at 0.
Once you’ve sharpened, press “Ok”. You should now see a much sharper image (zoom in to 100% with the navigator if you can’t).

That’s it! you should now have a much sharper image, with the background left untouched. Remember, your technique contributes greatly to how sharp your image is. Now you’ve finished reading this guide, make sure you also read “The Secret to Getting Sharp Photographs“. Selective sharpening will improve sharpness, but it can’t save what was already a blurred image.


