
6 Wildlife Photo Editing Tips for Beginners
With the help of the wildlife photo editing tips in this guide, your images will stand out with greater impact than ever before!
The primary objective of editing your wildlife images is to maximize the impact of what you saw or felt in that defining moment when you pressed the shutter.
The adjustments and improvements you choose to make to a photo are largely a personal choice, but there are some basic changes to keep in mind that can increase a wildlife photo’s impact.
In addition, if you shoot in RAW format, photos can look great on the camera’s LCD screen, but most require post-processing to become a “finished image”, even when you do everything right in the camera.
This article outlines some basic post-processing considerations and steps to help make the most of your wildlife photos.
Read more: Why You Should Be Shooting in Raw
1. Calibrate Your Screen
Before you are deep into post-processing, be sure your computer/laptop monitor is calibrated to ensure colours are visually correct.

Colours change on the screen a little bit over time and need to be tweaked, so it’s necessary to recalibrate your monitor periodically (quarterly is a reasonable frequency).
I use the Datacolor SpyderX Pro for calibration – it’s easy to use and takes only a few minutes.
2. Find Your Target
Before you start post-processing a photo, be clear about what the “target” is in your photo. This is where you want the viewer’s eye to go.
It should be what you focused on when you took the picture, so for most wildlife images, the target is the eye(s).

There could be another or additional target, but I suggest keeping the number of targets to a minimum of one and a maximum of three.
Other targets might include the face, claws, teeth, talons, a paw, whiskers, beaks, wings, tails, water droplets, an interaction with another animal, rim light, or whatever else you feel is important for the viewer!
Knowing your target(s) will guide you through the post-processing steps.

Post-processing steps can be divided into two basic categories: First, the clean-up, and then the enhancement stage.
Read more: How to Improve Your Wildlife Action Shots
3. Clean Up Your Image
Clean-up can include, but is not limited to:
- Correcting white balance.
- Correcting exposure, highlights, whites, blacks, and shadows.
- Straightening the horizon line.
- Cropping.
- Eliminating minor distractions (e.g., dust spots, bugs, dirt, grass).
- Eliminating major distractions (e.g., twigs, branches, other animals, bright elements). Note: eliminating any major distractions may disqualify an image from a competition.
- Eliminating digital noise.
- Sharpening (sharpening is typically considered an enhancement, but I sharpen as part of denoising an image, so I define it as a clean-up step).
4. Enhance Your Image
Enhancements usually aim at creating contrast. Contrast can draw the viewer’s attention to the target(s), create a feeling or mood, and maximize the impact of the overall image. Examples of contrast are:
- Shadow versus illumination.
- Light versus dark.
- Cool versus warmth.
- Texture versus smooth.
- Vibrant versus muted.
All changes should be intentional, not arbitrary, and the adjustments you make should always be as subtle as you can afford to make them.

This can be hard to grasp at first, but as you master the tools you will soon realise that a little goes a long way. I recommend making small adjustments at a time to prevent overdoing it.
5. Find Your Software
There are general and specialized software tools used for clean-up and enhancement tasks. Depending on your comfort level with technology, pick the tool that you can understand and use effectively.
Take in-person and webinar classes, watch videos, and do whatever you need to do to learn how to use the tools you have. Don’t take on more than you can comfortably learn and will use.

Just because I or someone else uses a specific tool doesn’t mean it’s right for you, and in time you will develop your own unique editing process and style. If you’re new to post-processing, it’s best to start with simple tools.
I shoot in RAW lossless compression and use the following software programs to process my selected files. Adjustments vary by image.
I use limited functions within these tools, but they do the job I need, and I understand how to use them. I would encourage you to try multiple tools and software on your work to see what works for you!

Camera Bits Photo Mechanic: Photo Mechanic is used to organize, add metadata, and rank – it is the browser from where I initiate image processing. Metadata includes keywords, location, photographer, and copyright information.
Adobe Photoshop: Camera Raw is used to adjust exposure, correct white balance, reduce highlights, bring up shadows, and maximize whites and blacks.
Photoshop is used to crop, straighten the horizon, eliminate distractions, and enhance contrast within images. Both are used on every wildlife image. Most adjustments are made using layers.
Topaz Labs Denoise AI: Denoise AI is used to remove noise and sharpen images and is used on every wildlife image, regardless of ISO setting.
DxO NIK Collection: The NIK filters are used to enhance images. Applied in some way on nearly every wildlife image.
Tony Kuyper Luminosity Masks: Masks used to selectively enhance dark or light elements. Used only occasionally.
Camera Raw, Denoise AI and the NIK filters are all Photoshop plug-ins in my workflow, eliminating the need to save and re-open files for continued processing.
6. Learn from Others
It can be very useful to see how other photographers work on their images and to follow along on their editing process until you get the hang of things yourself.
Follow along with me below:
Sample Post-Processing Photo
Here is a sample photo and the tools and functions used to clean up and enhance them. For this image, I used all the tools noted in the software section, except for the Tony Kuyper Luminosity Masks, which I will touch on in another example.
The image below is the original RAW unprocessed photo of a leopard photographed in Botswana.

It had been raining, so the ground was soaked, and the sky was overcast. This female leopard had stopped momentarily under a tree to groom herself.
The photo was taken from a safari vehicle.
Camera and settings: Nikon Z9, Nikon Z100-400mm f/4.5-5.6 lens, 400mm focal length, manual exposure, f/5.6, 1/320s, exposure compensation 0, auto ISO 3600, auto white balance, matrix metering.
1. Adjust Exposure
I recommend using Adobe Camera Raw (ACR) for this, as shown in this image.

Here I have increased the exposure and brightened the whites. How to decide whether to increase/decrease exposure, or selectively brighten/darken whites, blacks, and shadows is based on the impact of the changes on the subject and target(s).
The goal is to maximize the whites/blacks, recover blown-out highlights, and increase shadows on the subject without losing any detail.
I have less concern about the background and don’t generally rely on the histogram to make my decisions, but it’s a common approach for many photographers.
In this photo, I do not want to blow out the tip of her tail or the white fur on her chest, so I’m cautious about brightening the whites.
Her black spots are already black, so I’m good with blacks. I don’t need to bring up shadows on her. I increased exposure just slightly to bring up overall body brightness a little.
2. Cropping
Use Photoshop to crop your image – here I have cropped the image to emphasize the eyes and head. Don’t be afraid to play around with various cropped versions of your shots (if the quality of the image is high enough to allow for it).

Sometimes getting in closer to your animal can remove distractions of the background, and allow for a more striking image, helping your audience to focus on the wildlife in the frame.
Other times, you may want to keep the frame wider to allow more of the surrounding environment to make up the composition. Here, the surroundings of the leopard were too distracting, and the image is much more effective cropped closer.
Read more: 6 Secrets of Photoshop’s Cropping Tool
3. Erase Distractions
In Photoshop, you can erase unwanted distractions with the Spot Healing Brush Tool, such as particularly oddly placed sticks or twigs.

This can be a very useful tool but remember; if you are planning to enter edited wildlife images into any competitions, too much manipulation can result in a disqualified image. So, be sure to check the competition rules for specifics – some may not allow digital manipulation of this kind at all.
Read more: How to Use the Clone Stamp in Photoshop – Removing Objects
4. Increase Sharpness/Reduce Noise
You can use Topaz DeNoise AI to reduce digital noise and increase sharpness. The left side is “before”, and the right side is “after”.

An easy approach to applying denoise and sharpening to your image is by selecting the “Clear” option, then selecting “Med” for noise reduction, and “Low” or “High” for sharpening.
I always use the “Med” level of noise reduction – I’ve found it works well for all my photos.
I typically use the “Low” setting for sharpening but chose to add more to this image. Be sure to view the selected settings on your target area(s) to see their impact in preview before you select “Apply”.
5. Dodge and Burn the Eyes
In photoshop, increase the impact of your subject’s eyes by using “dodging & burning” – using the Brightness/Contrast Tool and a small brush.

The first image (above) is the “before” and the second image (below) is the “after”.

The light-catch, horizon, and reflection are the primary areas of the eye that are brightened. The dark lines and pupils are darkened. This technique applies to most wildlife eyes and is a small but important step in enhancing your images.
6. Vibrancy
In Photoshop, I have now increased the vibrancy of the area surrounding the leopard using the Curves Tool and selective painting. Vibrancy is a subtle way to punch the colours in your image.

Remember a little change goes a long way!
Here, I’m moving the curve line only slightly to give the colours of the leopard’s fur a little more richness.
Then, I created a mask within the layer and applied this change only to the leopard, because there wasn’t a need to punch the colours of the background.
7. Filters
Try working with Photoshop and NIK Filters; here I continued dodging and burning to illuminate the leopard against the surrounding using the Brightness/Contrast Tool, NIK Viveza and NIK ColorEfex Darken/Lighten.

8. Watermark
Remember to insert your business logo/watermark for a finished image. I use a logo/watermark created by Photologo. It is an electronically designed PNG signature with a transparent background.

Once created, a white version and a black version are emailed. On dark backgrounds, I copy/paste the white version and vice versa.
Read more: How to Watermark a Photo
9. Save Multiple Versions
For every finished image, I save a TIF file with all layers, a high-resolution JPG for posting to my website with no logo, and a reduced-size JPG (1000 pixels on the longest side) with my logo embedded for social media.
Tony Kuyper Luminosity Mask Tool
This can also be a useful tool that is worth knowing about, though I didn’t use it in the leopard example above.
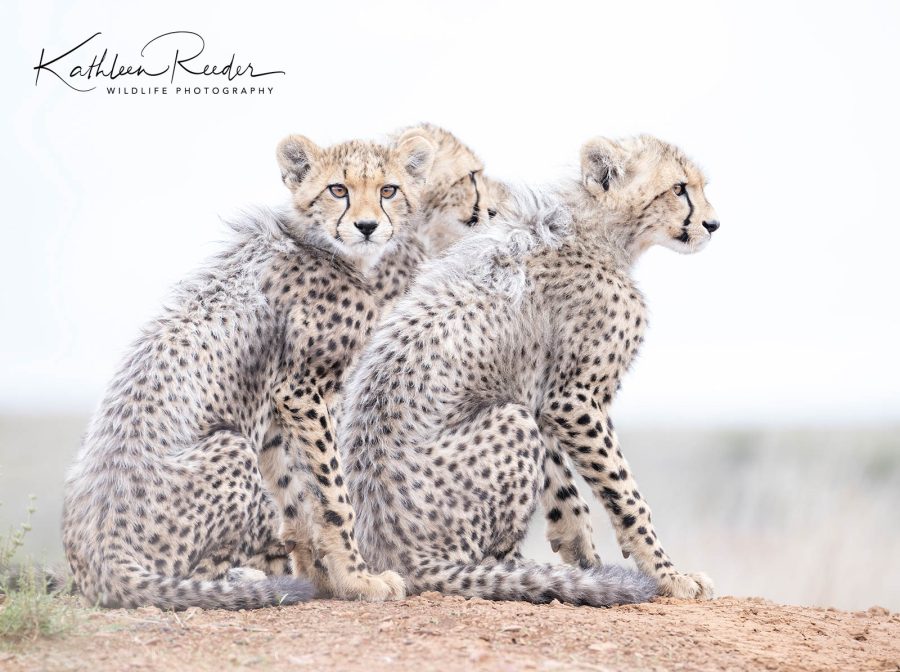
In wildlife images where I would like to make something in particular pop (e.g., the spots and markings of a cheetah), the Tony Kuyper Luminosity Mask Tools makes selecting the dark tones of a photo easier than other tools I’ve used.
The tool is a plug-in that you can use directly in Photoshop.

The image above is the original RAW unprocessed photo of a cheetah photographed in South Africa. I intentionally photographed overexposed for a high-key effect.
Camera and settings: Nikon Z9, Nikon Z100-400mm f/4.5-5.6 lens, 400mm focal length, manual exposure, f/9, 1/100s, exposure compensation +2.7, auto ISO 640, auto white balance, matrix metering.
I followed a similar post process with the above photo as the leopard example. You’ll notice in the finished image below that I flipped the orientation – I like the cheetah moving from left to right better.
Don’t be afraid to try this with your own images. Sometimes changing the orientation can have a surprising effect on the composition.

You might also notice that the cheetah spots and markings are darker now.
The Tony Kuyper tool enabled me to isolate a selection of only the dark tones in the image to which I applied a brightness/contrast adjustment.

It is a slightly more advanced tool, and maybe one that you only progress onto once you have spent some time figuring out your basic editing workflow first!
In conclusion
Starting your journey into editing wildlife photos can be a daunting one, as there are many processes, software, and styles out there.
But don’t feel overwhelmed! Look for online tutorials to help you at the start, and don’t be afraid to experiment or create multiple edits of the same image to see what you like best.
You’ll soon instinctually see where and how you might improve your wildlife images through post-processing, and it is usually an enjoyable process that will ultimately bring your images to life.
As a summary, here are my top tips for wildlife photo editing:
- Use post-processing to maximize the impact of your images
- RAW images will still require some post-processing to become a “finished image” even when you do everything right in camera
- Select your targets in your photo – where do you want the viewer’s eye to go? With wildlife images, the target is usually the eyes.
- Pick the post-processing software tool(s) that you can understand and use effectively. Start simple and build up your breadth of knowledge as you gain more experience and confidence with the editing process.
- Do the clean-up steps first, then come back for the enhancement steps.
- Image adjustments are largely a personal choice – following your instincts can help you to develop your particular editing style
- All changes should be intentional, and a general rule of thumb with much wildlife photography is to try to keep your edits ‘subtle.’ We are often trying to capture what we really saw in that moment. We have the benefit of being able to enhance it slightly afterwards, but ultimately, we want to remain truthful to nature.


