
How to Improve Your Wildlife Action Shots

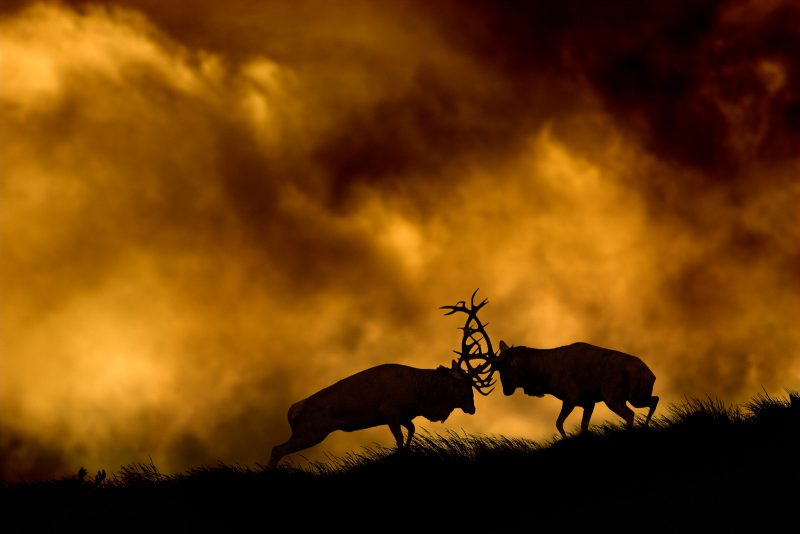
Taking successful action shots can be one of the most rewarding challenges for any wildlife photographer. Nothing compares to the excitement I feel when I manage to capture a moment in time that offers a fleeting glimpse into the life of my subject.
A split-second interaction between species perhaps, or a mammal sprinting to escape the hungry claws of a predator. Maybe it is the moment that a small garden bird takes flight with golden light streaming through its wings.


In this article, I will cover various tips and techniques to help you improve and master your wildlife action photography.
Observing and understanding behaviour
One of the most important aspects of any type of wildlife photography is an understanding and knowledge of your subject.

Nowadays there is a wealth of useful information to be found online, and whilst I do recommend arming yourself with as much knowledge as possible, it is even more important to observe your subjects first-hand. Time spent out in the field simply observing behaviour, and noting down any patterns you see, is always invaluable.
If you aim to photograph a bird in flight, an osprey diving for fish for instance; observe the flight patterns and make a mental note of them to prepare yourself for the next opportunity. The same goes for other subjects such as jumping squirrels, or a garden bird in flight.

Animals are creatures of habit, and the more time you spend with your chosen subject, the more you will be able to predict its movements. This is vital to secure successful action shots.
Read more: Photographing a Species In-depth
Equipment recommendations
Shooting action can be a challenge, especially with an unpredictable subject, but a fast lens can make things a little easier.
A lens with maximum apertures of f/2.8 or f/4 will let more light in compared to an f/5.6 lens. This will allow faster shutter speeds to be used, and will ultimately improve your chances of capturing sharp images.

Of course, a camera with a fast frame rate will also make life easier, but action shots are perfectly possible on slower cameras. Anticipation and timing are key.
For panning with a moving subject, a tripod with a gimbal head is the perfect choice for support, especially for longer lenses that cannot be handheld reliably. A gimbal head will eliminate the weight from the lens and allow complete freedom of movement. This is particularly useful for birds in flight. Rather than loosening the head completely, I like to keep a little bit of resistance as I feel this makes it easier to keep a constant speed when panning.

Using a tripod with no centre column, or a removable one will allow you to get the camera down low to the ground. This is important for ground-level subjects as it will allow an eye-level angle, helping to create an intimate view of your subject and encouraging a connection between the subject and the viewer.

I would highly recommend investing in fast memory cards for any action-based photography. There is nothing worse than being presented with the perfect opportunity, only to find that your camera stops firing to write images to the card!
I use SanDisk Extreme Pro CF cards with a write speed of 300 MB/s, and they have always been reliable and fast. Firing images on a high-burst rate can soon eat through a card so you might also consider going up a size.
Read more: The Best Camera for Wildlife Photography
Camera settings for pin-sharp action shots
Photographing any moving subject will require a relatively fast shutter speed. The minimum speed that you will need will depend entirely on your subject.
A slow-flying heron will not need as fast a shutter speed as a diving kingfisher for example. Most medium to large birds in flight will need a shutter speed of at least 1/1000th second, while smaller and quicker moving subjects such as garden birds will require at least 1/2500th sec.

Use these guides as a minimum to ensure maximum sharpness, and don’t be afraid of increasing your ISO if you are struggling for speed. Noise levels can be vastly improved at the post-processing stage, but a soft image will always be a soft image.
Depending on your lens, turning off image stabilisation can increase autofocus speed, and at these shutter speeds, it is not needed anyway. To further increase your chance of a successful action shot, you should use your camera’s high-speed drive mode to fire a sequence of images.
All it takes to ruin an otherwise great shot is a distraction in the background; a small movement of wing position, a waving tree branch, or a myriad of other possibilities. By shooting a burst of frames you will give yourself the best possible chance of capturing the optimum moment.
Your chosen aperture will depend on the light levels, and how much depth of field you require. As already mentioned, a fast lens that opens up to f/2.8 or f/4 can be useful for increasing shutter speed, but depth of field will become very shallow, making accurate focus vital.
Read more: How to Master Exposure in Your Wildlife Photography
Auto-focus
Single spot autofocus mode will offer the most accuracy, but following a moving subject with just a single focus point can be tricky. Add in subjects that move fast and erratically, and it can be near enough impossible!
Increasing your focus area by selecting a group of points will give you more margin for error, but less accuracy. The key is to experiment and see which works for your chosen subject.

For instance: using a group of focus points for a bird in flight can result in the wing being picked out, rather than the head. In this example, stopping down to a smaller aperture will result in more depth of field, thereby increasing your chances of a sharp eye.
Read more: Understanding Autofocus Points and Modes
Back button focus and continuous focus
Most digital cameras have a continuous focus mode as well as a one-shot mode. Continuous focus will keep adjusting the focus while the shutter button is half-pressed, and it’ll predict the movement and speed of your subject.
With one shot mode activated, the lens will simply lock on to your subject and not re-focus until the shot is taken, or until the shutter button is released and pressed again.
The theory is that continuous focus should be used for a moving subject, and one-shot mode should be used for a static subject. However, by setting up your focus to the back button (which most modern cameras allow) it will enable you to combine these two modes in one.
Once the back button is activated as only the focus and not the shutter, you will be able to keep your camera set to continuous focus at all times.
To use continuous focus, you simply need to keep your thumb pressed; the top shutter button will then only be used to take the shot. If you need to lock focus to re-compose, you press the back button once and then lift your thumb off. You are then free to recompose and fire the shutter without the camera re-focusing.
This is a huge benefit when it comes to taking advantage of opportune moments of action.

I remember photographing a barn owl one winter; it was sitting on a gate post surrounded by falling snow, I was busy firing away when it suddenly took flight with no warning. I was able to push the back button with my thumb and hold it to activate continuous focus, managing to capture the first few wing beats as the owl took off in the snowfall.
It is one of my favourite barn owl images. Had I been using the top shutter button, and set to one-shot mode, there is no way I would have managed to secure the shot.
Read more: Back Button Focus: When and Why to Use It
Motion blur and abstract images
Using a slow shutter speed can be a great way of creating a sense of movement in your wildlife action shots. You can create anything, from completely abstract images to those which depict motion blur, by switching to shutter priority and experimenting with a variety of shutter speeds. Both of these are great ways of accentuating the feeling of speed and energy.

The key to depicting motion blur lies in the ability to match the shutter speed with your subject. I find that anywhere between 1/15th and 1/60th sec is a good place to start, but experimentation is key as it will depend entirely on the speed and distance of your subject.
When panning with a moving animal, it is important to match its speed with your camera movement and pan as smoothly as possible. With a suitable shutter speed selected you should find it possible to create a motion blur effect in the background whilst keeping the subject relatively sharp.
It is a difficult technique to master and you will need to take plenty of frames to increase your chances. Large, slow-flying birds such as swans are great subjects to practise on, and it is worth the perseverance as the rewards can be hugely satisfying.
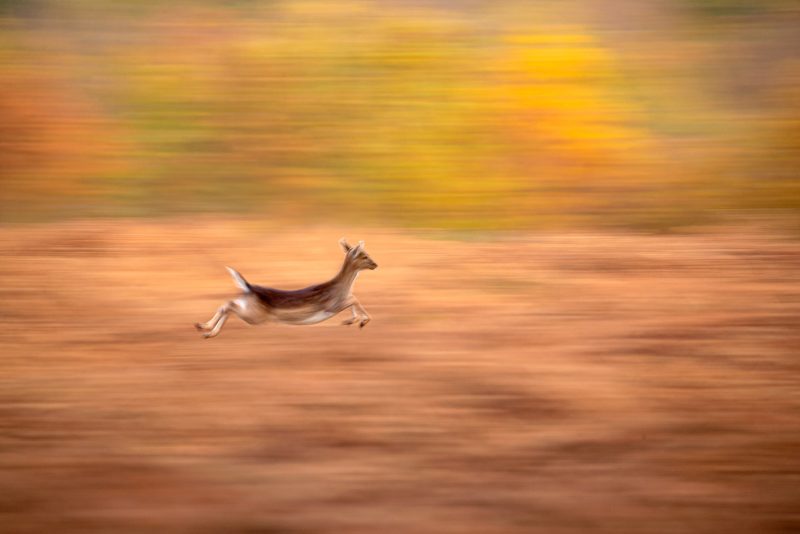
For a more abstract result use even slower shutter speeds; these can create wonderfully creative images closely resembling impressionist paintings.

Colour can play a big part in abstract images so pick your subject and background carefully. Autumn can be a great time of year for this reason. For abstract shots, shutter speeds can be as slow as 1 second or more. Remember: the subject doesn’t need to be recognisable for the image to work, most important is your unique vision and creativity.
Read more: Creative Visions – How to Photograph Abstracts in Nature
Garden birds in flight
To practise wildlife action shots close to home, a simple garden bird feeding station is all you need.
Being small and very fast-moving, capturing a garden bird in flight is a challenge, but having a specific set-up can greatly improve your chances.
Your first step should be to position a feeder and a perch about 1 to 2 feet apart. Consider the background carefully and ensure that it is as distant as possible to prevent any potential distractions.

Place a garden cane halfway between the perch and the feeder, keeping everything parallel to the camera. Now focus on the tip of the cane, and remove it. Switch to manual focus and you have now pre-focussed on the point in which the bird will pass through as it flies from the perch to the feeder.
For your best chance of success, fire a burst of frames each time a bird flies from the perch to the feeder.
To attract as many diverse bird species as possible, I have 3 to 4 feeders up with a different food source in each. When I start shooting, I remove all but the feeder that is set up for flight shots. This encourages the birds to queue for the feeder and will dramatically increase the number of opportunities.

Most garden birds such as tits and finches are small and fast-moving, so you will need a shutter speed of at least 1/2500th sec for sharp images. Rendering some blur in the wings is an effective way of conveying a sense of movement, but if you aim to freeze the wings then you will need to increase this further – up to 1/4000th sec.
Shooting in strong light will help to keep shutter speeds fast.

It is also worth experimenting with the direction of light. Strong backlighting when photographing birds in flight can add a wonderful effect. The light will shine through the outstretched wings creating an almost translucent effect, adding drama and atmosphere. This is best attempted during the first or last hour of light; contrast levels are relatively low, and the light is warm and rich.
Read more: How to Photograph Garden Birds
In conclusion
Photographing wildlife in action is challenging and often frustrating. Nothing is worse than waiting hours for a shot only to miss the golden opportunity when it arrives without warning.
Always remember that practice makes perfect.
Observe and learn the behaviour of your subjects, and spend as much time as possible working on your technique. Action photography will test your reactions, patience, and perseverance. It can also be a hugely rewarding project.
Best of luck!


