
How to Harness Light in Bird Photography

When it comes to capturing a beautiful or captivating image there are many elements that need to be considered. One of the key elements, arguably the most important, is light. When light is harnessed properly in bird photography it can completely transform your image.
It can turn a standard portrait into a beautiful piece of art; when an image of a bird is captured in a more pleasing and captivating way, it will help grab people’s attention and possibly bring more conservation awareness to nature.


Like many of you, when I first started my bird photography journey my main focus was the subject, and how to find them. At the time I was just excited to capture a nice sharp image and, truthfully, I never really paid close attention to light and how it was affecting my images.
Fast forward a few years and my focus has completely shifted towards light; I now spend so much time just looking at how light affects its surroundings and the various objects within the environment.
Once you begin to see light and the ways you can use light to achieve various looks or styles in your bird photography, you will quickly learn how powerful it truly is.
Lighting scenarios
Here is a list of the types of lighting scenarios you can look for, how to achieve these looks by using certain camera settings, and how to position yourself in relation to the sun and your subject to harness the light in a powerful way.
1. Direct light
This is often the type of light we focus on in the beginning of our photography journey. It’s probably the most standard lighting scenario, positioning the sun at our backs and illuminating the subject in front of us. That’s not to say it’s not a good lighting situation – it is one I still regularly use to photograph birds.

However, unless the light is exceptional, it can just lead to more ‘basic images,’ unless we get intentionally creative with compositions, by adding foreground elements and such.
What do I mean by exceptional light? I’m referring to those very first few moments of light in the morning, or the very last light of the day. To take full advantage of these brief moments, I look for areas with no obstructions behind me to block the very moment the sun peeks over the horizon.
This light works so well at highlighting all the feather details and really showing off the true beauty of our subjects. The camera settings for this type of light are pretty straight-forward. I expose for my subject and use the highest aperture possible, like f/4 or f/5.6, and then a shutter speed that is low enough to freeze my subject, and can keep my ISO down.
Read more: Composition in Wildlife Photography: Getting Creative
2. Shadows and light
Though there is no specific technical term that I know of to describe this type of lighting, it is probably one of my favourites, and one I am known for in my waterfowl photography.
Though this lighting style is very similar to direct light, the main difference is that the light should fall directly on the background, highlighting it, while the subject itself remains in shade. There are a number of elements that can be used to create the shade like trees, hills, mountains, and even buildings, depending on your location.

The aim is to have your subject fall within the shaded area, and to allow the background behind your subject to be lit up by the sun. I find this technique creates very vibrant backgrounds and, when captured around a body of water, the reflected light can be very pleasing as well.
As you can see in the image above, the light is very soft and even on the subject, yet the background and reflected light in the water is warm and vibrant, as the fall foliage on the pond is illuminated by the warm tones of the sun.
When capturing images with this method of lighting I tend to underexpose slightly so that none of the vibrant colours in the scene are blown out. In postproduction I will then bring out the shadowy details of the birds.
3. Side lighting
There are various ways we can use the direction of light on our subjects to add a bit of drama and mood to our images. One of these styles of light is side lighting. This is where we position ourselves and our subject with the light coming at us from the right or left.
This light can be tricky to capture correctly, as the position of your subject has to be just right in order to highlight the proper features of the bird in question, and to ensure there is some catch light in the eye to help make a pleasing image.
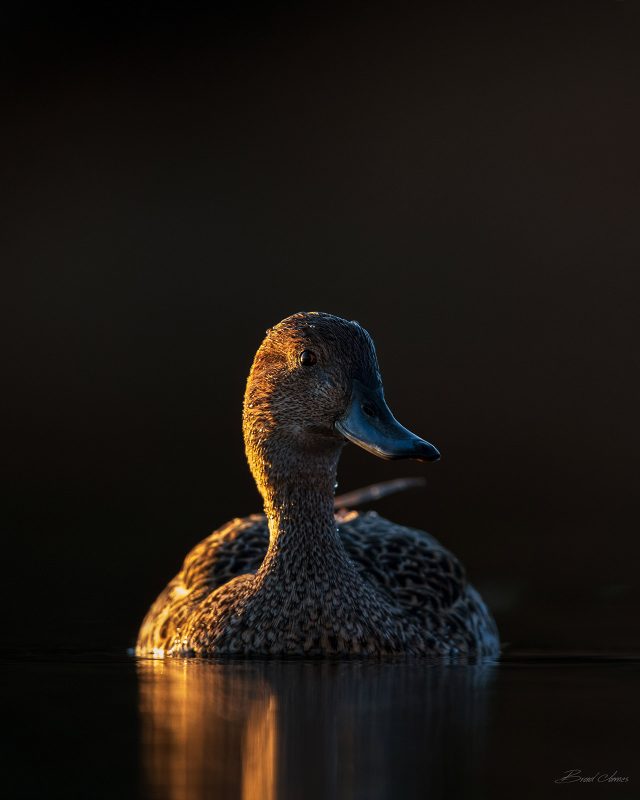
Take the image above: if our subject was looking to the left towards the direction of the sun, then the side facing the camera would be in shade. There would be no catch light in the eye, which is a key element for drawing your audience in.
For this type of light I expose for the highlights, which generally means underexposing the scene. This will often also create a nice dark background which, in turn, gives the image some mood.
Post-processing can really come into play with these types of images, as a little dodging and burning and, in some cases, darkening of the background, can go a long way to achieving the striking style of image we are after.
Read more: How to Take Impacting Portraits of Wildlife
4. Backlighting and rim lighting
Photographing our subject with the sun at its back is often the most challenging effect to achieve, yet it can create some of the most rewarding results in bird photography if we know how to harness the light properly.
One of the most magical moments with regards to backlighting subjects happens on very cold mornings, at first light with no wind, on or by a pond or lake. These conditions often result in lake fog or mist coming off the water and, when we shoot into the sun, the light will accentuate the mist even further.
Because I’m shooting into the light in this type of lighting scenario, the subject will most often become just a silhouette, as in the image below of these two common mergansers.

A key element to consider when backlighting a subject, especially if the end result will be a silhouette, is to consider the subject’s overall shape. Ask yourself, does this subject have a distinct shape that can be recognised as a silhouette?
Photographing in this manner can really highlight the beautiful and elegant shapes found in various bird species, as you can see from the mergansers shown above with their pointed bills and longer necks. Also keep in mind that action shots during this lighting situation can really add a bit of drama.
Since we are shooting into the light, our shutter speeds will tend to be higher to allow us to freeze the action; look out for moments such as in this image below of a black duck taking off. Though this is a ‘common’ species, the lighting conditions made this image special for me.

We can also use backlighting to highlight unique moments in bird photography, like in this image of a song sparrow vocalising on a calm cool morning in spring. Because the light is at the back of our subject, and we have a nice dark background (which is key), the breath from the sparrow is illuminated.
The dark background also allows us to capture a nice rim light on the subject as well.

Rim lighting works so well for bird photography in particular, as all those feathers can catch the light and become illuminated. This is especially the case if the bird fluffs up its feathers, or during windy conditions when their feathers are being blown around!
5. Low lighting
When we think of lighting for bird photography, we obviously jump to those moments after the sun has risen, or even before the sun goes down. However, there are actually a few minutes prior to sunrise and after sunset in which we can capture some truly magical light.
This time of day is often called ‘blue hour’ and, even though we refer to it as an hour, it’s really only a few minutes when the ambient light is still powerful enough to allow us to capture images that are still ‘useful’. This means we don’t have to push our settings so high that our images become way too noisy for use.
If you are going to actively explore this type of lighting, I recommend investing in a higher-end camera and lens. Especially the lens: it’s better to have a lens with a wide aperture like f/4 or even f/2.8, which will allow much more light in.
This in turn will keep your ISO down and possibly your shutter speed high enough to freeze your subject. In these shooting conditions you may also want to have a tripod or monopod to help stabilise your shots, as your shutter speed will tend to be lower.

Although I will admit that I never use a tripod or monopod, instead relying completely on a steady hand or a shooting position that allows me to keep my lens steady, like laying flat on the ground.
With this being said, I have begun to use a float pad for waterfowl and shorebird photography. I used this in the image above, captured just prior to sunrise. You can see the soft, reddish glow from the pre-dawn light on the greater yellowlegs.
I captured the above image with a shutter speed of 1/50s in an attempt to keep my ISO down, since my subject was so still.
Read more: How to Photograph Wildlife in Low Light
6. Artificial light
Speaking of low light, we can actually take this concept a bit further and incorporate artificial light when the ambient light is too low. For this type of light I often seek out locations in and around urban areas that have street lights or lights from buildings.
This type of light can create some truly unique and creative images. I tend to prefer locations where I can harness the artificial light that is reflected off bodies of water. The combination of the warm tones of the reflected light and the cool tones of the rich blue hour water colours can be really appealing.

Again, this is where equipment really matters; low shutter speeds and wide open apertures play a big part in capturing what little light there is.
Read more: How to Harness Artificial Light for Stand Out Urban Wildlife Photos
7. Bokeh
This particular lighting technique in bird photography can add a lot of interest to your images and allow your subject to stand out in the frame. Bokeh is essentially the effect of a soft, out of focus background and, in some cases, foreground as well.
Background
When the light is at its peak during golden hour, I often search out pleasing highlighted areas behind or between myself and my subject. Take, for example, this image of an Atlantic puffin on the edge of a cliff.
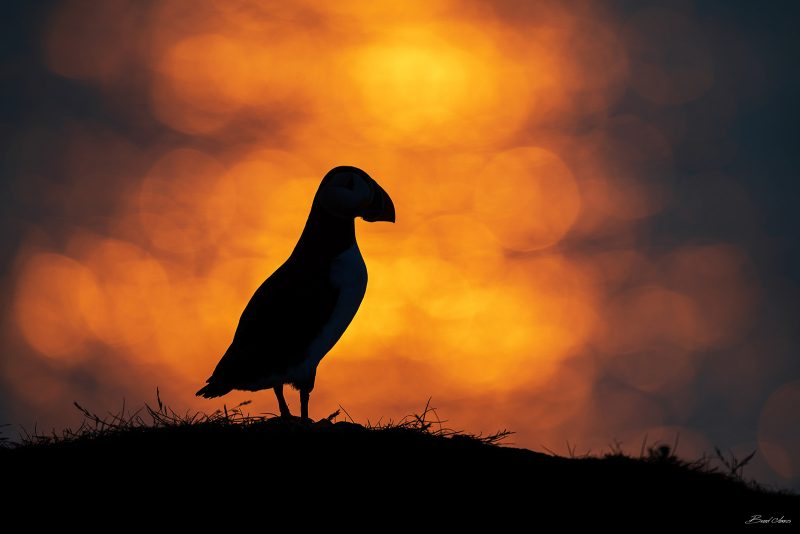
As I noticed the warm tones of the morning sun glistening on top of the ocean below, I lined up my subject with the light behind him. Since the highlights on the water were far away they turned into beautiful bokeh balls.
Foreground
Here is another example, this time I used a small patch of pond grasses between myself and my subject. They were still damp from the early morning dew, and created some nice bokeh balls in the foreground.

Since I was positioned with the light in front of me, the sun illuminated each little water droplet on the grasses. Then, with my focus set on the American wigeon, the foreground grasses became completely blurred out, creating this beautiful effect.
Filtered light
One final example: this time the bokeh was achieved by harnessing the morning sun that was filtering through a large spruce tree behind my subject. Because the tree was about 30 feet behind the yellow warbler, all the small gaps in the tree where the light was peeking through turned into gorgeous bokeh.

The key with bokeh is distance from your subject. You need your backgrounds to be a good distance away so that they blur out and the colours in the environment bleed into each other, creating a pleasing scene. Having a long lens with a high aperture will help achieve this look.
In conclusion
Light is such a powerful tool for photographers. Once you begin to train your eyes to see light and learn how you can harness it, it will become the most useful tool for transforming your bird images.
I hope that this article has opened your mind to the possibilities of using light within your own work, and that these tips will help you achieve them. Bird photography is all about exploring and seeing nature’s beauty, which we are so privileged to be able to capture in a single frame.
So, get out there, be creative, and don’t be afraid to explore new light!


