
How to Expose Wildlife Photos at Dawn and Dusk

The nature of wildlife photography is that we, as photographers, find ourselves following in the footsteps of our subjects. Many animals are active mostly at dawn and dusk, and that means that we are often trying to expose wildlife photos in low light.
In hot countries, many animals can be found resting in the shade – they don’t like being out in the hot sun either. This provides another challenge for us as wildlife photographers, and learning to deal with difficult lighting conditions is an important skill to learn.


Whether you’re shooting at dawn, dusk, twilight, or capturing an animal in the shade, fighting low light can be a daunting task. Ideally, we capture images with a low ISO speed to reduce the digital noise in our shots, but this isn’t always possible in such dim conditions.
However, there are a few techniques – both in the field and in post production – that can help you to get fantastic results. Let’s take a look.
Photographing animals in the shade
When you think of low light, you’ll easily jump to dusk and twilight and not even think about shade. As I’ve explained, many animals love the shade – particularly when it’s hot and the sky is clear – so will be hiding under trees and bushes for long periods of the day.
This means, despite there being plenty of light everywhere else, that we have to consider the lack of light when photographing something in shade in order to get a correctly balanced exposure.
First off, for wildlife photography it’s always important to prioritise your shutter speed over your ISO – a clean and noise-free image isn’t much good if everything is blurred, whilst noise we can deal with. But don’t be afraid to drop your shutter speed if your subject is still (such as a leopard sleeping under the shade of a tree), but if it’s moving or giving hints of imminent movement, it’s best to take a gamble and raise your ISO.

One of the more difficult situations that can arise is when an animal is in shade but surrounded by harsh, contrasting light. Normally, the best option would be to reposition so you get these contrasting elements out of your frame, but sometimes this is impossible and you end up stuck in one position.
So how do we get the best results when we have very dark and bright elements in our frame? My advice in these scenarios is to expose for the mid-tones. Remembering that we can use post processing to bring bright areas down and raise shadows up, it’s advisable to get an exposure that makes the most of mid-tones (avoiding high contrast in the image by exposing for either the light or dark areas of the frame) as this is where detail lives.
Read more: How to Rescue Over and Underexposed Photos
The final thing to be very aware of is your white balance. Light carries colour, which our eyes automatically adjust for, but our cameras can struggle at times. As such, photographing an animal in the shade may give a blue tone to your subject as the colour of the sunlight around the animal is so warm.
By selecting and adjusting our white balance in camera, we can counteract this by “adding more warmth” to the image. However, the feasibility of this in the realm of wildlife photography is difficult, unless you’re with an animal that doesn’t intend to move. If you have a moving animal, on the other hand, that’s darting in and out of shade, you can’t be expected to change the white balance for every movement it makes.
This is when auto-white balance comes into its own, as the camera will adjust it accordingly and then you can fine-tune yourself when editing. Whilst this may not be great for those wanting to have every bit control to themselves, it does mean that you can focus more on the sighting, allowing for more shots, better composition and a more enjoyable experience.
Having said that, if you are shooting in raw format then you are able to adjust the white balance in hindsight without any detrimental effects to your image. Even so, it can be nice to get an accurate white balance in the field to help you get your eye into the shot.
The golden hour
The golden hour (or, magic hour) is the first hour after sunrise and the last hour before sunset. It’s when the sun is at its lowest and, depending on the weather, causes long stretching shadows and casts a beautiful golden light; making nearly any subject all the more eye catching. It’s often heartily chased and renowned as the best time to photograph wildlife. Whilst this is true, the light does fade very quickly, and you’ll often find that you’ll have to adjust your settings every couple of minutes.

My number one piece of advice when photographing during the golden hour, especially with African wildlife, is to try to stick to open areas. There are fewer trees and bushes to block that beautiful light, and you can come away with some wonderfully lit images.
You’ll also benefit from long shadows cast by your subject, and any dust or flies will be caught in those final moments of sunlight. Think about the different kinds of lighting you can introduce into your shot, thanks to that low sun.
Read more: Choosing the Best Lighting for Wildlife Photos
Side and back lighting, if you get the opportunity to pick your angle, is a fantastic way to experiment with your photography and get a new kind of image with a familiar subject. This approach, with a white balance set to bring out the warm tones, can lead to some beautiful and atmospherically rich pictures.
Of course there are also silhouettes, where we underexpose the photograph for a black cut-out against a beautifully rich-in-colour backdrop. A strong silhouette is formed when the subject is clear from distractions, in the open, and perfectly side on to the camera.
Twilight and showing motion
So the sun has set and the light, whilst still attractive, is getting frustrating and difficult to work with. For landscape photography this is a great time of the day to shoot thanks to the advantage of being able to take long exposures – surely this wouldn’t work with wildlife, when our subjects are moving?
I always tell photographers that we need to adapt and learn to work with light, and not fight it. We can no longer photograph and freeze the action like we could earlier in the day, so why not tap into long exposures? By slowing down our shutter speeds we open our sensor up to more light and, whilst risking blur, can still get suitable exposures. The trick, or rather the skill, is now to portray the motion, speed and movement of our subjects.
Read more: Panning Technique – Conveying Motion in a Photo

By panning with our subjects, we hope to freeze them as much as possible whilst blurring out the background and foreground elements. I feel the need to throw in a disclaimer, as this is a very tricky method of action photography.
We see great results from motorcar racing, but cars travel in very predictable routes and usually at consistent speeds – animals don’t. They speed up, slow down, hop, skip, jump, duck, dive, and bounce as they run – so it can feel like any good results come from luck rather than skill, but learning your subject’s behaviour and movements will help infinitely with this.

To have motion blur in your picture is great at depicting the motion and speed of your story, so why not go a bit more abstract and experiment? Sure, this is not to everyone’s taste, but it’s a great technique that enables us to keep photographing after the sun has set.
One of the things you’re aiming to keep in focus, above all else, is the head with the focus on the eyes. When we’re playing with slow motion, and depicting blur, we really need to make sure that there’s a point of focus to connect with for the viewer.
To stand the best chance of keeping the eye sharp, turn on any image stabilisation you may have. Pan steadily, matching the speed and direction of your subject, and move only on a horizontal (or vertical) plane. Tuck your elbows in, or use a monopod, to keep as steady as possible.

The faster you move the more abstract your motion blur will become, but the harder it will be to track animals. The same goes for your shutter speed; the slower settings of 1/15th of a second will result in great blur, but also increases the risk of blurring your subject entirely. As such, this is a game of experimentation, repetition, and is a perfect example of practice makes perfect.
When you put in the effort and dedication, you’ll have unlocked a new photographic skill to not only keep photographing after the sun has set, but also in capturing natural scenes with a wicked and diverse new energy that’s not often showcased.
Post production
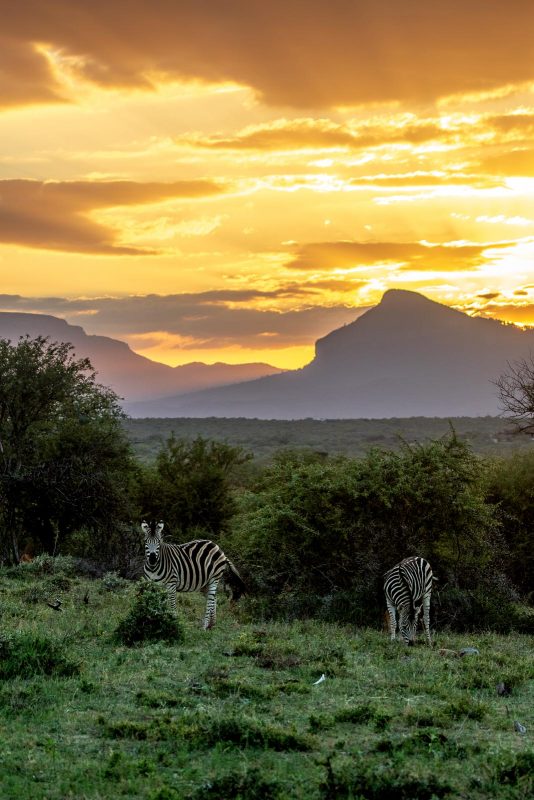
It’s far too easy to look at the back of your camera and feel dismayed. But remember, Lightroom (or any other post processing software) can radically change your images. With modern cameras boasting extraordinary dynamic range, it still blows my mind to see the amount of detail we can raise from shadows and bring out of highlights.
Never delete photos from the back of your camera, especially in the field. An image you feel may be useless at first glance could easily turn into a winner when given a bit of time in the editing suite. The more you know what Lightroom can offer, the more comfortable and confident you’ll be in pushing yourself technically and creatively.
Shooting in raw is always hugely advantageous if you have the time to edit them in Lightroom and sufficient space to store the larger files. They are uncompressed files, as opposed to JPEGs, and carry a lot more information in them, allowing us more freedom and flexibility afterwards.
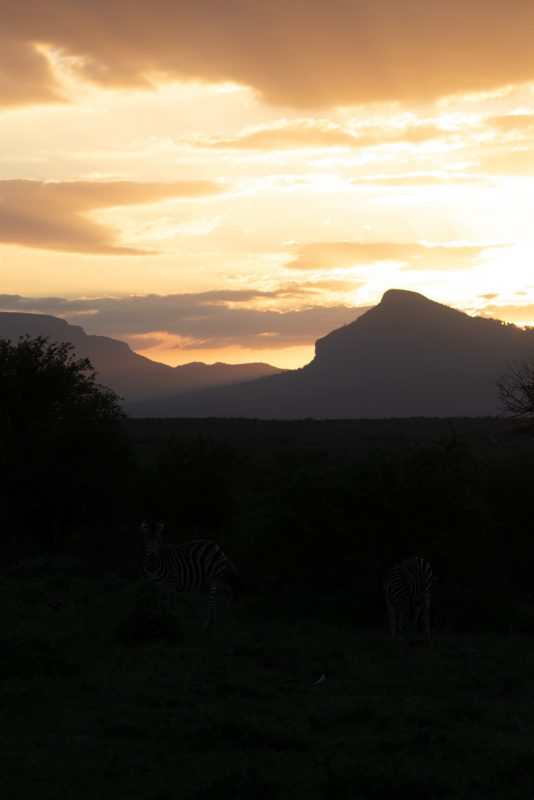
Look at the before and after image below to see the kind of recovery that is sometimes possible, albeit not ideal.
Embrace the challenge
Wildlife photography is hard, but a big part of the joy is the challenge itself. Everything we do as photographers revolves around light, so it’s easy to feel frustrated when the light is anything but perfect – but it’s in the challenge that we develop.
Those moments of frustration where we want to drop our cameras, that’s when we’re pushing ourselves and our equipment – and that’s something to be commended for. Without a challenge we cannot improve, and if it was easy then everyone would be doing it.
Rise to the challenge. Try something new and you never know, you might get some cool shots you wouldn’t have gotten any other way.
Final tips
- Evaluative / Matrix metering is recommended for a more balanced exposure across the whole of your image, whilst giving a slight priority to where you’re focusing.
- A slightly over / under-exposed image is easy to fix and bring balance to, so don’t be dismayed if things don’t look great on the back of your camera.
- Learn about your subjects. Again, the more you know about the wildlife you’re photographing, the better you’ll be about decision making and your settings.
- Don’t hold the ISO too close to your heart, and don’t be afraid to pump it up to maintain a fast shutter speed.
- When light is really low (after sunset) try experimenting with slow-motion / showing motion. Get creative and work with light, don’t fight it.


