
How to Shoot Striking Silhouettes
We are all after the ‘perfect’ exposure, right? But how exactly do we define this. The truth is, what is technically correct will not always yield the best or most striking result. Sometimes a bad exposure can actually be a good one! There is nothing in the nature photography rulebook stating that we have to record colour, detail or authenticity in our shots. It is our artistic interpretation of the scene or subject that really matters – our images shouldn’t always replicate just what our eyes see. What I am saying is, the perfect exposure is simply one that is faithful to the vision of the photographer when he or she triggers the shutter. Wouldn’t you agree?
High and low-key results are a good example of manipulating exposure for creative effect. By adjusting the overall brightness of a shot, you can dramatically alter the viewer’s perception of the scene or subject. Doing so isn’t cheating – photographers have been manipulating exposure for creative effect since the very first permanent photographs were captured back in the 19th century. It is certainly nothing new. Without doubt, there is a significant difference between what is technically correct and what is aesthetically most pleasing.


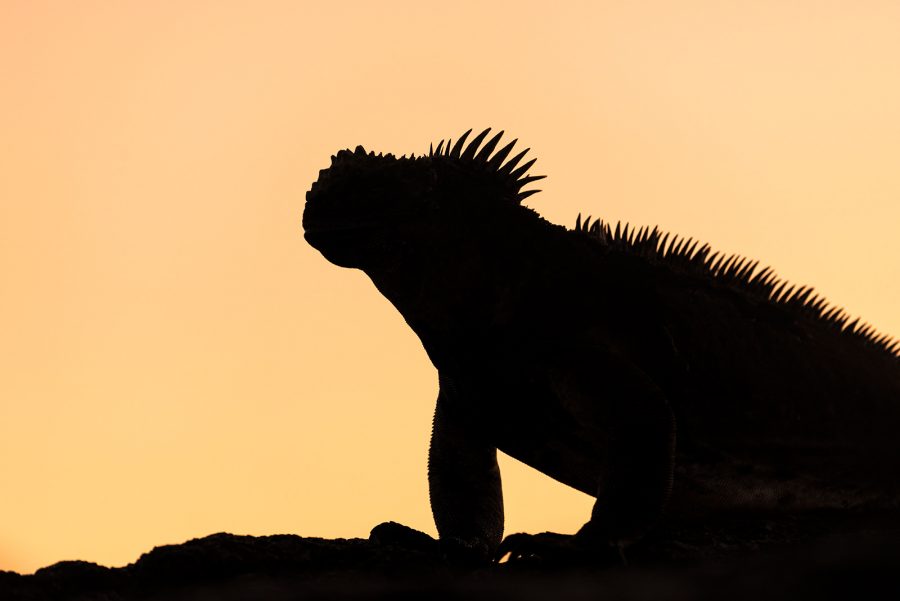
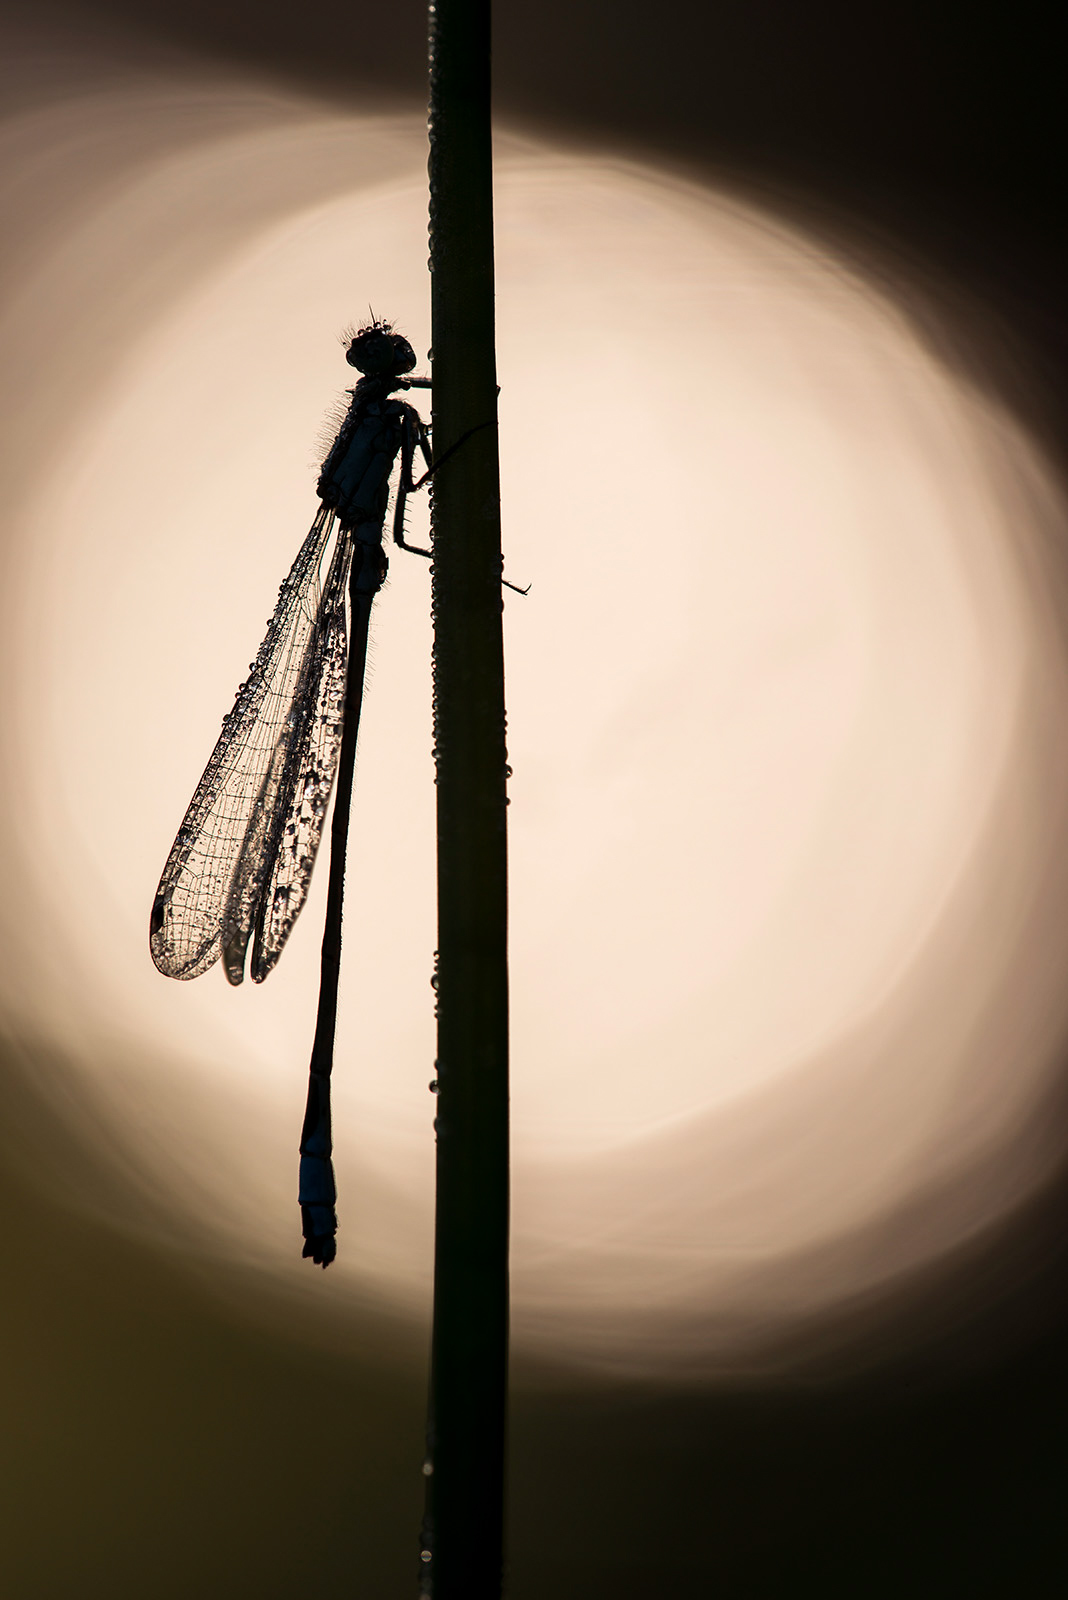
Silhouettes are probably the best example of how bad exposure can be an acceptable and welcome thing. It is the most extreme form of backlighting – with the subject recorded as an inky black outline, devoid of colour or detail. Combined with the right subject, results can be bold and eye-catching. If you’ve not shot silhouettes before, now is the time to give it a go.

Exposure
Put simply, a silhouette is caused by lots of underexposure – hardly sounds like a recipe for success, does it? However, by reducing your subject to a simple outline, photographers are able to place added emphasis on shape and form. Capturing a silhouette is not a particularly difficult thing to do, given the right circumstances.

First of all, your subject needs to be backlit or contrasted against a much brighter background. Outdoor photographers rely on the sun as their light source, so for this style of contre-jour photography, you need to be shooting in the sun’s general direction. By doing so, you can sandwich your subject between your camera and the light. This is normally easiest to do when the sun is low in the sky. Therefore, morning and evening are the best times to capture silhouettes. A colourful or dramatic sky will undoubtedly add to your photo’s impact.
Further Reading: “How to Photograph Sunrises & Sunsets“

Spot metering
Obviously, your camera doesn’t know, and can’t predict, the effect you are trying to achieve. Therefore, don’t simply rely on your camera’s automatic exposure settings – it will attempt to average out the light within the scene and not produce the true silhouette you are after. Instead, you are best to switch to spot or partial metering mode. Spot metering is available on practically every digital SLR and allows you to base exposure on just a very small percentage of the image-space – typically 2-5%. By aiming the spot-metering point at a bright area of the sky, the camera will bias its settings for this light portion of the frame.
Employ these settings to take your photo. The result will be a faster shutter speed – one that is correct for the bright sky, but too fast to record detail or tone within your backlit subject. As a result, your subject will be badly underexposed and rendered as a silhouette. Alternatively, continue using your standard evaluative/matrix metering exposure mode, but then apply negative exposure compensation incrementally until you achieve the effect you desire. Either way, achieving silhouettes is quite simple to do.

You will notice that histograms are skewed to the left, with a sharp spike to the very far left of the graph. This is a graphic illustration that there are lots of dark or black tones within your shot – something you fully expect when shooting a silhouette. Shutter speeds are often quite fast when shooting silhouettes, so a tripod is an optional extra, rather than a necessity. However, while you might not need legs for stability, they still prove handy for fine-tuning and perfecting composition.
Further Reading: “The Importance of Composition“
Subject choice
Why do silhouettes work so well? I think it is due to the wonderful simplicity they create. However, understanding the technique to capture a silhouette is only half the battle. If you opt for the wrong subject or shooting angle, you won’t capture successful results. As your intention is to record your subject without any discernable detail, it is essential you only photograph subjects with strong, instantly recognisable outlines. Landmarks, buildings, people, trees and animals are among the most obvious and suitable subjects. However, almost anything can work as a silhouette. Speaking personally, I regularly shoot insects and flowers against a rising or setting sun in order to highlight their shape and form – nothing does this better than a silhouette. Golden hour light is my favourite time to take shots – the warmth of the sky contrasts beautifully with inky black foreground subjects.

Shooting angle is another key consideration. Often low angles, looking slightly upward, work best and help you to project your subject clearly against the brighter sky. However, bright reflections, sunlit snow and fog can also create a suitably light background to contrast subjects against. A key thing to remember is to avoid your subject significantly overlapping other silhouetted objects. If they do, subjects will just merge and blend together, appearing as one big black blob. Your subject’s shape and form will be disguised, and its recognisability lost. Therefore, think carefully about your shooting position and try to maintain good separation between your subject and other elements within the image-space. Try and keep the frame simple and uncluttered – just to reiterate: simplicity is often the underlying key to capturing successful silhouettes.
I guess my concluding message is to not let the pursuit of ‘perfect exposure’ get in the way of creative exposure!

Top tips
- Photograph subjects with interesting, distinct or instantly recognisable outlines.
- Opt for clean, simple backdrops – free of clutter or distraction – for example, a colourful sky, brightly lit snow, or reflective water.
- Always be careful if you’re pointing your lens towards the sun or bright light. To help minimise the risk of lens flare, attach a lens hood.
- To create your silhouette, meter correctly for a bright area of the frame and then employ these settings. Your camera’s spot metering mode is ideal for doing this.


