
Golden Hour Photography: A Landscape Photographer’s Guide

You’ll sometimes hear it said that it’s possible to create great landscape photographs at any time of day. You can certainly make a case for this, but there’s no denying that most landscape photographers favour golden hour photography.
This refers to the time a little before sunset or after sunrise, when the sun is just above the horizon and casts a warm glow on the landscape. With the sun low in the sky and travelling through more of the atmosphere, it is diffused and warm, casting long, raking shadows across the landscape. The light adds relief, highlight texture, and better conveys depth.


The colour temperature at these times is very warm – around 2,500 Kelvin to 3,000 Kelvin, compared to 5,500 Kelvin at midday – hence the phrase “golden hour”, but there can be subtle differences between sunrise and sunset light.
They can both produce very dramatic light, but there is slightly more warmth at the end of the day as there are more particles in the air to diffuse the sun’s warm light. With clearer air at the beginning of the day, the light can be slightly cooler, with bluer shadows.
When is the golden hour?
The golden hour does not necessarily last an hour and its exact duration varies depending on geographical location, season and the prevailing atmospheric conditions. However, it’s probably fair to say the “golden hour” sounds a little bit catchier than the “golden 33 minutes”.
It’s also worth extending your stay on location beyond the precise period of the golden hour as the light in the half hour or so before sunrise and after sunset can also be extremely photogenic.
Read more: How to Photograph the Blue Hour
Understanding light in landscape photography
Unlike studio photographers, landscape specialists have no control over lighting and so it’s important to understand the effects of different lighting conditions and to how to make the most of different situations.
If you’re shooting in the golden hour, you’ll have a choice of shooting with the sun to your side (side-lighting), shining towards you (backlighting), or coming from behind you (front-lighting).
Side-lighting is the favourite for many landscape photographers, as shadows falling across the scene reveal texture and suggest depth. Combined with the natural warmth of the golden hour sun, this is light which really flatters a landscape, creating a mood which can be calm and tranquil or, depending on the sky, dramatic.

Front-lighting doesn’t reveal texture and, with shadows falling behind the subject, the danger is that the scene can appear a little flat. However, combined with the low sun of the golden hour, it can deliver highly saturated colours which can suit some subjects.
Backlighting can create exposure difficulties and problems with flare, but the results can also be dramatic, with shadows racing towards the camera. This type of lighting works best with strong shapes and bold, graphic compositions.

What to shoot during the golden hour
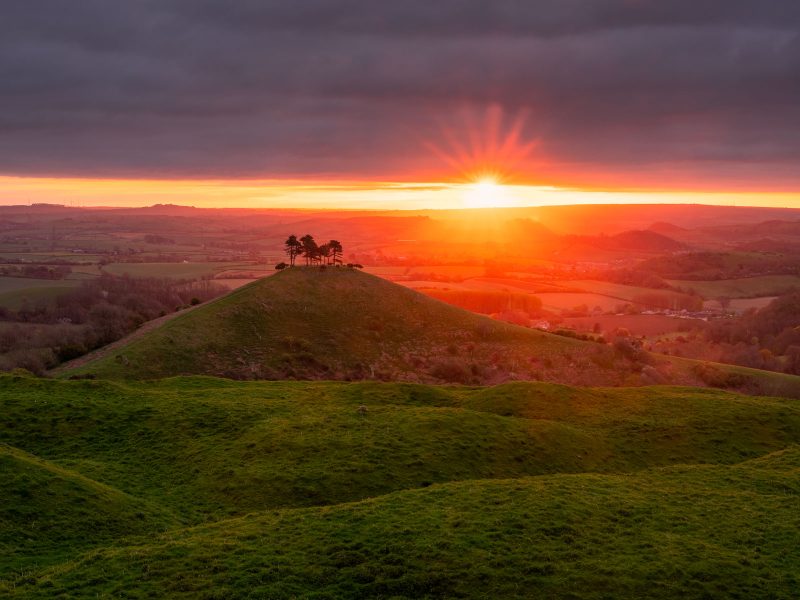
1. Countryside hills
Almost any landscape looks good in the golden hour, but some locations seem to be especially suited to this lighting. Rolling countryside and ranges of hills or mountains can look particularly good when side-lit by golden light.
This can create a kind of “layered” effect, with alternating bands of light and dark adding depth to the composition. If you find yourself in more remote rural locations, look for single elements to silhouette such as trees, tors or buildings.

2. The coast
Coastal locations generally work well. Side-lighting can reveal texture in foreground rocks and give a pleasant warmth to cliffs. Depending on the type of rock, this can range from a subtle warming to a golden glow – sandstone in particular will take on dramatic hues.
The great thing about the coast is that you can also make the most of any pre-sunrise or post-sunset colour, which will be reflected in the water and off wet rocks and sand.

3. Woodlands
Woodland may not at first seem like an obvious choice for golden hour photography, but dramatic shots are possible. It’s probably best to be there when the sun is just slightly higher than you might consider ideal for open landscapes.
This particular timing means that you can shoot backlit leaves; these can look stunning at the right time of year. Autumn is the obvious choice, but early spring when the leaves are fresh and green is also a good time.
You can also silhouette tree trunks and incorporate their shadows into your compositions.

Planning a golden hour shoot
Planning is key to successful shoots. You’ll need to consider a number of factors such as the location, time of day, time of year, and the weather.
Once you’ve chosen a location which you think will suit golden hour lighting, the next thing is to make sure you visit at the right time. This means not just the right time of day but also the right time of year.
If you ask most people, they will tell you that the sun rises in the east and sets in the west. However, this is a generalisation as it only rises due east and sets due west around the spring and autumn equinoxes. In fact, it rises and sets to the north in the summer and the south in the winter and the difference in position between mid-winter and mid-summer is around 45 degrees.
This has a huge impact on location choice for sunrise and sunset shoots, as there will be more or less optimal times of year. For example, on the south coast of England, the sun rises and sets over the sea in the winter, but quite far inland in the summer. There are some bays and coves where you will only see the sun rise or set for a couple of weeks in the year.
Furthermore, with the sun rising higher in the summer, the light will get harsh more quickly after sunrise at that time of year, giving you less time to nail your golden hour shots in the morning. However, at the other end of the day, twilight lasts longer, meaning you can extend your shoots somewhat.

Predicting the lighting conditions
You should aim to arrive a good half an hour before you intend to start shooting, so knowing when golden hour starts is obviously important. There are websites and apps which give this information, though I would take the timings as a guide only.
Even so, it’s hard to be this precise in reality – everyone’s idea of when golden hour starts is slightly different and the weather and atmospheric conditions can have an impact, too. The light will be harsher on days when the sky is clear and visibility high.
So, for the evening golden hour, aim to be in position around 60 minutes before sunset and for the morning golden hour, around 45 minutes before sunrise.
Mornings are more difficult than evenings, because you have to set up in near darkness and try to anticipate how things will look when it’s light. So it’s even more important to research your location in advance, know exactly where and when the sun will rise and have some compositions in mind before you start shooting – you’re unlikely to have enough time to react in rapidly-changing light. Sunsets are easier, as you can set up while it’s light and it’s easier to envisage how things will look in lowering light levels.

As well as the golden hour website, there are a number of apps and websites which give more detailed information, including the precise angle of the sun throughout the day for any given location and date. The better ones also integrate with your phone’s camera to give an augmented reality view of the scene in front of you so you can check on location exactly where the sun will be at any given time.
Two of the best known apps are The Photographer’s Ephemeris (TPE) and PhotoPills. Both are paid-for smartphone apps, and TPE is also a free download for desktop computers.

Working with the weather
When it comes to weather forecasts, there are numerous websites and apps which photographers swear by. However, I’ve always found the Met Office local forecasts to be extremely accurate. Like any forecast, you can’t rely on them if you look too far ahead, but once you get to within 48 hours they’re pretty reliable.
One potential bonus of a golden hour shoot is a colourful sunset or sunrise. But how do you know if you’re going to get one? Of course, you can’t with any certainty, but there are a few signs you can look out for.
First, a certain level of cloud cover is necessary – around 30-70% is good, but even heavy cloud can produce great results if there are gaps near the horizon. Mid and high level clouds are more likely to produce intense colour, but low clouds can be more dramatic, although the chances of good colour are lower.
The biggest problem is if there is cloud or thick haze on the horizon, which will kill any potential for colour.

Golden hour photography techniques
When it comes to capturing eye-catching shots in the golden hour, there are few areas of technique which you will need to keep in mind.
1. Properly exposing the photo
First is exposure. Side-lit scenes don’t present too many exposure problems although, depending on the composition, the sky may be bright in relation to the sky. Be guided by your camera’s histogram: if the tones are not contained within the histogram, then the tonal range exceeds the dynamic range of your sensor. In such a case, you will need to use a graduated filter to capture the full range of tones, or to bracket your exposures and blend images in post-production.
Read more: The Essential Filters for Landscape Photographers
The light can change quickly as the sun sinks towards the horizon, so if you are shooting in manual mode, meter constantly and be prepared to adjust your shutter speed. If you’re shooting in aperture priority, the camera will automatically adjust the shutter speed as the light levels change.

Shooting towards the sun is trickier. The contrast is greater and you will almost certainly need to use a grad or bracket your exposures. If using a grad, be guided by the histogram to help you choose the correct level of filtration – once the tones are within the histogram’s boundaries, then you have a strong enough filter. Take care with positioning it to make sure that the transition line is not obvious in the frame.
2. Working with strong light
With strong side-lighting or backlighting, there is always the risk of flare. Check for it in the viewfinder and when reviewing images and , o help prevent it, make sure that your lens and filters are spotlessly clean. You can also shade the lens with your hand (or a lens hood, if you’re not using filters).
You should also pay attention to white balance. Auto white balance is designed to deliver neutral colours whatever the colour temperature of the ambient light. It’s therefore excellent when it comes to neutralising colour casts, but it can also remove the natural warmth of golden hour shots as it may misinterpret this to be a colour cast. Select the ‘daylight’ preset to preserve the natural colours or ‘cloudy’ to enhance them slightly.
If you’re shooting into the sun, there’s always the possibility of creating a starburst effect, or ‘sunstar’. Sunstars are actually caused by lens diffraction (usually considered a bad thing) and become more pronounced the more you stop down your lens. How much depends on the particular lens, but usually f/16 will do the trick – though sometimes, you may need to stop down as much as f/22. Some lenses create better sunstars than others, so experiment and see how you get on.
You will need a reasonable amount of contrast, so it’s best to shoot when the sun is low on the horizon. That way, the rays will be clearly visible against the land and the darker sky above. If the cloud is poking out through a gap in the clouds, or is setting behind a cliff edge, this will enhance the effect. Air quality helps, too; sunstars are more defined when the clarity is good.
Read more: How to Create Sun Stars in Landscapes and Avoid Lens Flare
3. How to shoot golden hour silhouettes
The current trend in landscape photography seems to favour lots of shadow detail. Often, it can be argued, an unnatural amount – but bold compositions based around silhouettes can make striking shots.
Subject choice is important: select easily identifiable shapes such as trees, buildings and recognisable landmarks, to avoid confusing the viewer. A single subject is better as it is less likely to cause confusion.
Shooting technique is straightforward. Unlike ‘standard’ landscapes, you’re not looking to balance the light so you should avoid using graduated filters.
Place the subject in a key part of the frame, such as on one of the lines in a rule of thirds grid and keep the horizon low. Use manual exposure mode and take a meter reading from a bright part of the sky (but avoiding the sun itself). Then, recompose and shoot.
The result will be a correctly exposed sky and underexposed (silhouetted) main subject.

Read more: How to Shoot Striking Silhouettes
4. Composition
As far as composition is concerned, there is nothing unique about the golden hour compared to other landscapes. However, when composing your shots, try to choose a focal point which picks up the warm colours.
If you’re on the coast, make the most of any texture revealed by the low sun – so getting in close to foreground elements with a wide-angle lens can work really well. It also helps to create a sense of depth and perspective, with the rest of the scene stretching out behind.
To ensure you have enough depth of field, select a smallish aperture of around f/11 – f/16 and use the ‘double distance’ focusing technique: calculate the distance from the nearest object in the frame which you want to be sharp and focus on something which is at double that distance.
Read more: Where to Focus in a Landscape Photo

In conclusion
Depending on the time of year, golden hour photography can mean very early starts and late finishes. Even so, it’s definitely worth the effort to shoot in the most photogenic light of the day.


