
Bracketing & HDR: Photographing Landscapes Without Filters

Photographing landscapes without any filters can be challenging. Scenes of incredibly contrasting light are difficult to translate onto the camera and expose properly without them. The biggest problem is exposing for the sky as well as the land, as the former will be far brighter than the rest of the scene.
HDR (high dynamic range) photography has quite a bad reputation. A lot of images we see online that are taken using the HDR technique are over-processed and look incredibly fake. Heavily saturated colours and unnaturally contrasting edges are commonplace now. But if you use the technique properly, you can come away with quite a natural looking image.


Last May I was in Sicily, Italy, and planned to take lots of landscape images. However, I had stupidly forgotten to bring the plate that mounted my camera on the tripod I had lugged all the way across Europe. Not good – but that’s when I had a realisation that I could use HDR to achieve similar effects as the filters I could no longer use.
Bracketing your images allows you to take 3 (or more) shots: 1 underexposed, 1 properly exposed, and another overexposed. When you process your photos, you can easily merge these 3 shots together to achieve a nice and evenly exposed image. The idea is that the different frames will all expose for different parts of the image. It’s a great way to work without filters in your landscape shots.
Setting Up the Camera to Use Bracketing
For Nikon cameras, you can access the bracketing settings by holding down the BKT button and moving the wheels around to choose the number of shots and the stops of difference in exposure. If your camera is earlier than a D7000, you’ll probably need to access this through the menu. Here’s a quick video to help:
For Canon cameras, you can access this setting through the AEB button or by navigating through the menu. Here is a video from Canon which will help you to set up the camera to bracket properly:
https://www.youtube.com/watch?v=15-jhTFBUJU
Shooting with Bracketing
In an ideal world, you’ll use a tripod for this. Have the frame and the focus identical between the shots is important for achieving the optimum output when you come to merging the shots together. However, if you forget your tripod plate then that’s a different story.
During my time in Sicily, I was hand-holding the camera between the bracketed frames. This isn’t good practice, but it worked. Just holding the camera steady and firing the shots quickly meant the frames were pretty exact. I did suffer sometimes when one of the exposures resulted in a longer shutter speed, meaning that I was merging just 2 shots sometimes instead of 3 because one was too blurred.
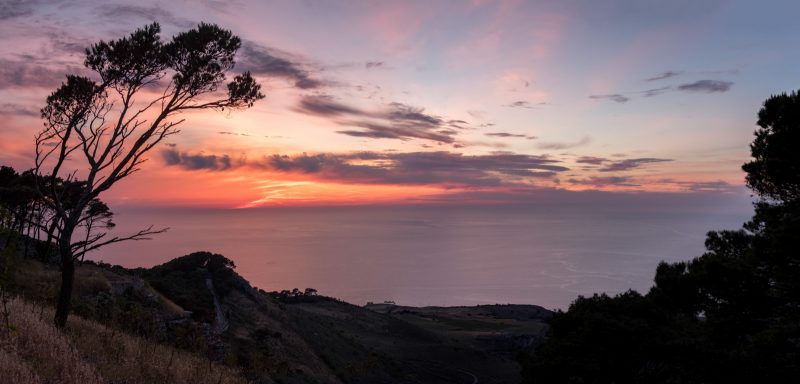
There were a lot of beautiful sunsets that I wanted to capture, and by using bracketing I was able to create really quite lovely replications of the scene I saw. One that really stood out to me was a shot through the window of an old castle looking out onto the rolling hills of Sicily. There was no space for a tripod anyway, so I took my 3 bracketed frames:

You can see in the side-by-side comparison that each frame is exposing for one particular part of the shot. Merging the three together gives me the benefits of every photo in the final image. As soon as I saw the result, I knew I had to do some more of this HDR imaging:

Don’t overuse this technique when it’s not necessary. It should be used when you use can’t capture a scene without causing peaking in the histogram (over or underexposing an area to the point it can’t be recovered). If you have filters, then use them instead (although actually for the scene above filters wouldn’t be appropriate because of the window wrapping the scene).
One thing I also did was an HDR panorama. Taking 3 shots at a time, I moved the camera along between each group of shots. This allowed me to blend and merge and really nice replication of the sunset.
Even if I had been able to use my tripod and filters, the technique would still be the perfect choice for photographing the old Sicilian streets. With buildings bordering the sky, filters would have caused strange dark patches on the buildings. The only way to properly replicate the sky was to merge to exposures.

For more specific techniques to HDR photography, rather than a more general view like this one, I recommend reading our Beginner’s Guide to HDR Photography.
Processing Your Bracketed Shots into an HDR Image
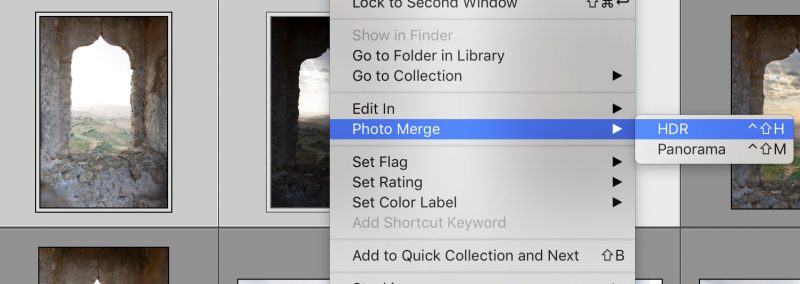
When you have your bracketed shots on your computer, you can merge them using Lightroom. Import them into the software, select them, and right-click to find “Photo Merge > HDR…”. It’s that simple. Lightroom will then crunch the files together and you can make further edits to the file afterward, just like you would a normal shot.
The aim here is to have a natural looking HDR shot. Pulling out the contrast, colours, and oversharpening the shots just makes them look far too processed and ugly. This is why HDR has a bad name, after all.
Keep things simple, and always process an HDR shot to best reflect the scene as you saw it, and nothing more. You don’t want your nice landscapes looking like they were shot on an alien planet of neon colours.
In Conclusion
My experience showed me that HDR isn’t the horrible technique it’s made out to be. I used to think that it should be avoided at all costs, but now I can see that I was definitely wrong about that. Used properly, it can produce some quite pleasing results. Give it a try next time you’re out and see what you can come up with. Just remember not to be too aggressive in post production.
Further Reading: A Beginner’s Guide to HDR Photography


