
What are the Best Filters for Landscape Photography?
Have trouble understanding and choosing the best filters for landscape photography? Whilst you can spend plenty of money on accessories, filters are an absolute must-have landscape photography item.
At first, they can be tricky to get your head around and implementing them at the right time is a skill in itself. There are many filters on offer, but I would narrow them down to the most important ones:


- Neutral Density (ND) graduated filters
- Circular Polarising filters
- Solid Neutral Density (ND) filters
These are the essential filters for landscape photography – and the fun begins when you combine all three at once!
With advancements of image processing programs and the amount of dynamic range captured in your images files, some of you may be thinking why bother with filters when you can recreate similar effects in the digital darkroom?
Well, that’s partly true; especially in the case of subtly adding an ND Grad to an image, but the other two cannot be replicated afterwards, or more specifically the effects of them can’t be. I’m a big believer of getting it right in the camera, and not relying on the computer to ‘fix’ your images.
Plus, who doesn’t love playing with fancy looking accessories and seeing the real-time effects they have on your images out in the field?!
Types of camera filters for landscape photography
There are two types of filters for landscape photography that you can choose from.
1. Screw-in filters
Screw-in filters do exactly that: they screw onto the end of your lens using the lens’ filter thread. Before purchasing these, you’ll need to double check the filter thread size of your lens (usually in mm) so you purchase the correct one.
They’re fast and easy to use, and you’ll find a variety of types from ND filters to polarisers, but you’ll notice there are rarely any ND Grad filters. This is because you will always need to carefully place your ND Grads to meet the horizon line, and therefore it needs to be separate from the lens as it will not necessarily always be in the middle.
While these are top quality and easy to use, the main problem is if you have many lenses, you’ll most likely need to buy different sizes.
Filter brands to look out for are B&W, Hoya, and Tiffen.
2. Slot-in filters
Slot-in filters work differently. You’ll first need to purchase an adaptor ring (to suit your lens’ filter thread size) that screws on. Then, purchase a filter holder that locks onto the adaptor ring allowing you to slot in your filters.
ND Grads, Solid ND and Circular Polarisers are all available as a slot-in filter. With slot-in filters, it’s better thinking ahead and investing in a system as, in the long run, it will save you money.
Good starter kits are made by Cokin, then Formatt-Hitech with LEE Filters being the best and mainly used by professionals.
When it comes to filters, I’m afraid you do get what you pay for and a word of warning is “buy cheap, buy twice!”


Neutral Density (ND) Graduated Filters
Bring your skies back to life by learning how to correctly use a Neutral Density Graduated filter. How many times have you taken a photo of a lovely scene, but either had a blown out sky or underexposed foreground?
Some photographers might shrug it off and say “I’ll fix that later”. That’s all well and good if there’s information there to rescue or recover, but sometimes the sky can be so overexposed that it has lost all its information resulting in blown out parts.
Other photographers might take two images, one correctly exposing the foreground and another for the sky, and then blend both images together on the computer back at base. This method does work well, but both mean more time spent editing on the computer and less out and about in the field.
For me, I prefer to combat all of this just by using an ND Grad filter. They’re made of resin and are dark on top and clear on the bottom. The strength of the dye on the top half changes how much light it will block. This means you can balance up your exposure by choosing the correct strength for your scene.
Choosing the correct density of landscape filters
All ND Grads come in measurements of ‘stops’ (stops being stops of light coming into the camera). 0.3 is 1 stop, 0.6 is two stops and so on.
With the dynamic range captured on cameras these days, I’d say 0.3 ND Grads are somewhat redundant because you can add this in processing using such programs as Adobe Lightroom.

However, once you start to get over 2 stops (0.6+) of difference, I would definitely reach for the filters. 3 stop filters (0.9) are generally used at either end of the day when there is a strong light source, such as controlling light from a sunset or very bright sky.
Some companies do sell 4 stop (1.2) filters, but you can always obtain this value by stacking your filters – i.e. placing both a 1 stop and 3 stop ND Grad filter in the holder. Generally, I’d say my 2 stop (0.6) gets the most use in landscape images. 3 stop (0.9) can be too much sometimes, making the foreground off balance and appearing too bright against the newly darkened sky.
Should you use hard or soft graduated filters?

ND Grad landscape filters not only come in different densities, but they come in different gradients too. This refers to the way in which the dyed part graduates down into the clearer section.
Hard grads have quite a sudden falloff, while soft ones are a lot more gradual. If you’re shooting a seascape with a flat horizon, then you’ll opt for the Hard ND Grad as the transition is sudden. Whilst if you’re out shooting a mountain scene with an undulating difference between land and sky, go for the soft ND Grad to make the transition a lot less stark.


Landscape filter alignment
This is the most important part of using ND Grads. It’s not only choosing the right density and transition, but it’s also getting the cut-off spot on.
This can make or break an image, and will either leave you with a bright line along the horizon or ugly darkened mountain tops if you get it wrong. At worst, it’ll give you an obvious dark line across your image.
After you’ve nailed your composition, lock up your tripod head and slide in a ND Grad into your holder. Slide it down until you can’t actually see the transition in the scene. It will take a while to get right, and use Live View if it makes it easier – I find this is the best way.
It can be a case of nudging it a mere couple of millimetres to achieve the best results. Also, Live View is a great tool for you to try different filter densities, making sure you pick the right one for your scene.

Polariser Filters
If I could have just one filter in my bag, I’d probably choose a polariser! In some ways, this is the best landscape filter to have in your bag – if you are only bringing one, that is.
Why? Well, it’ll boost sky colours and reduce reflections from water and foliage. To me, these two things really give any photo impact.
When light strikes across a surface, the light rays scatter becoming what is known as polarised. In turn, this causes surface reflections and glare, reducing colour saturation. The best examples of this are on shiny surfaces like water.
Polarising filters stop the scattered light from entering the lens by only allowing the light rays through from one direction, effectively blocking out all of the polarised light. It sounds complicated, but it’s best seen in practice.
The first benefit you’ll notice from this is that your blue skies will become a much deeper blue and clouds will really stand out. This is because the sky contains a lot of scattered light, so just isolating the light rays can cause a massive visual impact for any scene.
Polarising filters can also cut down the glare from non-metallic surfaces such as foliage and leaves. This will increase the colour saturation of your foreground details, enhancing your images.
Lastly, you will be able to see through water and glass because it eliminates reflections at any given angle.

They’re super easy to use: just rotate the filter while looking through the viewfinder, or even better live view, and you’ll see the effect it has on the world around you. I find it’s best implemented when you want to make your blue skies pop and also cut down any surface glare.
Stop the rotation at the optimum moment and take your photo. They do work best on sunny days when there’s more polarised light around, but they’re still very useful on dull days, especially for removing glare from overcast foregrounds.
My favourite time to use them is on autumnal days out in the woods and along rivers, it’ll make those russet tones pop and give you a real colour boost to your images.


Polarising filters do have an optimum angle on sunny days, and that is 90 degrees away from the sun. Shooting this way, you’ll always have the maximum amount of polarisation and the deepest of blues.
A word of warning when using polariser filters on extreme wide-angles though, as it will create an uneven darker patch in your skies. So it is best either to use them either slightly less than maximum, or on a mid-range focal length.
Read more: The Best Lenses for Landscape Photography
When you’re photographing a scene and you want to remove surface reflections and boost the sky, you’ll notice the maximum effect of these won’t tie up with one another. This is due to both having separate light ray angles (sky is 90 degrees while reflections are around 30 degrees). The solution is therefore to two images and blend them together, or choose a trade off in between the two by rotating the filter some more.
Polarisers sometimes come in cooling or warming versions. This doesn’t matter too much if you’re shooting raw, as a simple tweak of the white balance in post will change this factor either way.
Lastly, using a polariser will affect your exposure times. Most polarising filters cut down light intake by two stops (some by one stop), so it also acts as a solid ND filter and extends your shutter length.
On a day out in the woods by the river this is the only filter you need. It cuts down reflections, boosts colours, and gives you a longer exposure to blur any water movement – perfect!
Should you use a circular or linear polarising filter?
There’s two types of polarising filter available: Circular or Linear. Personally, I’d say avoid linear. Linear filters were made years ago to work with older film cameras and SLRs.
These days you’ll be wanting to use a polarising filter with your Digital SLR, so you will need a circular version (abbreviated to CPL).
They both do the same job; it’s just mainly down to the fact that circular polarisers are manufactured differently to make sure the digital camera can still measure exposure and meter readings correctly through them.
Neutral Density (ND) filters

The third choice in our filter arsenal are ND filters. Unlike the graduated version, these will be solid grey with no clear parts and will come in either the screw-in variant or, for the slot-in type. They are almost always square.
Fundamentally, the only purpose for this filter is to block incoming light, thus increasing your shutter speed length.

Also, as the name suggests, they won’t affect the colour balance and should be truly neutral, having the same uniform effect across the whole filter.
The benefit of extending the shutter length is to either capture motion or force the camera into giving you a slower shutter speed. Most popular uses for them are slowing down water and waterfalls, allowing you to blur a crowd of people walking, trees swaying in the wind or capturing the incoming waves at a beach creatively.
Another use is if you wanted to photograph a moving object by panning the camera, but the resulting light conditions gave you a shutter speed too fast to induce blur. Putting on a ND filter will allow you to use a slower shutter speed even on a sunny day.

Choosing the right density of landscape ND grad filter
Just like the graduated ND filters, these come in different versions of density strengths known as stops. Again, the most popular choice of ND I would recommend is a 3 stop (0.9) filter, although you can get much higher versions right up to the ten stop (3.0) filters that will allow you to shoot well over thirty second exposures in the midday sun.
There’s even a 15-stop available for prolonged exposures. These are, however, made for a much more specialist usage and are overkill sometimes – especially when you’re standing bored behind the camera during a 6 minute exposure and it’s still not finished.
Back to the normal ones, and up to a density of 4 stops (1.2) the camera should be able to deal with it being on the lens – i.e it should still be able to autofocus and meter through it. Plus, you’ll still be able to see through the viewfinder.
However, when you go for a stronger density you may find the camera is underexposing your images, so you’ll need to take over and flip it to manual mode. Take a meter reading before placing the ND filter on and calculate how many stops to add to your exposure time to compensate for what ND filter you are using.
If you’re using a 3 stop ND filter, then you’ll need to add 3 stops to your exposure time. There are many cheat sheets available to carry round with you to determine this, or even better these days there are phone apps, meaning you can calculate it anywhere on the move.
Alternatively, just learn that a ‘stop’ is either halving or doubling your current value. So, for example, your current scene is giving you a good exposure using the settings of 1/250, f/16, ISO 100. If you add a three stop ND filter, you need to compensate for this by doing one of three things:
- Slowing the shutter speed down to 1/30
- Opening up the aperture to f/5.6
- Increasing the ISO to 800
Remember, different densities will affect your exposure, so choose the right strength for the effect you’re after. Generally, the point of using a solid ND filter is to extend the shutter length, and for landscape images you’ll want to keep your ISO low and your f-stop number high.
Here’s a handy chart to help you. You’ll notice that most cameras are limited to 30 seconds as their slowest shutter length on manual mode, so to go longer than that you’ll need to swap it to the Bulb (B) mode and use a cable release or timer to start and stop the prolonged exposure.
| No filter | With 2 stop ND (0.6) | With 3 stop ND (0.9) | With 4 stop ND (1.2) |
| 1/500 sec | 1/125 sec | 1/60 sec | 1/30 sec |
| 1/250 sec | 1/60 sec | 1/30 sec | 1/15 sec |
| 1/125 sec | 1/30 sec | 1/15 sec | 1/8 sec |
| 1/60 sec | 1/15 sec | 1/8 sec | 1/4 sec |
| 1/30 sec | 1/8 sec | 1/4 sec | 1/2 sec |
| 1/15 sec | 1/4 sec | 1/2 sec | 1 second |
| 1/8 sec | 1/2 sec | 1 second | 2 seconds |
| 1/4 sec | 1 second | 2 seconds | 4 seconds |
| 1/2 sec | 2 seconds | 4 seconds | 8 seconds |
| 1 second | 4 seconds | 8 seconds | 16 seconds |
| 2 seconds | 8 seconds | 16 seconds | 32 seconds |
| 3 seconds | 16 seconds | 32 seconds | 1 minute |
| 4 seconds | 32 seconds | 1 minute | 2 minutes |
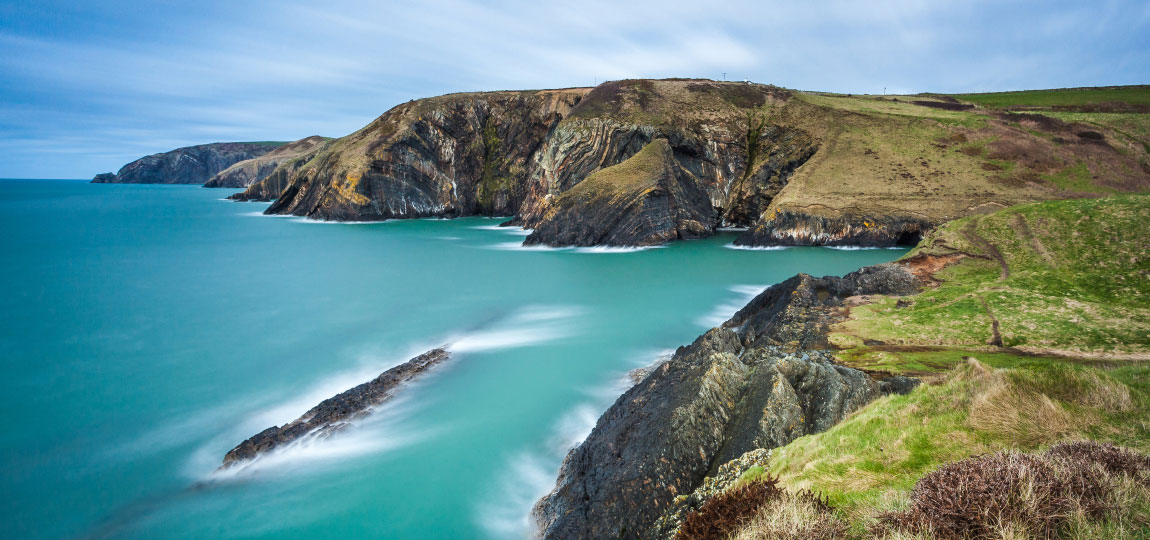
The fun begins when you use all the above filters in one image, then you can really make some striking shots. Here I’ve implemented a 0.6/2 stop soft ND grad to keep the sky in check and added a Circular Polariser (CPL) to cut down the surface reflections and boost the sea colours.

Looks ok as it is, but as the shutter speed is only a 1/3 of a second, I personally find seeing all of the details of the waves etc distracting – plus the sky isn’t the best.
Now, slotting in a Big Stopper and adding 10 stops, the new image after nearly four minutes of exposure looks totally different.

For me, this is what I find so addictive with photography! It’s still the same scene as the original but all you’ve done is use a filter. No computer trickier, just simply affecting the amount of light coming into the camera.
Landscape filters really are a fabulous way of being creative with your images, and I definitely urge you to have a go.
Getting started
Remember, there are some fantastic starter kits produced by a selection of popular brands. Here are some recommendations:
- LEE Filters produce the best filters, and are a favourite of professionals.
- Formatt also has a great starter kit
- Cokin is the cheaper option, but still a good buy.
Good luck and have fun!


