
Editing Photos in Lightroom: 7 Essential Tips for Nature Photographers
Editing photos in Lightroom has become an essential skill for photographers looking to enhance the quality and visual appeal of their images.
Having begun my photography career during the film era, I am a firm believer in capturing the perfect shot in-camera.


Using the appropriate exposure, white balance settings, and framing are skills that every photographer should strive to master, without relying on post-processing to fix potential mistakes.
However, post-processing has become an integral part of digital photography, and there are several steps that can be taken in post to enhance and perfect even the best in-camera image.
This tutorial will cover some essential tips for editing your nature photographs in Lightroom, informed by my own experiences with this helpful software.
1. Set the white and black point
The first step I take when importing an image into Lightroom is to set the white and black points to achieve the desired exposure.
In the Tone panel located at the top of the Develop module, you will find sliders for both white and black adjustments. I always begin with the white point.

To make these adjustments accurately, hold down the Option key (for Mac users) or Alt key (for PC users) while moving the sliders. When adjusting the whites, the screen will turn black. Now, drag the slider until the first hint of colour becomes visible.
This colour indicates clipped highlights and will show you where detail is being lost, so avoid going beyond this point.
The same process applies when adjusting the blacks, but the screen will turn white.
Setting these two points accurately will provide your image with a wide dynamic range and ensure sufficient contrast.
Read more: All You Need to Know to Process a Raw File in Lightroom
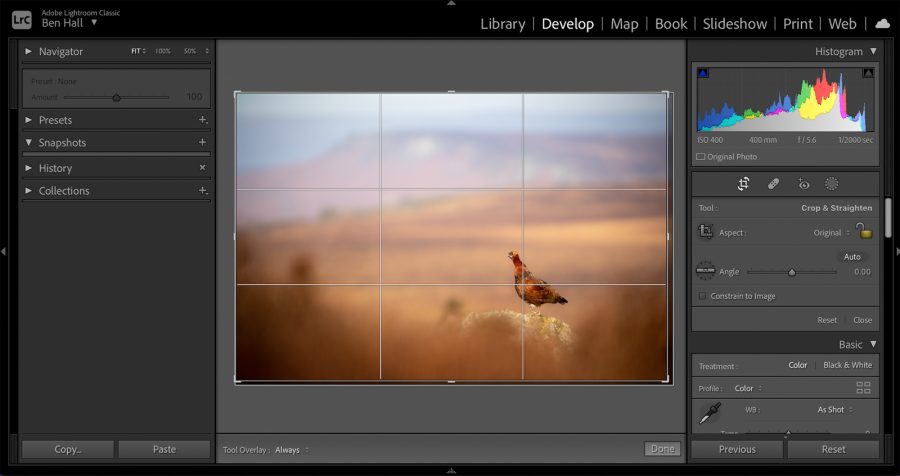
2. Think about cropping
Framing an image perfectly during the time of shooting should always be your goal, but there are often circumstances that prevent us from achieving a flawless composition in-camera.
Perhaps your subject is wary and doesn’t allow a close approach, or the surroundings simply limit your access. Whatever the reason, there are times when cropping becomes necessary.
The crop tool in Lightroom includes a grid overlay that is useful when applying the rule of thirds. It displays power points at each intersecting third, as well as two horizontal and vertical lines.
By holding down the Shift key while dragging the corners or edges of the boundary, you can lock the width and height to the correct proportions.

Dragging without holding the Shift key allows you to move each edge of the crop boundary independently.
Pressing X will switch the crop area’s orientation between horizontal and vertical.
The crop tool also enables rotation. To rotate an image, hover your cursor just outside the crop boundary, and a curved, double-ended arrow will appear. Simply drag to rotate the image.
I find this particularly useful when working on images taken with my floating hide. To get my camera as close as possible to the water, I use an angle finder, which can make it challenging to achieve perfectly straight images.
The rotation tool can easily fix this without losing too much from the edges of the frame.
3. Use selective sharpening
The viewer is naturally drawn to the face of a subject, particularly the eyes. When capturing a portrait image, it is crucial to render the eyes as sharp as possible, as this helps establish a strong connection.
The background and foreground should have a soft appearance to eliminate potential distractions and ensure clear separation between the subject and its surroundings.
Even images that are initially sharp straight out of the camera can sometimes benefit from enhanced detail and selective sharpening in specific areas.

When sharpening an image in Lightroom, the key is to apply sharpening to only the subject or even just part of the subject, and not to the out-of-focus background. Lightroom comes with a powerful sharpening tool that can be found within the Detail panel.
Before applying any sharpening, you should always view your image at 100%. To do this, simply left-click anywhere on your image.
Once in the Sharpening tool, you will see four sliders: Amount, Radius, Detail, and Masking.
The amount simply refers to the amount of sharpening. Apply too much, and you risk increasing noise and introducing unwanted artefacts, so keep this in mind and be careful not to overdo it.
The radius refers to the amount of sharpening around the edges.
The detail controls the amount of sharpening on the details of the image. A smaller value will only sharpen large edges, whereas a higher value will sharpen smaller edges.
Masking is the key to applying sharpening to the subject only, as it enables you to mask out areas such as soft backgrounds and foregrounds. It is perfect for wildlife images where your aim is to isolate your subject from its surroundings.
The most effective way to use the masking slider is to hold down the Option key (for Mac users) or the Alt key (for PC users), then move the Masking slider to the right.
As you move the slider, you will see the areas that are out of focus appear grainy. As you move the slider further to the right, these areas will become black, with detailed areas such as the subject itself appearing white.
This means sharpening will only apply to the white areas, leaving the out-of-focus parts of the image free from any sharpening. This is a great way of selectively sharpening your subject, without the risk of introducing noise to soft backgrounds.
Read more: How to Sharpen Photos in Lightroom
4. Use dodging and burning
Thanks to Lightroom’s new masking feature, it is now easier than ever to darken (burn) or lighten (dodge) parts of an image. There are several reasons why you may want to dodge or burn an image.
In nature photography, we must rely solely on the available natural light, with little to no control. This light isn’t always ideal, and you may find unwanted shadows or bright highlights in your images.
By lightening or darkening specific areas of the image, you can achieve a more balanced exposure and reveal details that might otherwise be lost.

Dodging and burning is also a great way to add depth to landscape photographs. You can draw the viewer’s eye to specific parts of the image by selectively highlighting those areas.
The most effective way to achieve this is by clicking the Mask tool, which is the circular icon on the far right just underneath the histogram.
Next, click the + symbol and choose Brush from the drop-down menu. Now you can freely brush the area of the image that you would like to dodge or burn, and Lightroom allows you to control the Size, Feather, Flow, and Density to ensure that the selected area blends well with the rest of the image.
Once you have brushed the area you want to adjust, a highlighted box will appear, giving you control over Exposure and other options such as Clarity, Sharpness, and Color Balance.
I personally like to use subtle dodging and burning to enhance the depth and contrast of images that may appear a bit flat.
For example, in a forest interior, working on the highlights and shadows can accentuate the way natural light is falling, adding more dimension and impact.
Read more: This Top Tip Will Change How You Use Lightroom’s Local Adjustments
5. Manipulate your colour temperature
Colour temperature can have a significant impact on the overall mood and atmosphere of an image.
While I always set the white balance in my camera based on the situation, I often make adjustments to the colour balance afterwards to either warm up or cool down the colours in the image.
A large portion of my photography, whether it involves landscapes or wildlife, is captured during the golden hour. The beautiful warmth of the light when the sun is near the horizon is incomparable.
While a cloudy white balance can enhance this warmth, increasing the colour temperature further in Lightroom intensifies the golden hues.

Silhouettes and backlit images taken when the sun is low in the sky are perfect candidates for a warm mood.
However, there are times when I prefer a colder feel. Images captured during winter conditions, such as snowfall or frost, should not have a warm appearance.
In such situations, I often use daylight white balance to cool down the temperature, and additional adjustments in Lightroom can further enhance the cold mood.
There are several ways to adjust the colour temperature in Lightroom. You can use the White Balance drop-down list, which is located just above the Temperature slider in the White Balance panel, to choose from various presets.
These presets are similar to the white balance presets available in your camera.
I prefer using the manual Temperature and Tint sliders as they provide greater control. Adjusting the Temp slider allows you to increase or decrease the colour temperature of your image.
Dragging to the right increases the colour temperature, giving the image a warmer appearance, while dragging to the left cools down the colour temperature.
The Tint slider can eliminate any unwanted colour casts by adjusting the amount of magenta and/or green in the image.
Read more: Lightroom Colour Correction: Hue, Saturation, and Luminance
6. Try a graduated filter
The Lightroom graduated filter is an effective tool that can be used to edit a specific part of an image without affecting the entire composition.
Grad filters are commonly used in landscape photography to darken and enhance the sky. The Lightroom graduated filter, specifically the Linear Gradient, is user-friendly and can make a significant difference to an image when used correctly.
To begin, click on the Masking icon and choose Linear Gradient from the dropdown menu.
Next, click on your image and drag it to apply the filter mask. For example, if you want to apply the filter to the sky, click at the top of the image and drag it downwards, finishing just below the horizon.
If needed, you can adjust the position of the filter by clicking on the centre handle and dragging it around the frame, or rotate it by adjusting the outer handle.

Once the filter is in place, a box will appear with various effects such as Exposure, Temperature, Texture, Clarity, and more.
After making your desired edits, you can reduce the strength of the filter if you find that your adjustments are too strong by adjusting the Amount slider.
I prefer using Lee filters on my camera when shooting landscapes. However, there are occasions when I don’t have my filters with me. In such situations, the Lightroom graduated filter provides an effective alternative, offering even greater control over the editing process.
Read more: Master the Graduated & Radial Filters in Lightroom
7. Be careful with clarity
The Clarity adjustment is a tool I frequently use in landscape photography and occasionally for wildlife. However, it’s important to exercise caution as it’s easy to overdo it.
Less is often more, so use restraint to avoid introducing excessive contrast that may lead to loss of important detail.
It’s worth noting that the clarity slider works by increasing mid-tone contrast, unlike the standard Contrast slider, which affects the entire tonal range.
The Clarity tool is highly impactful and an excellent way to enhance detail and texture. Landscape images with intricate sky detail are ideal for Clarity adjustment as it can intensify cloud detail, adding drama and mood.

Clarity can also be selectively applied to enhance texture in specific parts of an image.
When combined with the Graduated Filter to enhance the sky or using the adjustment brush to add detail to foreground rocks, it effectively directs the viewer’s attention to a particular area.
I also find the Clarity adjustment beneficial for close-up images of abstract nature, such as ice patterns or tree bark. These intricate details often benefit from a boost in Clarity.
There are also times when you may want to apply some negative Clarity to soften detail, perhaps in a background or foreground that appears too obtrusive.
Just remember to be measured and be careful not to overuse this tool. It’s easily done, but it can have a negative impact on your edits.
In conclusion
As mentioned at the beginning of this article, you should always strive to get everything right in-camera.
Post-processing should be viewed as a means of enhancing and perfecting an image, rather than covering up mistakes made during the shooting stage.
However, in this digital age, post-processing plays a significant role, and Lightroom provides an excellent platform for making these edits.
By familiarizing yourself with these simple techniques, you will be able to effortlessly add the finishing touches to your nature images, thereby elevating your photography to the next level.


