
Master the Graduated & Radial Filters in Lightroom
In this article we’ll be looking at the superb Graduated & Radial Filters in Lightroom. Out of all of the secondary stage adjustments that are available, these are probably my most used tools. I’ll go through where and when you’ll use them, how to use them properly, and some extra tips and tricks along the way.
If Lightroom is new to you, make sure you have read my other tutorial “All You Need to Know to Process a Raw File in Lightroom“. This will start you on your way to using this powerful image processor, helping to turn your original camera raw files into images that pack a punch.


When and Why to use the Graduated & Radial Filters in Lightroom
Much like the Adjustment Brush covered in my previous tutorial, there’s no specific answer to this. It’s purely down to how you want your final image to look. You can use it to change areas you want to emphasise, and these two filters can really transform the look of an image. Again I must stress that the moment that it’s noticeable that a filter has been used in Lightroom then, for me, it’s gone too far. Don’t go overboard with sliders; treat them with caution and remember subtlety is the key to a well processed, realistic looking photo.
So what do they do? Graduated Filters will create a mask that affects an area of the image in a linear direction, while the Radial Filter will affect them in a circular area. This shape can be adjusted and rotated to any kind of circle/ellipse, so the possibilities are endless when creating your masks. Most of the time, the main reason to use either of these tools is to adjust the exposure, making one part of an image brighter or darker. However, they can be used for a variety of things and you can have as many as you want on one image, each adjusting different settings. You also have the most of the processing slider controls (Exposure, Contrast, Clarity, White Balance etc.) found in Lightroom at your disposal to use on these masks, making them very powerful tools!
Graduated Filter
Firstly, I’ll go through the Graduated Filter and a few keyboard shortcuts. The main keyboard shortcut for opening the Graduated Filter tool is the letter M. Hit this on your keyboard and you’ll be taken to the Develop module where the Graduated Filter tool will open. It’s just below the Histogram, and the Graduated Filter tool will become illuminated with an array of sliders below it.

Make sure all of the sliders are reset to zero before starting by either double clicking on each slider’s heading, or by holding down the ALT (Option on Mac) key so that the word Effect will change to say Reset at the top left of the panel (then just click on that). To apply a Graduated Filter, drag anywhere on the picture and, whilst still holding down the left mouse button, dragging in your chosen direction before releasing the mouse to finish.


The distance between the first click and the release will determine the transition of the Graduated Filter, and also the angle will be designated as per your direction of mouse movement. You can click from top to bottom, left to right, right to left or bottom to top, there are no limits in how and where you apply a Graduated Filter.
[twenty20 img1=”8246″ img2=”8245″ width=”100%” offset=”0.5″]
You can see in the example above, a simple Graduated Filter covering the sky area with the exposure dropped and contrast boosted just adds more to the image without overdoing it.
Top Tip: Pressing ‘O’ on the keyboard will show the masked regions in red. This is very handy as it’ll show you exactly where you masked off. If this is hard to see, press Shift + O to cycle round different mask colours.
For images that require a dead straight transition between where you want to apply your mask, hold down the Shift key when dragging your Graduated Filter. This will make a straight line at either 0 or 90 degrees depending on whether you drag vertically or horizontally. Graduated Filters are easily rotated by positioning the mouse cursor over the centre line of the three, until the rotate handle appears. Then click this and spin it around to suit.

[twenty20 img1=”8248″ img2=”8249″ width=”100%” offset=”0.5″]
In the above image I decided to put more emphasis on the moody sky by darkening it, adding more contrast, and also adjusting the white balance to a cooler tone. This required dead straight transition between the masked areas so a simple press of the Shift key helped to create this.
The main purpose and sole function of Graduated Filters and Radial Filters are to mask a certain area, and then to apply your changes via the effects sliders only to that area. You’ll be able to revisit these at anytime by clicking on each individual ‘Edit Pin’ control point. You can also move the whole Filter by hovering over the Edit Pin with the mouse, and clicking and moving it around should you have placed it incorrectly.
Fundamentally that’s all there is to the Graduated Filter; the power of the tool now is how and where you implement it, changing the values to suit and to add and boost your images.
Radial Filter
The Radial Filter can be a bit more confusing, however it’s for me the most versatile one here! I’d say I use the Radial Filter on every image that I process in one way or another. Ranging from tiny exposure lifts, increasing clarity to full blown sky adjustments. Generally, as the natural world isn’t made up of straight lines or linear transitions such as what the Graduated Filter helps to change, the Radial Filter is useful in a variety of ways and on many subjects, including wildlife too.
Hold down Shift and press the M key to get started loading the Radial Filter tool. Just like the Graduated Filter and Adjustment Brushes, make sure to start off with all the sliders reset to zero. With the Radial Filter, the first click determines the centre point of the circle/ellipse mask, then dragging out with the mouse button down will dictate the shape of it and finally the release of the mouse finishes the shape. Just like constraining straight lines on the Graduated Filter, if you want a perfect circle for the Radial Filter, hold down the shift key as you drag out your circle.
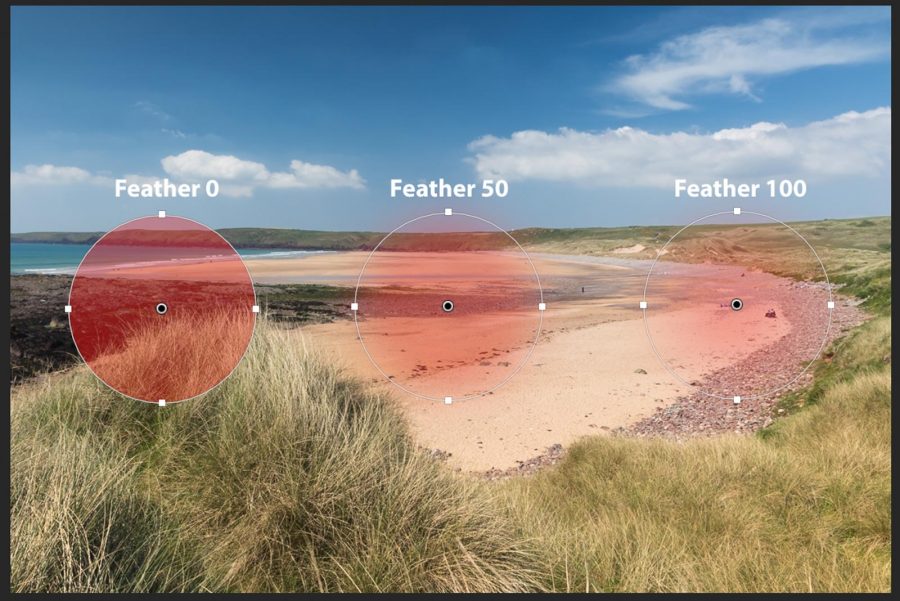
Feather is an important tool too for the Radial Filter as this, like the length of drag on the Graduated Filter, dictates the transition between the affected and unaffected area. As default, Lightroom has this set to 50 and I rarely change this value.

If the Radial Filter you require isn’t a perfect circle and you would like it angled, this is possible by rotating it. By hovering your mouse’s cursor on the circumference of the filter between the drag handles, the cursor will change to a rotate function. Then, if need be, use the handles to stretch and change the shape of the Radial Filter to suit. Another function of the Radial Filter is the Invert Mask checkbox.

In the above image I wanted to add some Clarity to the breast feather patterns of the Cuckoo. When I drew the Radial Filter onto the image, I rotated and stretched it to ensure the affected area was everything other than the bird itself. By ticking the Invert Mask checkbox, changed the mask to inside the Radial Filter region, therefore only affecting the area I wanted.

This can be handy when used in turn with exposure or colouring changes to zone in on a particular area.

Likewise with the Graduated Filter and the Adjustment Brush, you can come back and edit your Radial Filters by selecting the tool again and clicking on any of the Edit Pins to access the options.
Brush Edit
One exceptionally useful function to both the Graduated Filter and Radial Filter is the Brush edit tool. This would be used in a situation when you’ve applied a Filter, but it’s affecting an area which you don’t want to be changed.
Say, for instance, you wanted to add a Graduated Filter to darken the sky in the shot below. To do this, you’d drag your Graduated Filter over the image and end up with the below mask.

However, the mask now covers the tree. So when darkening the sky, it will also darken the top of the tree.

You can counteract this by clicking on the ‘Brush’ at the top right of Filter panel, and then you can then paint out any area that you don’t want to be affected by the Graduated Filter.

For more of an in-depth explanation on the Brush settings, read the Adjustments Brush tutorial – but one handy function here is to use the Auto Mask while brushing out the tree. Remember to hold down the ALT (Option on Mac) key to make sure your brush is set to remove.

This function is possible when using the Radial Filter too, and I think you’ll agree this is a great addition to some already powerful tools to help with your image processing.
Both the Graduated and Radial Filter are fundamental in my view in the image processing stages and they both feature, to some extent, in all of my work. Personally, I find the Radial Filter more useful than the standard Adjustment Brush because, unless you’re creating a very specific mask, you can easily transform and shape the Radial Filter to suit most masking situations.

Finally, here’s a Mountain Hare image showing five Radial Filters. As you can see with the before and after, there’s really not much to see if you were playing spot the difference. Remember, subtlety is key and only apply a Filter if it’s helping your photo by drawing more focus to a certain area, emphasising the detail, or selectively boosting to help the overall impact of the image.
Advanced Shortcut Keys
To duplicate a Filter: Control + Alt -drag (Win) or Command + Option -drag (Mac) an existing Filter
To adjust the Radial Filter handles independently use the ALT (Option on Mac) key.
Double-clicking on an existing Filter Edit Pin will apply the filter and dismiss the tool.


