
How to Use the Adjustment Brush in Lightroom
Once you’ve mastered the more general processing of a raw file in Lightroom, you might find yourself wondering about the advanced features hidden in the software when exploring the Local Adjustments panel. These often overlooked tools are some of Lightroom’s most useful additions, and they can be found in the Develop module just underneath the Histogram.
In this article we’ll be looking at the Adjustment Brush in Lightroom – a great tool that allows you to make your adjustments to specific areas of your photo. Where you’ll most likely need to use it, how to use it with care and to speed things up, a few handy tips and shortcuts along the way.


The above before/after comparison let’s you see the changes made to the head of the fox, without affecting the rest of the photo. Neat, huh?
When and Why to Use the Adjustment Brush in Lightroom
There’s no right or wrong answer to this one, it’s all down to how you want the final image to look. As with using any slider, setting or tool in Lightroom, the upmost key is subtlety. You never want to go overboard with any effects, because as soon as the viewer of your image can obviously notice that you’ve used the tool, it’s a big fat fail in my eyes. Even more so because, with the Adjustment Brush, it’s known as a local adjustment and you’ll only be changing a small area, so the effects will become even more apparent compared to the rest of the image that surrounds it. This is very different to the overall changes you’d normally make in the ‘Basic’ develop panel. Such scenarios for using the Adjustment Brush are to lighten or darken a selected area, change the colouring, or white balance adjustments on a small area. The possibilities are quite literally endless when editing specific portions of your images, but figuring out how to use it can be overwhelming.

Brush Settings & Keyboard Shortcuts
With any workflow, it’s important to work efficiently and, like in many graphic programs, the sooner you learn keyboard shortcuts in conjunction with the mouse, the better. The main keyboard shortcut for opening the Adjustment Brush tool is the letter K. Hit this and you’ll be taken to the Develop module and the tool will open straight away. If you’ve not used this before, it’s easy to wonder whether anything’s changed as the sliders all look the same in the Develop panel, one way of telling is that you’ll have some more options below the Histogram, and the Adjustment Brush tool will become illuminated too, it’s the one that looks like a magic wand. Or you could just click on the Adjustment Brush icon instead, but where’s the fun in that?

Further Reading: Keyboard Shortcuts for Photoshop & Lightroom CC
The sole function of the brush is to mask a certain area to then accept any changes you make with the effect sliders. You can come back to these at any time and change the settings to your heart’s content, by clicking on each one’s ‘Edit Pin’ control point. On to the control panel, and it’s laid out a bit back to front in my opinion. The Adjustment Brush panel is divided into two sections, with the effect sliders above the brush options. The first thing you should do before commencing using the tool is to choose your brush settings, so scroll down the window and check these out initially. Here’s a look at the brush settings:

Size
This one is pretty self explanatory: the size slider determines how big your brush is. So, the bigger the number the bigger the brush, and vice versa. The measurement isn’t relative to pixel size and, to be honest, whatever number it says is pretty irrelevant. Only you will know how big or small it needs to be to mask the area that you need to change. Change this quickly by hitting the right ] or left [ square bracket keys on the keyboard to increase or decrease your brush size.
Top Tip: If you working on a small area, zoom into your image with the Adjustment Brush activated by holding down the space bar and left clicking the mouse to zoom in. This will help you to fine tune your brush size.

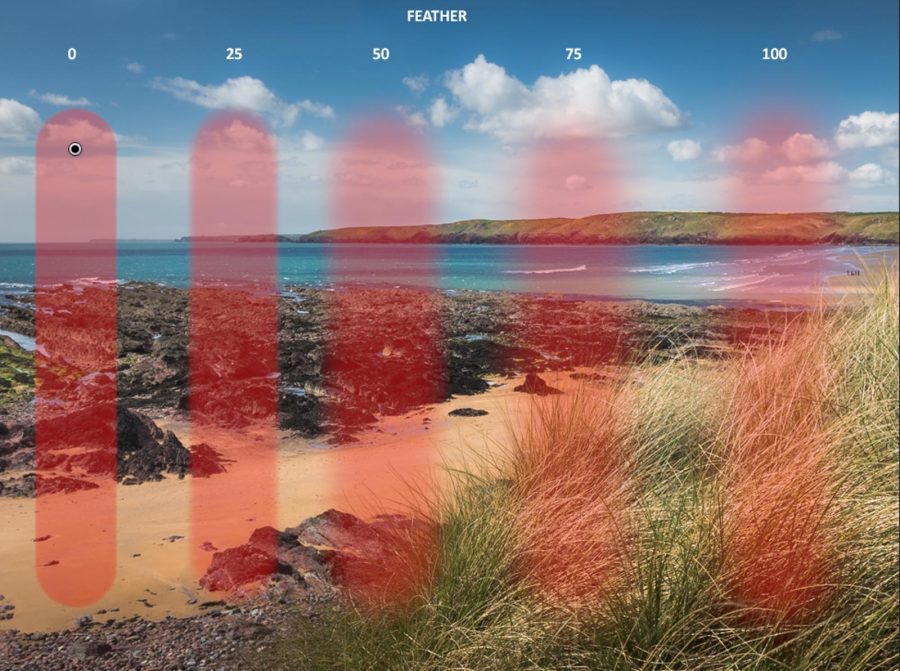
Feather
Feather is a term given to brush settings in many graphic design programs that dictates the softness at the edges of the brush. So with zero feathering, the transition between your masked area and the surrounding image will be a sharp edge. With a high feather value, it will make for a very soft-edged brush with a soft transition between the affected area and nearby pixels. Very rarely do I ever use zero on the feather as harsh edges do not exist in reality, so always use at least a small amount of feathering.
You’ll notice when you change the feather slider, the mouse cursor will change to show you your brush size and the feather radius; use this as a guide to help you choose the right setting. You can increase the feather size by pressing the Shift + ] or Shift + [ keys on the keyboard to increase or decrease the size.
Top Tip: To draw straight lines hold the shift key down while brushing – this constrains lines to 0, 45 or 90 degrees. Or do a single click, hold shift and click somewhere else to draw a straight line between the two points.

Flow
This controls the rate at which the effect is applied in the masked region. If set to 100%, it means the Adjustment Brush will affect the area at maximum level. If it is set to 50%, then only half of the effect will be seen. Flow can be changed by pressing the keys 1 through to 9 on the keyboard.

Density
This is similar to Flow, and the effects can look very alike. But Density puts a limit on how strong the effect will look on your image, mainly controlling the transparency of the effect. With Density, you can also layer it similar to how you would when shading with a pencil on paper; the more times you go over the same area, the greater the effect will be.

Auto Mask
A very handy little tool, and one that’s often missed: a simple tick of this check box can save you hours painstakingly drawing around objects. With this enabled, the Adjustment Brush tries to confine the masked region to areas of the same colour and exposure as the initial brush stroke. Normally, if you have to select an area it would take ages with a small brush trying to follow the edges, so this tool can quickly help and does a great job! The trick is to start painting inside your object in an area where the colour is well defined, so that when you reach the edge (and as long as there is enough separation in colour) Lightroom will stop the brush from going outside the region.

Here’s an example of what the mask looks like when applied to a red kite.

And then the before/after result of using this mask to make my edits (drag the slider):


A / B & Erase
Just above the size slider are the letters A & B. I don’t use them personally, but with these you can have two brush presets to use at your disposal. For instance, you might have one large, soft edge and one small, hard edge brush. To set them up it’s a simple task of clicking the letter, changing your slider settings and they’re saved until you change them again.
The Erase tool is handy too! Just like in school when we were reaching for our erasers (or rubbers as I called them) every five minutes, it’s just the same in Lightroom. The Erase tool can be set up the same as the normal brushes, so you can change the size, feather & flow (but not the density). You can also use auto mask in conjunction with the eraser to constrain it to certain areas. The quickest way of using the Erase tool is to hold down the ALT key (the Option key on Mac computers) and click with the mouse to erase away. On releasing the key, the tool goes back to the standard brush.


Working Habits
As with everything in Lightroom, changes you make are never set in stone so you can always come back to them and tweak forever. Each Adjustment Brush you draw onto your image puts an Edit Pin down at the start of the mask, however Lightroom will allow multiple brush strokes on each Edit Pin, even if you change the settings. A good practice to get into is that if you’re changing any brush settings, always use a new brush. Do so by pressing the New button at the top right of the Adjustment Brush tools panel. Also, when making a new brush the slider settings don’t reset back – so you’ll have to manually do this by double clicking on the word Effect at the top right of the panel to reset the values.
Once finished, press Close in the bottom right corner; this will close the Adjustment Brush tools panel. If you need to edit any of the brushes again, you’ll need to activate the Adjustment Brush again by hitting K and choosing the appropriate Edit Pin. It’s a bit long winded, but it’s the only way to go back and forth between the Adjustment Brush and the standard Basic panel.
Tips & Tricks
A few handy things to know when you’re in the Adjustment Brush panel are:
Press O on the keyboard to show the masked regions in red. This is very handy as it’ll show you exactly where you painted it. If this is hard to see, press Shift + O to cycle round different mask colours.
Pressing H will cycle round the viewing options to show or hide the Edit Pins – handy if you have a lot of these dotted across the screen and want to see what the image looks like without them covering it.
You can actually use it like a paintbrush. Once you have chosen your Brush settings, at the base of the effects panel is a colour picker. Next to this is a box with a cross in it. Click this and choose a colour. Lightroom will apply this colour to the masked region along with any other effect adjustments you may have picked. Examples being changing the colour of a flower or altering eye colour for instance.
Hopefully by now you have a better understanding of the Adjustment Brush and what it’s capable of. You’ll notice in most of my examples that it’s implementation is for very subtle changes and tweaks. The second your changes become obvious, you know you’ve gone too far!
There are infinite possibilities with how and where you can use the tool, and it makes a very powerful addition to your image processing workflow.


