
Essential Photoshop Tools for Landscape Photography Editing
Every time I mention Photoshop to my clients during workshops or to my friends, I’m often met with scared expressions. Many of us are afraid to delve into the big, bad world that is Photoshop for landscape photography editing.
The word itself immediately hints at fakery or totally changing the image, but that is not the case.


I started taking my post-processing seriously when I delved into Photoshop. Although Lightroom has now caught up with Photoshop in many ways, it still lacks in some key areas which I hope to teach you about in this article.
The way I have this article laid out is: first, I give the title of the tip or skill I want you to learn; then I explain where it is found and what it does, followed by an example of how it works using screenshots. So here are 7 tools which I believe will help your Photoshop workflow.
Read more: 8 Post-Processing Tips for High Quality Images
1. Layers and naming
Layers give you excellent control over your image in Photoshop. They can be used to gradually build up different areas within the photograph and also remove mistakes.

If I am making an adjustment in Photoshop, I will often duplicate the current layer I am working on and rename that new layer to the adjustment type I am creating. To duplicate your layer, simply right-click on the current layer and select the duplicate layer option.

If I want to do some dodging and burning, for example, I will rename my new layer “D&B.” This way, I know what adjustment is what, and this also gives my D&B layer its own platform to be reduced or increased as I see fit.

As you can see above, I’ve duplicated the layer before beginning the dodge and burn adjustments. In the next tip, I am going to show you why this is so important.
2. Layer opacities
If you look closely above the layers, you will see the word opacity and a percentage. This is basically the percentage of the layer that is visible, with 100% being completely visible and 0% being invisible.
Why is this important? Adjusting the opacity of a layer can control how strong you want the effect of that adjustment to be.

For example, above I have applied a curve adjustment to my image. However, it is too strong. There are multiple ways of dealing with this, however, the most straightforward one is adjusting the opacity of the curves adjustment layer.

By bringing down the opacity (to 40% in this case), we have reduced the strong effect of the curves layer, and it looks more natural in the image.
3. Masking
Lightroom has caught up with Photoshop in many ways and has developed quite a good masking system. However, in Photoshop, we can use layer masks to target certain areas of the image.
This is similar to doing local adjustments in Lightroom as opposed to global adjustments.
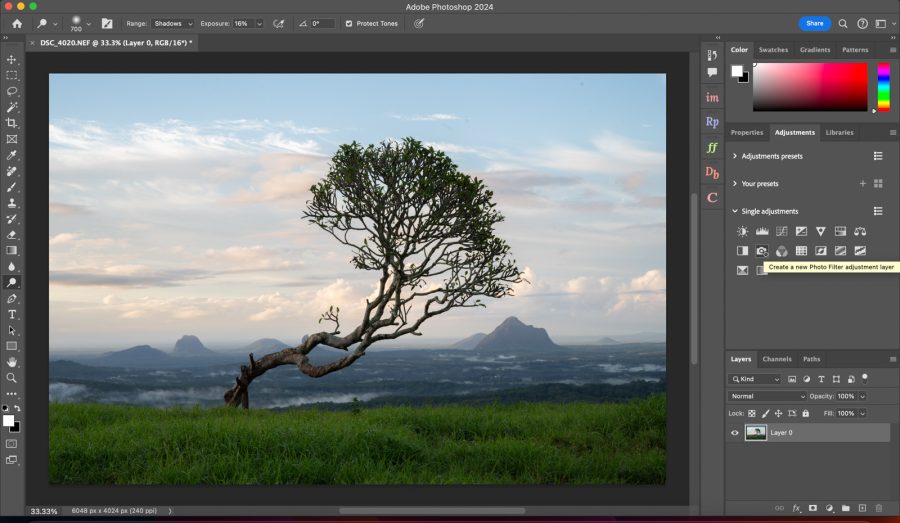
In case you haven’t noticed, with each adjustment you apply in Photoshop, a white layer mask is attached to it. By adjustment, I mean a curves layer, color balance, exposure, contrast, etc. All of these options are available in the adjustments panel on the right-hand side.
In the image below, I have added a color filter adjustment to bring more warmth into the image; however, I only want it to affect the sky. To do this:
- Select the brush tool from the left-hand toolbar.
- Set black as your foreground color.
- Paint out the adjustment from the shadows using your mouse.
This is such a fantastic skill to learn, and it can be applied in so many different ways in Photoshop using any adjustment.


You can see where I painted out the warm layer from the shadows here, leaving it only in my highlights as there was no warm light on my foreground.
4. Content-aware fill
Ever had an amazing image ruined by a sign or a random car in your shot? Content-Aware Fill is a powerful tool that can quickly and easily remove unwanted subjects from your image.
Depending on the complexity of the image and how much needs to be removed, it can clean up your shot quite well. I often use it for stray branches on trees or unwanted things in my foreground.

For example, in the shot above, I used Content-Aware Fill to clean some of the rushes sticking out of the water. These were distracting, and I wanted as clean a foreground as possible. To use this tool:
1. First, you need to make a selection of the area you want to clean up using the lasso tool. The lasso tool is found three down on the left-hand toolbar. If it is not there, simply right-click on whatever tool is there already (typically Magnetic or Poly Lasso) and select Lasso.
2. Then, with your brush, freehand draw around the object you want to remove.

3. Once you have selected the object, you will see the line turn into marching ants. This means the selection is active.
4. Next, click on the Edit toolbar and select Content-Aware Fill.

5. In the next window that opens, you will see your image on the left and a preview of the filled image on the right. All the areas that are green are where Photoshop is sampling pixels from in order to clone out the reeds.
6. You can add or remove the green using the + or – symbol at the top of the bar. This takes practice.
In the shot below, I painted more green in the water as this is the area I wanted Photoshop to sample from the most, seeing as the reeds were in the water. I did not want Photoshop to be looking for pixels from the sky, as then the clone would not look natural.

7. When you are done, hit OK, and voila, you have now removed that ugly distraction and cleaned the image right up.
8. Try to avoid overly complicated selections. Best practice in this case is to keep them out of your composition from day one; get as much right in the field as possible before post-processing!
Another helpful tool for these scenarios is the Remove Tool. It can be found on the left-hand toolbar and works in a similar way to the Clone Stamp tool in Lightroom; however, I have found it more powerful!
Read more: Composition in Landscape Photography – The Essential Guide
5. Exposure Blending
This is what got me intrigued in Photoshop. I began to learn how to use luminosity masks for exposure blending.
If you’re keen on exposure blending, I highly recommend looking into the Raya Pro panel, which has excellent shortcuts for helping you blend exposures. However, I will show you here how we can blend exposures using a tool called Apply Image.
Essentially, Apply Image is a way of targeting specific areas of your photograph. I like to blend darker exposures into brighter exposures, i.e., an exposure for my highlights into an exposure for my shadows and midtones.
In order to blend these exposures, you must open both your images in Photoshop and place the darker exposure above your brighter exposure. You can find Apply Image in the top toolbar under Image > Apply Image.
One or two things before you start:
- Make sure the exposures are aligned properly. You can do this by selecting both of them, then going to Edit > Auto-Align Layers. This will ensure any movement that may have happened between frames is removed.
- The exposures cannot be drastically different in luminosity values. What I mean by this is you can’t have a totally bright foreground blending with a dark sky. It will not look natural.
- Try to bring up the shadows on your darker exposures ever so slightly and decrease the highlights on your brighter one; this process is called matching.
To blend the exposures:

- Make your top layer invisible and place a white layer mask over it. You will find the layer mask on the bottom right toolbar; it looks like a camera!
- Make sure you have the white layer mask selected, then go to Image on the top toolbar and Apply Image.
- Your settings should be the same as mine. I have attached a screenshot for reference.

I could write a whole separate article on luminosity masking and exposure blending in Photoshop, but I’m going to try to keep things simple here.
Essentially, what Photoshop is doing with Apply Image is creating a black-and-white version of your photo. Then, it will use these lighter and darker tones of grey to decide what to keep and what to remove.
In simple terms, all the light grey to white will be selected as your sky from your brighter exposure, and the darker greys to black from your top exposure will not be selected.
Click OK and watch as your two shots are blended together. If you find the image looks a bit flat or lacking contrast, then we can fix this in a number of ways:
- Reduce the opacity of your top layer. This will bring back more detail from your base (brighter) exposure.
- While holding Alt or Option, select the white layer mask. You will now see your image go black and white. Hold Control or Cmd + L to open a Levels dialogue box. Essentially, what we are doing now is adjusting the mask that Photoshop created on our images. Sometimes, Photoshop will create too general a mask. By this, I mean a mask that is affecting both our sky and our foreground when we only want it to affect our sky. By bringing the midtones (middle) slider along to the right, you will see the shadows and midtones get darker. Whatever is white to light grey in the photo will now be selected in the mask.


When you click OK, click on your top exposure, and it will go back to color. You should see a difference; if not, then reduce the opacity of the layer to find a balance.
Remember, there is a white mask on your top exposure. So if you select your brush tool and set your foreground color to black, anywhere you paint on the photo will remove that white layer mask.

We covered this in tip number 3 – Masking. So if areas of your foreground have been affected, simply paint them out. Easy!
6. The Orton Effect
I’m sure if you are a landscape photographer, you have heard of the Orton effect. It is that dreamy glow that you might see in woodland or waterfall images.
I use it on my skies if I want to create a soft glow coming from the sun or some nice diffused light. It is a great tool to master and simple to do.
Orton in Photoshop is done by using the Gaussian Blur filter. I must warn you, this is to be done quite subtly. It will decrease detail in your photograph, so unless you want the whole image to turn into a dreamy pile of mush, then pay attention.
I personally love using Orton in foggy woodland scenes. Take the image below, for example. I’ve included a side-by-side of no Orton vs. Orton.
To create this effect:
1. First, duplicate your layer. We covered this in an earlier tip, but a shortcut is Ctrl or Cmd + J.

2. Rename your new layer “Orton.”

3. Go to Filter > Blur > Gaussian Blur.

4. A dialog box will open; here, you will select the amount of blur you want. I usually select 24; that is the megapixel of the camera I use. You don’t want to go crazy here, trust me.
5. Click OK, and yes, your photo now looks like a dreamy pile of mush. However, using our very helpful layer opacity slider, we can reduce it right down. I typically have it set to 20% opacity.
6. Now you’ve created a dreamy scene!

Again, remember our lesson on masking. If there are areas you don’t want affected by the Orton effect, then put a white mask over your Orton layer and, using a black brush, simply paint them out.
This is particularly useful for landscape shots where you might only want to apply Orton to a sky or sunset and keep your foreground nice and crisp.
Read more: How to Use the Orton Effect
7. Smart Objects
My last tip for you in Photoshop is a very important one. This will make your editing workflow much easier in terms of control and fixing mistakes in your edits.
Using smart objects allows us to go back into the particular adjustment or filter we have used and make changes to our liking.
Yes, we can do this by adjusting opacities; however, smart objects are like an undo button without deleting the entire edit.
Let me show you.
Below, I have applied the Gaussian Blur filter to my photograph. I go through the process as explained in the last tip; however, I am not happy with the amount of blur. I want to reduce it, but I want to do this in the filter box itself, not the opacity.
However, I cannot because I did not make the layer a smart object. It is still a regular layer.
By turning my Orton Layer into a smart object, the filter applied to that layer will be visible below it, and you can double-click that filter to re-open the adjustment box. This is not possible with regular layers.
So it is smart, if you are doing filter adjustments or working in Camera Raw, to make the active layer a smart object.
That way, you can go back in again and again to make adjustments, which would otherwise not be possible if you kept it as a regular layer. This is known as a non-destructive workflow.
I have attached screenshots below which show what a smart object layer looks like.
As you can see, my Orton layer is just a normal layer, and I cannot adjust the amount of Orton applied without using my opacity slider.

Here you can see the “convert to smart object” button when you right-click on the layer. This should be done before applying the filter or adjustment you wish to make.

Now that the layer is a smart object, any filter I apply will be attached below that layer along with a white layer mask. By double-clicking the Gaussian Blur layer, it will bring me back into the Orton preview box where I can reduce or increase the amount of Orton in my image.

I mentioned Camera Raw above. This is basically the raw photo editor built into Photoshop. It is almost identical to Lightroom, so if you wish, you can edit a whole image between Camera Raw and Photoshop.
You can find Camera Raw by clicking Filter > Camera Raw Filter.
Go ahead and make whatever adjustments you wish, then click OK. Photoshop will bring the edited image back into its window.
However, if you have not made the layer a smart object, then you cannot go back into Camera Raw to adjust your sliders; they will be reset back to their original position.
Yes, the edit will still be as you left it, but the sliders will be set back to their original state. So you would end up doubling your work.
However, once the layer is a smart object, you can double-click the Camera Raw filter in the layers panel, and all your edits will be saved and left as they were. Again, I’ve attached some screenshots to illustrate my points.
Below is my image before Camera Raw edits.

Below is inside Camera Raw with some minor adjustments made. Note the position of the sliders.

However, when I click OK and then re-enter Camera Raw, the sliders have been reset as the layer was not a smart object. The edit remains, but the sliders have been reset.

Once you make the layer a smart object and begin working in Camera Raw, your edits will be saved, and the sliders are kept in the position you left them along with any local adjustments made like radial and grad filters.

Just double-click on the Camera Raw filter in the layers panel.
In conclusion
You may have noticed I did not go into much detail on basic landscape photo editing such as shadows, highlights, exposure, etc. That is because all those can be achieved in Lightroom.
This article’s goal was to introduce you to some key tools which I use in my Photoshop workflow each week, and these are tools which, as of yet, are not possible in Lightroom.
I will admit that Lightroom is catching up; it has fantastic new masking features, and its HDR blending has vastly improved from previous years. However, Photoshop still has the upper hand in terms of control with your edits.
When I edit in Photoshop, I really feel like I’m a painter with a canvas, creating and manipulating the image with every click of the mouse.
If that’s not for you, then I understand, but trust me when I say that some of the best landscape photographers in the world are using Photoshop in their editing workflow.
Thanks for reading, and I hope this has been helpful and insightful.


