
How to Use Focus Stacking for Landscape Photography

Focus stacking in photography is a term you’ve likely heard before when discussing sharpness in landscape photography.
Most of the time when shooting landscape photos, one of the technical goals is to capture tack-sharp detail throughout your composition.


However, whilst some high-quality modern lenses allow us to go beyond f/16 and still achieve a sharp result, there are many times when the depth of field is simply too great to capture in a single frame.
To overcome this, we can employ the technique of focus stacking in the field and in post-processing.
Read on to learn how (and when!) to create landscape images that are sharp and finely detailed from the immediate foreground all the way to the far background.
Read more: 8 Best Lenses for Landscape Photography
What is focus stacking
Have you ever tried to photograph a compelling scene with great dimensionality, only to have either the foreground or the background appear soft and out of focus?
This generally means that the depth range of objects within the composition is too far apart for the lens to capture in one image.
Rather than increasing your aperture to f/22 and beyond, risking softness from lens diffraction and reducing image quality, we can instead bracket focus points on different areas of the image.

These separate frames with focus progressing further into the image are then merged together later in post-processing, either manually in Photoshop or automatically with a program such as Helicon Focus.
If this process sounds familiar, it’s because this technique is essentially the same as exposure blending or HDR but applied to focus instead of exposure.
It’s the concept of using multiple frames and software editing to overcome limitations of the gear that we take photos with.
Read more: Where to Focus in a Landscape Photo
How and why focus stacking is useful to landscape photographers
There are many common use cases for focus stacking in landscape photography.
While more creative interpretations of the landscape may experiment with shallow depths of field, traditional and fine art approaches to this genre of photography generally aim for sharp detail throughout the image.
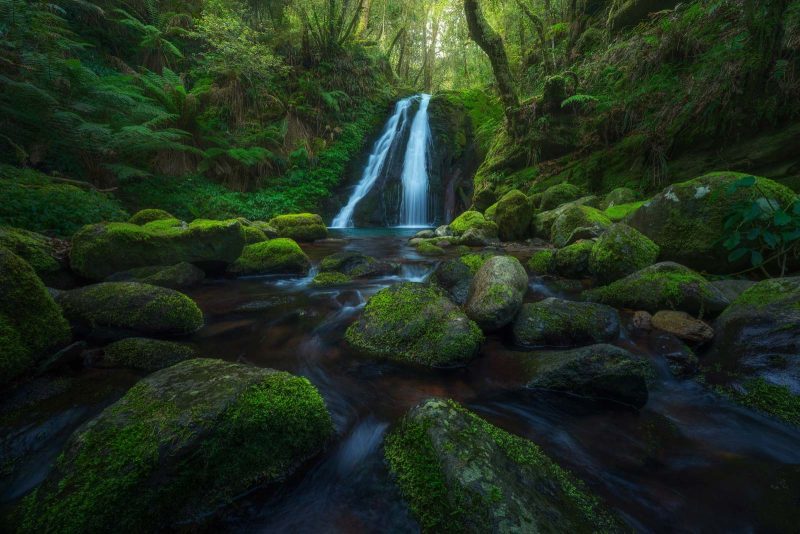
A very common style in landscape photography is near-far composition. This utilizes a foreground interest of some sort, with its proportions often exaggerated by close lens proximity and a wide angle, and a subject or point of interest in the far background.
Some classic examples of this would be a patch of wildflowers with a glaciated mountain, or foreground water flowing through rocks and a sea stack behind it.

This sort of composition often requires a focus stack to capture everything in focus due to the sheer depth of field present in the frame. Focus depths frequently ranging from 1 foot (or less!) through to infinity will need to be covered.
Telephoto compositions also often need meticulous focus stacks if the subject isn’t on the same plane of distance. These can deceptively be even more pedantic than wide-angle compositions.
Be careful to zoom in and check when you’re capturing something at a long focal length when the entire frame isn’t all in the far distance.
Read more: Landscape Composition – Using Foreground to Create Depth
When a focus stack isn’t necessary
While focus stacks are a great technique for achieving sharp results and overcoming a lens’s limitations, they are not necessarily something to apply to every image.
Sometimes getting experimental with shallow depths of field can work really well for certain subjects.

For example, deliberately capturing a charismatic tree amongst a chaotic rainforest at f/4-f/5.6 will create a subtle blurring of the foreground and background, helping it to stand out amongst its environment.
Compositions that capture a consistent plane of distance, i.e., 90 degrees to a flat subject, also commonly do not need a focus stack.
This is due to the simple fact that a single exposure at anything above f/8 will typically cover any slight variations in depth of field, making focus bracketing totally unnecessary.
How to focus stack
As previously mentioned, focus stacking involves blending multiple points of focus together. Whether you’re manually focusing or auto-focusing here depends on your camera and its functions.
On my Nikon Z7II, I can tap the part of the screen I’d like to begin focusing on and apply the automated focus bracket function.
On my old Nikon D810, however, I had to zoom in on the screen and fine tune the focus ring manually, progressively taking individual exposures by hand.
Just use the appropriate approach for your own setup – the principles of the technique apply to whatever methodology you use here.
When focus stacking, I find it easiest to start at the point of the composition that is closest to your camera.
Once you’ve taken that first frame, you subtly move the focus forward until there is still enough overlap with the previous frame to blend seamlessly later.

Continue with this process until you’ve captured an image with the furthest background point in sharp focus.
Be sure to double check that you have overlap between each of these frames. Not doing so could result in lines of blur between your focus points.
Once again, whether you’re doing the frame-capture process by hand or with an automated function will depend on your camera set up; either way, you should be zooming and checking you’ve captured the right frames for the scene.
Once you’ve got the necessary frames, the next step takes place in the digital darkroom.
Photoshop does have a focus-stacking option (“Auto-Blend Layers” under “Edit”), but it is far from perfect and is susceptible to leaving little patches of softness where it hasn’t done a great job of putting the stack together.
For years, I actually manually blended my focus stacks in Photoshop using layer masks and a hard brush. This worked for the most part but became a long and arduous process for complicated blends, resulting in occasionally sloppy results when I simply got sick of the process.

The easiest – but more expensive – way to blend your focus bracketed frames is to purchase a dedicated program for that exact function.
I now use Helicon Focus, which does a great job even with very complicated scenes that I would have greatly struggled with if I had attempted them manually.
However, they are yet another program with costs associated, so it’s worth weighing up whether the purchase is worth it for your needs.
Challenges with focus stacking and equipment and settings to overcome them
It goes without saying that one of the most important pieces of equipment for a focus stack is a tripod.
A basic stack can be done without one if the photographer has a stabilized camera and can hold it steady. However, it is undeniably easier to use this technique when there is zero movement between frames, which a tripod guarantees.
Be sure to keep the tripod in the same position throughout capturing your necessary frames so there isn’t any misalignment (though, if there is slight movement, you can auto-align them in Photoshop to help with this).
If your composition only consists of static (non-moving) objects, then what shutter speed you use doesn’t matter too much.

This means that when the light is dim, you can still shoot at a higher aperture to reduce the number of frames you need to capture in your focus stack.
To compensate for the low amount of light hitting the sensor due to the narrow aperture, simply extend your shutter speed to capture a well-exposed frame.
When there is wind and non-static objects in your composition, such as flowers or foliage, things can get a little tricky.
Since there is movement between frames, you want to shoot at an aperture high enough to capture these elements and what is behind them in as much focus as possible, as well as a shutter speed fast enough to freeze the detail.
This way, you won’t have to deal with ghosting and blurriness in your final focus stack. However, this often means increasing your ISO to compensate, which requires you to apply some noise reduction techniques in post-processing.
A commonly used approach in these tricky situations is to capture the base image at a lower ISO, then capture your necessary frames that use higher ISO for a faster shutter speed.

Once you get to Photoshop, you can then blend in where motion blur has caused issues. This way, only small parts of the photo are dealing with higher noise rather than the entire image.
Forests can be an especially tricky environment for focus stacking. Along with the challenges mentioned above, since there is so much foliage around, the many small details of the forest can be focus stacking’s biggest foe.
Near your camera may be a small, narrow stem, with only far background behind it, creating a large gap in depth of field that is very fiddly to work around.
You’ll want to utilize an aperture as narrow as the scene allows so the depth of field covered is maximized. Programs such as Helicon Focus really shine here and will save you a lot of time when you get to the blending stage.
Read more: How to Choose the Right Tripod
In conclusion
Just like any other technique in photography, focus stacks are a great tool to have on your tool belt to utilise when necessary.
The extent that you apply it to your own images will depend on your own artistic approach; however, as you can see, it’s a great way to work around the inherent limitations of our cameras and lenses.
I utilise focus stacks frequently for my own landscapes and have found them an invaluable technique for improving image quality and detail in countless situations. I hope this has helped for your own future photos when you’re dealing with similar situations!


