
How to Master Dynamic Range in Landscape Photography
Dynamic range in photography is a term you’ve likely heard before when discussing high-contrast scenes with other photographers, or perhaps you’ve read it when looking into a new camera to buy. But what is dynamic range, and how can it help our photography?
Understanding the concept, and utilising dynamic range is an essential part of the photographer’s toolkit.


I’ll start off by establishing what dynamic range is, and then run through techniques to master it in the field and in post-processing.
What is dynamic range in photography?
Dynamic range describes the contrast ratio between the minimum and maximum light values that your camera’s sensor can capture – essentially white and black.
A high dynamic range scene has exposure values spread all the way from the dark side of the histogram to the bright side. It can even go beyond what the histogram can capture; in other words, a scene with lots of naturally occurring contrast in luminosity.
On the other hand, a low dynamic range scene is much flatter in contrast and has a limited spread over the histogram.

Dynamic range is measured in stops; each stop indicating a doubling of the level of brightness captured. The human eye can see over 20 stops of dynamic range and rarely encounters true white or black. However, our cameras are more limited. Even the most advanced sensors today only reach about 15 stops (which is a tremendous leap from fifteen years ago).
This does mean that some cameras are better than others at capturing a high dynamic range within a single raw file. Nikon and Sony sensors tend to perform best, though Canon has just started to catch up after many years of lagging behind.
A sensor with 15 stops of dynamic range, for example, can capture a wider range of luminosity values between white and black than a sensor with only 12 stops.
This is a factor to take into consideration when looking to buy a camera if you’ll be doing work that requires recovering shadow or highlight details frequently.

Understanding both dynamic range and your camera’s ability to retain or recover detail is an essential piece of knowledge for any photographer.
Due to our camera’s inherent limitations, we must employ certain techniques both in the field and in the digital darkroom to recover the full dynamic range of a scene.
Techniques to master dynamic range in the field
The most important skill to have for mastering dynamic range is being able to read the histogram.
I’ve already mentioned this a few times; if you’re unfamiliar with what the histogram is or how to read it, I recommend reading this article for a better understanding.
For a very brief explanation: you can check the sides of the histogram to see if the photo’s exposure values are clipping (losing detail) on the right (white) or left (black).
E.g., if the histogram is pushed up against the right and has room on the left before it starts to clip the blacks, you should darken your exposure until neither whites nor blacks are clipping.
If you’d like a handy tool to remind you, most modern cameras have a function to show an LCD preview where bright values have started to clip in your exposure. If you cannot capture the scene without either the blacks or whites losing detail, then you will need to exposure bracket.

Before I explain exposure bracketing further, it is worth noting that the histogram as displayed on the camera is not fully accurate to what has been captured by the raw file.
Often a histogram of a raw file that shows clipping on the back of the camera can have plenty of detail recovered in post-processing.
Dark areas especially retain detail much better than highlights. So, if you’re in a pinch and don’t have time to exposure bracket, you should expose your image to the left of the histogram, whilst planning to recover those shadows later in editing. However, it’s better to exposure bracket for a cleaner result.
This is because raised shadows in editing are more likely to introduce grain. Exposing to the right (brighter) also means more grey tones are retained. This leads to higher quality colour and tone gradation, making muddy tones and banding less likely.
Exposure bracketing is the technique of capturing multiple frames of the same scene with different exposure settings, with the intention of blending them together later to overcome high dynamic range limitations.
Ten years ago, it was often necessary to require four, five, or even six images to fully capture high dynamic range images (depending on the scene and camera). But with modern sensor technology, you’ll find only two or three will do the trick.

When bracketing exposures be sure that you’re using a sturdy tripod to ensure perfect alignment between the different frames. While post-processing software can align movement between frames to a degree, you want to make sure to avoid trouble with blending later as much as possible.
Exposure bracketing can be done automatically or manually. Your camera will have a function to set up an automatic bracket; you can set how many exposures you want and how many stops of brightness you’d like between each one.
It’s important to make sure in camera settings that this function only varies shutter speed. You don’t want aperture or ISO to change between bracketed exposures.
Let’s say you set it to 3 exposures, with 2 stops of difference between each one. Using a self-second timer, your camera will automatically capture the average exposure, an exposure 2 stops darker, and an exposure 2 stops brighter.
Functionality may vary between cameras, but you should be able to change from 2 exposures all the way to 5, or even higher, and from half a stop to 3 stops of exposure difference.
To exposure bracket manually, it’s simply a matter of increasing or decreasing your shutter speed. You can use your LCD preview and histogram to make sure you’ve captured the targeted exposure values without any clipping. This allows you more control and ensures you’re capturing the full dynamic range of a scene.
Another method for overcoming high dynamic range scenes is the use of graduated ND (GND) filters.

These filters work with a square piece of glass in a filter holder, which is an ND filter in the top half only, so as to darken the sky but not the land. The ND portion of this filter can be of varied darkness and can have a hard or soft transition.
These can be useful but are quite expensive and are slowly becoming outdated due to their limitations, and the advancement of editing programs.
They are limited in that they only work in a linear manner, and don’t account for anything sticking up above the bright horizon. So, if you’re capturing a seascape with a rock stack standing above the sea line, then the sky will be balanced with the land, but the rock stack will now be far too dark.
For the dual reason of saving money and having a lot more control over the final output, I advocate for exposure bracketing over GND filters.
Read more: Bracketing & HDR – Photographing Landscapes Without Filters
Techniques to master dynamic range in post-processing
Now that you’ve got files from the field capturing high dynamic range to the best of your ability, post-processing is where the pieces of the puzzle come together.
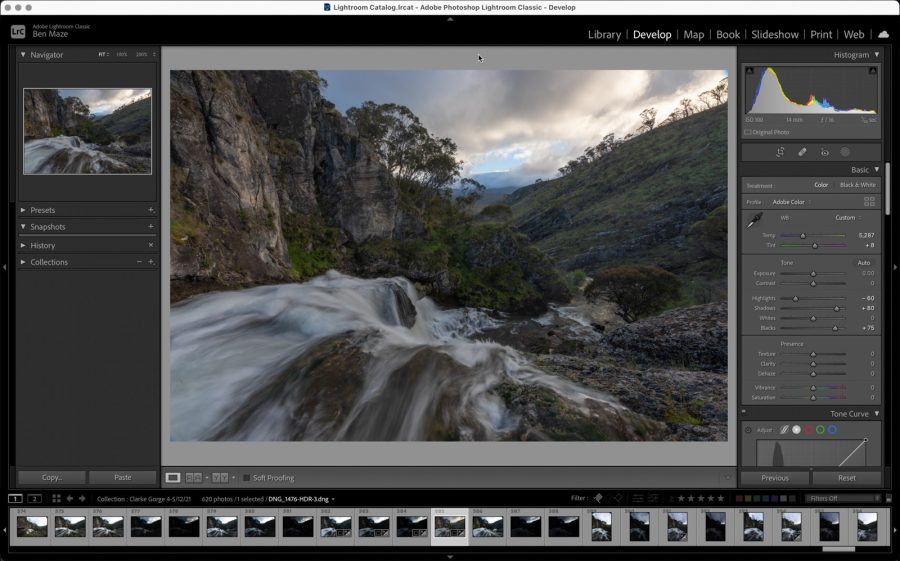
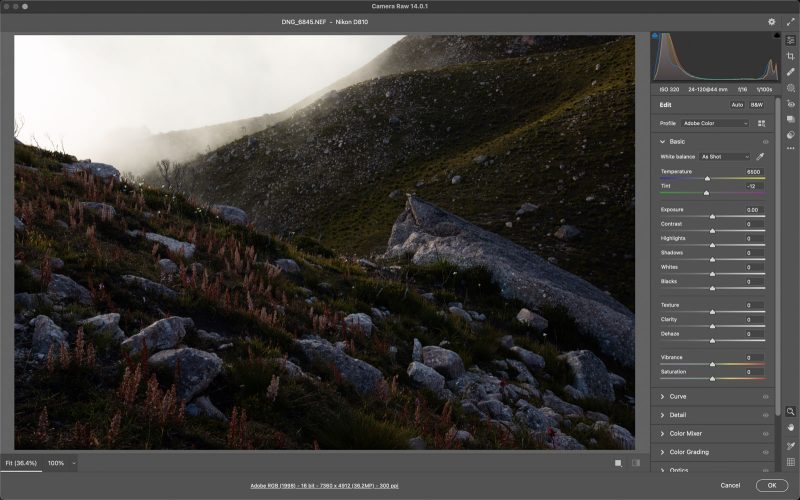
When processing a single raw file in Adobe Camera Raw (ACR) or Lightroom (LR), there are four main sliders that will help bring back detail in the dark and bright areas. These are the highlights, whites, shadows, and blacks. These all deal with different parts of the histogram, as illustrated below.

While the highlights and shadows sliders work somewhat algorithmically, the whites and blacks sliders work with the more extreme points of the histogram.
Raising the blacks slider will raise the point of true black in the image, whereas the shadows slider will raise the dark areas beyond that. And vice-versa for the whites and highlights, respectively.
To recover as much detail as possible from the bright and dark areas of the image, one must bring down the highlights/whites and raise the shadows/blacks.
This is a great way to bring back shadow and highlight details that the raw file captured. Just be careful to not go overboard on this adjustment, as it can look rather garish if pushed all the way.
If this adjustment flattens the contrast too much, you can bring some back by lowering the overall exposure a bit and raising the whites slider to compensate. Hold down option/alt to find the point where the bright areas start to clip and avoid going that far.
Check out the histogram in the unedited versus ACR-adjusted image below, along with the adjustments made.

When dealing with bracketed exposures, you will have to now blend those frames together to capture the full dynamic range of the scene.
This is frequently required for scenes like bright sunrises or sunsets, where the camera is pointed towards the light source. It can also be required for other scenes such as waterfalls, where the white water is bright but the shadows are quite deep.
The easiest method to blend bracketed exposures together is with an automatic HDR (High Dynamic Range) blend. There are several programs out there that offer this automation, however, Lightroom is probably the most commonly owned program out of these.
To merge your exposures into an HDR, select the required frames and right-click on them; in the pop-up menu, navigate to “Photo Merge”.
When hovering your mouse over this, three options will pop up; select “HDR”.
A window will appear with a few options; I recommend taking advantage of the “Auto Align” feature and playing around with the “Deghost” amount until everything looks right. A trick to help with this is selecting “Auto Settings” to give you brighter shadows in the preview, and then deselecting it when merging so you can make your own edit instead.
This will provide you with a new High Dynamic Range image, containing tonal information from all the bracketed exposures you captured.


However, as with any automated process, there are times when the automation doesn’t quite get it right. Sometimes the wrong exposure is used for a dark section, which results in a random grainy patch amongst otherwise clean shadows.
For maximum control over the output quality, blending exposures in Photoshop is the way to go.
The primary method for this is using a technique called “luminosity masks”. These are essentially luminosity (brightness) readings of the brights, darks, and mid-tones of an image, varying from least restrictive to most restrictive.
They can subsequently be applied to a layer mask, blending in only the darker highlights or the brighter shadows from your bracketed exposures. You will need a luminosity mask panel for this method; I recommend the free TK Basic V6 panel. I will be describing the method in line with the functionality of this panel.
To blend exposures in Photoshop, open your bracketed frames as layers in a single document. Place your average exposure on the bottom, your darker exposure above that, and the brighter exposure on top.
Apply a black layer mask to both of these layers and turn off their visibility, so that only the average exposure on the bottom is visible.
Hit the “composite” button in the panel to generate luminosity readings of the lights, darks, and mid-tones of your average exposure. You can then select a mask (e.g Lights 1/2/3 > Selection) that targets the highlights you need to blend from the darker exposure.
If done correctly, this will now show “marching ants” of the luminosity mask selection.
To hide this, go to “View”, and untick “Extras”.
Once you’ve done so, turn on the visibility of the darker exposure layer, and be sure to click on its associated black layer mask. Take a large, soft white brush, set it to 100% opacity, and simply brush over that mask to watch those detailed highlights replace the clipped ones.
You may need to fine-tune the brightness of the darker exposure, so it looks natural when blended in.
When you think you’re finished, hit command/control D to deselect the luminosity mask, and there you have it! You can now repeat the process for the shadows, simply using a “Darks” selection instead of a “Lights” one.
While much more painstaking and requiring some practice, blending exposures utilising luminosity masks provides much more control and a high-quality final output. 

There are times when both HDR blends and luminosity masks will introduce ghosting between exposures.
Ghosting occurs when there is movement in an object between bracketed exposures, which most commonly happens with trees, branches, and leaves.
Both an HDR blend and luminosity mask blend will be unable to blend bright sky through moving branches and leaves without introducing a messy ghosting effect.
The easiest way to get around this is to take the darker exposure and flatten the contrast between highlights and shadows as much as possible, usually by utilising the ACR/LR sliders as mentioned earlier.
Once you’ve perfectly matched the darker exposure’s shadows to those of the average exposure, you can now hand-blend the dark frame in without worry of ghosting.
Naturally, this cannot work if the dark exposure was too dark to properly capture enough detail in both the highlights and the deep shadows, so it’s good to capture a range of exposures in the field if you believe you may have to utilise this method.
In conclusion
So there you have it, a complete crash course in mastering dynamic range!
As a landscape photographer, I utilise these techniques both in the field and in the digital darkroom all the time. However, most of these techniques can be applied to just about any genre of photography and are an essential piece of knowledge for the modern photographer.
I hope this has been helpful, and that you now have some methods to create beautiful images with detail all the way from the deepest shadows to the brightest highlights.


