
8 Post-Processing Tips for High Quality Images
For today’s photographer, posting your images online is the most common way to build a presence for your brand, gain followers, and potentially attract new customers for your work, and so post processing becomes an important stage of our photography workflow.
As most people will be viewing your photos on a small screen like their phone or a laptop, the fine details in the photos you post on the web are important but not absolutely critical.
This is because small imperfections in your files are virtually impossible to see on a small screen.
But what if an interested customer contacts you and asks for a large print of one of your photos? Could you print it with confidence at three feet wide? How about five feet? Or even ten?

In this article, I will share some post-processing tips to create high-quality ‘master files’ for your images, from which you can produce web-sized or print-sized photographs with stunning quality.
But before we begin, it is important to review some fundamentals to be sure that your camera technique is on track before the post-processing begins.
Read more: What are the Best Settings for Displaying Photos Online?
High-quality files start in the field
In order to process beautiful master files, it is critical to start with clean images out of your camera that are in focus, exposed well, and as free from digital noise as possible.
No amount of processing can save an image that is out of focus with blown-out highlights, while excessive digital noise is detrimental for big enlargements.
The following camera settings and techniques will give you a solid start in increasing the quality of your shots in the field.
Always shoot in RAW
To maximize your camera’s sensor capabilities and ensure the highest image quality and post-processing flexibility, it’s essential to shoot in RAW format combined with the largest image area size that your camera allows to make full use of your sensor.
Use a tripod
Combined with a delayed shutter release, using a tripod will aid in keeping your camera as still as possible while shooting to increase image sharpness.
Read more: How to Choose the Right Tripod
Setting your ISO
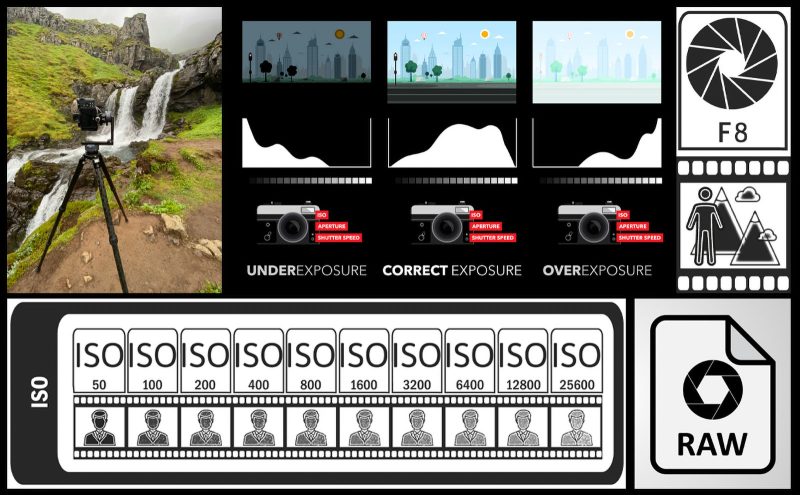
Set your ISO as low as possible for your subject matter. This will produce the cleanest images, virtually free from digital noise.
While most cameras offer a native low ISO setting, like ISO 100 or 64, it’s often possible to reduce it even further.
My camera will go as low as ‘Lo 1.0’, which is the same as ISO 32. This will give you even cleaner RAW files and will not harm or degrade them in any way.
Read more: Choosing the Optimum ISO Speed
Use your sharpest aperture
Every lens has a ‘sweet spot,’ or an optimal aperture that delivers the sharpest image, so test each lens in your bag to find its best aperture and use it consistently in the field.
Focus stacking is often necessary to record multiple files that can be combined later in Photoshop, resulting in a master file that is sharp from the foreground to the background.
Read more: What’s the Best Aperture to Use in a Wildlife Photo?
Use the histogram
Review each shot with your histogram. This will help to avoid over-exposed or under-exposed images.
I also use the ‘ETTR’ principle (Expose To The Right), choosing my shutter speed to push my image data as far to the right side of my histogram as possible without over-exposing the highlights.
Although the ETTR method will make your RAW files appear bright when first opened in Lightroom, you will easily correct them by dragging the exposure slider back down to an acceptable brightness level.
This technique will result in a slightly larger, higher quality file with more data recorded by your camera’s sensor.
Read more: All You Need to Know to Process a Raw File in Lightroom
Building master files
In my personal workflow, I use Adobe Lightroom for all of my RAW processing, then continue my edits in Photoshop for more complex adjustments.
For every image in my portfolio, my ultimate goal is to create a quality master file saved as a ‘PSB’ (Adobe Photoshop Large Document Format), which preserves all of my adjustment layers. This file format allows for almost unlimited file sizes.

At any time in the future, I can re-open the master and tweak my adjustment layers if I wish, without having to re-process the image from scratch.
From a master file, you can then create duplicates that can be flattened, resized, and optimized for web or print output.
The following post-processing tips are somewhat universal and can be applied with most software applications.
For this tutorial, I will be explaining a standard workflow that will allow you to render the highest quality digital master files for web or print, using Lightroom and Photoshop.
1. Set up your digital workspace
Lightroom uses the ProPhoto RGB color space in the Develop module by default, which is the largest color space available. Although this setting cannot be changed, it is beneficial because it allows your monitor to display all of the colors that your digital camera can capture.
There are, however, some settings that we will address to ensure that you are editing in the best digital space once you transfer your images to Photoshop.
In Lightroom, click Edit > Preferences, and in the pop-up window that appears, select the External Editing tab.
I recommend setting each box as shown in the photo below, with the most important ones being Color Space set to Adobe RGB (1998), Bit Depth set to 16 bits/component, and Resolution set at 300.

The reason I use Adobe RGB (1998) is because it is an industry-standard color space that is almost universally accepted by most printers.
Although ProPhoto RGB is a larger wide-gamut space, there are no printers that can reproduce all of the colors that it is capable of displaying on your monitor.
Secondly, the difference is virtually undetectable by your eyes anyway; therefore, it makes little sense to edit your images in ProPhoto.
Next, it is important to be sure you are editing in 16-bit mode to retain all of the data in your image files. This mode displays a much wider range of colors and detail, while allowing you to manipulate your images to a greater degree without causing degradation issues.
Finally, setting your resolution to 300 means that there will be 300 pixels per inch (ppi) in your image file. Again, this is a universally accepted standard of pixel density to produce high-quality prints that are sharp and detailed.
Anything less, especially when you are printing large, may result in lesser print quality.
Read more: Megapixels – How Big Can You Really Print a Photo?
2. Avoid digital noise
The single biggest roadblock to producing a high-quality print is having too much digital noise in your image file. This is why shooting at low ISOs whenever possible is critical because high ISOs can cause color noise, grain, and artifacts.
Any noise will be greatly exaggerated in a print, and the more you enlarge, the worse it becomes.
However it got there, addressing image noise and getting it under control is the very first step you should make when editing your RAW files.
If you forget to take care of it at the beginning, heavy image editing late in the process will often make the noise worse as you go, effectively ‘burning’ the noise into your master file to the point where it is difficult or impossible to remove later.
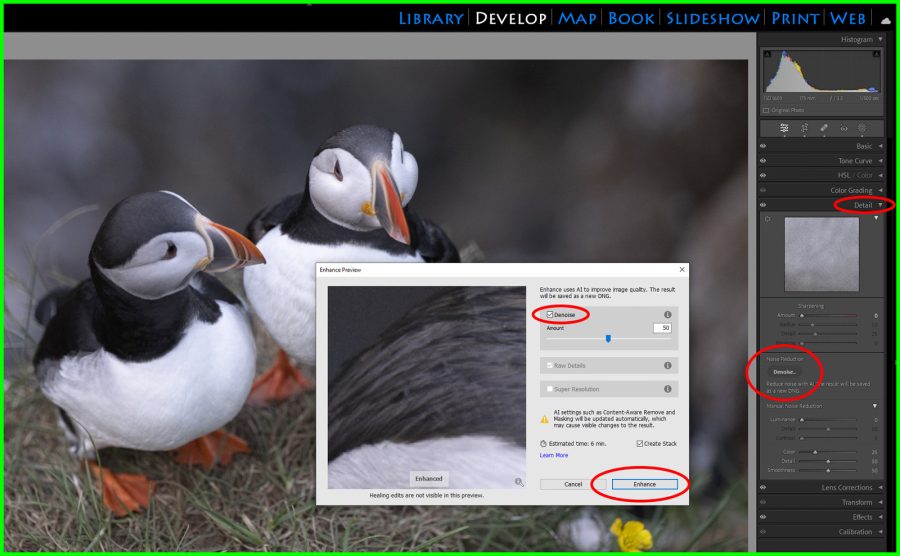
In the new world of AI, there are many third-party software applications dedicated specifically to noise reduction that can do amazing things. But Adobe has recently added one of their own right into Lightroom.

In the Develop module, start by opening the Detail panel and turning OFF the Sharpening slider to zero (any sharpening here will only exacerbate the noise – we will talk more about this later).
Then, click the Denoise button, and a pop-up window will appear. Make sure there is a check mark beside Denoise, then adjust the strength of the filter by moving the Amount slider to where it looks good to you and click the Enhance button.

After Lightroom has done its thing, it will save the ‘denoised’ version as a new DNG next to the original. This new version is the one you will use to continue your editing.
Alternatively, you can use the classic Luminance slider to manually reduce noise, but use it sparingly on detailed images. Pushing it up past 30 will soften your photo to the point where it begins to look mushy.
Read more: How to Reduce Noise in Photos in Lightroom
3. RAW sharpening, chromatic aberration, and sensor dust
Sharpening your RAW files is referred to by many names; RAW sharpening, capture sharpening, deconvolution sharpening, and the list goes on.
In the Detail panel, Adobe has their Sharpening slider set to 40 by default, with Radius at 1.0 and Detail at 25.
Unfortunately, these settings will do nothing except make any noise in your image even worse. It has been my experience that 95% of the time, you are better off leaving this slider set to zero.
If you have a super clean file with next to no digital noise, RAW sharpening can actually increase your final print quality by a small percentage, but only if used very carefully.
Slide your Radius all the way to the left (0.5), set your Detail to 3, then your Amount slider can go all the way up anywhere from 100 to 130. These settings will apply sharpening to only the finest details to ‘tighten up’ the image slightly.
But if you are inexperienced or unsure, leave it set to zero, as sharpening can always be applied later.
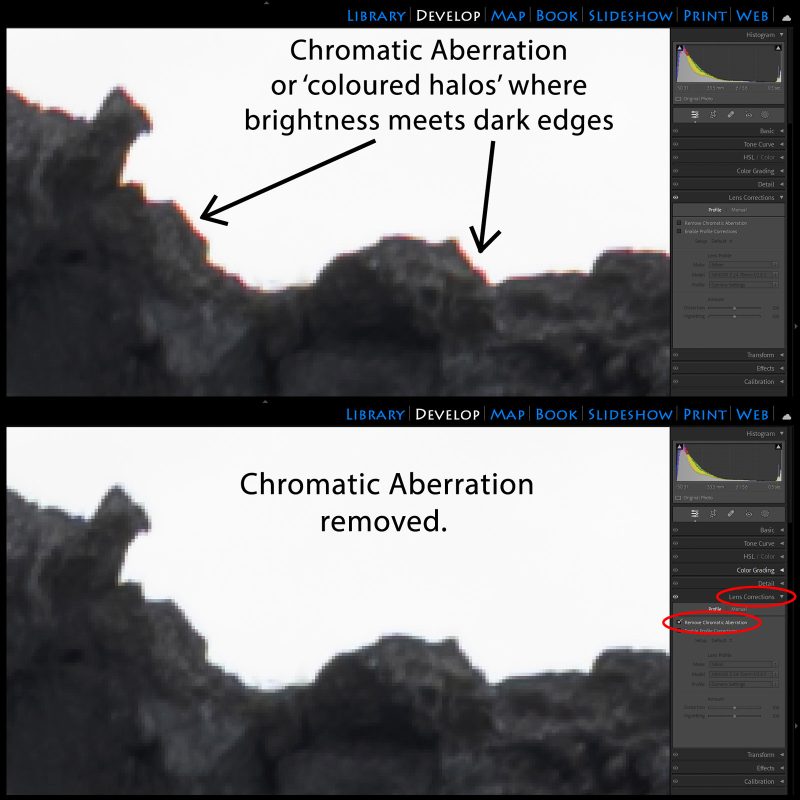
Chromatic aberration can be described as ‘colored halos’ or outlines of unwanted color along the edges of objects that often occur in high-contrast areas, for example, where a bright sky meets dark land.
These halos become highly visible and unsightly in large prints, so it is important to remove them. There is an easy way to eliminate this, by opening the Lens Correction panel and turning on the Remove Chromatic Aberration checkbox.
I recommend customizing your Lightroom workspace so that these settings are already done by default, and you’ll never have to worry about forgetting them. There are countless tutorials on the web that show how to do this.
Finally, don’t forget to carefully scan your images at 100 or 200 percent zoom to check for sensor dust spots, which are especially noticeable in skies.
The Healing tool (its icon looks like a band-aid) is made for taking care of these, and when activated, a ‘Visualize Spots’ checkbox appears at the bottom of the screen that you can also turn on, which helps you find them.
Read more: How to Sharpen Photos in Lightroom
4. Be careful with Lightroom tools
While Lightroom is an incredible RAW file processor, there are a few tools inside that can quickly degrade your images in a hurry if you get too heavy-handed. In no particular order, here are the biggest offenders:
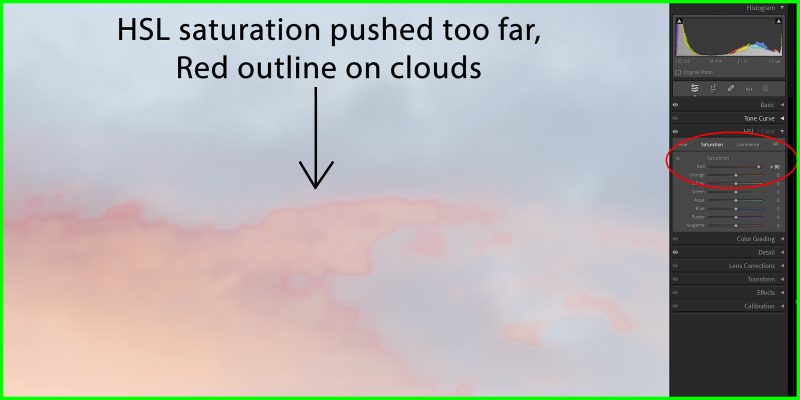
• HSL sliders (Hue, Saturation, Luminance) are very ‘selective’ and can quickly destroy tonal graduations, especially noticeable in colorful skies where ugly ‘banding’ or ‘outlines’ around clouds will occur very easily. Be especially watchful when using any of these sliders.
• Clarity can be used to tighten up details in an image, but overuse can exaggerate or even introduce noise. I rarely push it above 10 or 15 points.
• Vibrance and Saturation are very sensitive global adjustment sliders that will quickly oversaturate your image with unnatural colors. There are countless other methods for targeting specific colors in your image in a much more controlled manner, so I tend to avoid using them at all.
• Sharpening and Luminance are to be used with caution, as we discussed, to avoid enhancing noise or softening your image too much.
In general, I recommend paying careful attention to what any slider is doing to your image by occasionally viewing your photo at 100 percent zoom or higher and clicking the ‘eyeball’ on and off for each adjustment panel. Viewing the details up close will often reveal if you have gone overboard.
Read more: Editing Your Photos: How Far Should You Go?
5. Use your histogram
Your histogram will quickly tell you if there are any tonal values in your image that are ‘clipping.’ This includes highlights that are too bright, shadows that are too dark, and colors that are too saturated.
Any areas of an image that are clipping have lost all detail and will show up as pure white, pure black, or a solid color in a print.

Be sure to turn on the little arrows in the top left (shadows) and top right (highlights) of your histogram. Any shadows that are too dark will turn blue, and any highlights that are too bright will turn red.
In general, try to leave a little space and avoid cramming your image data up against the left or right edges of the histogram. If you are unfamiliar, there are numerous tutorials on the web that can explain how to read your histogram.
6. Take advantage of RAW
The beauty of processing your images as fully and as close to your final vision in Lightroom is that you are working directly on the original image data non-destructively.
You cannot harm your original file, and you can go back at any time to change or undo any of your edits and settings.
The increasing number of tools available in the Develop module makes it a very powerful program, even allowing very localized adjustments using masks, gradients, and brushes.

But as good as Lightroom has become, there are many complicated post-processing adjustments that are only possible in Photoshop.
This is why it is important to proceed with a very intentional, non-destructive workflow when transferring our images into Photoshop so that we are not compromising the quality of our original file.
What is the best way to continue editing in Photoshop? By converting our file to a Smart Object.
7. Smart objects
When you feel you have done as much to your image in Lightroom as possible but still wish to enhance it further, it is easy to move your RAW file over to Photoshop while keeping all of your edits intact and accessible.
While hovering your cursor over your image, simply right-click, then choose Edit In > Open as Smart Object in Photoshop. Your RAW file will then open in Photoshop automatically in the Layers panel, denoted by a small icon on the bottom right edge of the layer thumbnail.
The types of Photoshop adjustment layers that I commonly apply over my Smart Object may include curves or levels adjustments using luminosity masks, dodge and burn layers for enhancing light with color, a cloning layer for cleaning up distracting elements, and a targeted vignette layer just to name a few.

If you feel at any time that you need to go back to your RAW file to tweak an adjustment, you can double-click your Smart Object, and it will open in Camera Raw, which is the identical engine as Lightroom, albeit with a slightly different interface.
And this is the beauty of Smart Objects – all of your original adjustments are intact just as they were before you left Lightroom. You can make any changes that you wish, then click OK to save them.
Before piling on too many adjustment layers in Photoshop, ask yourself first if the same edit can be achieved in Camera Raw.
If the answer is yes, you are better off opening your Smart Object and working directly on your original data in the RAW file instead of adding unnecessary Photoshop layers. This practice will keep your final master file as clean and high quality as possible.
8. Saving your master file
When your image is complete, you are now ready to save all of your edits as a master file. To keep things tidy, I prefer to nest all of my adjustment layers in a Group.
Click the adjustment layer at the top of the stack to activate it, then while holding the Shift key, click the layer at the bottom of the stack.
This will activate all of the layers simultaneously. Then use the keyboard shortcut Control (PC) or Command (Mac) and click the letter ‘G’. This will create a new Group with all of your adjustment layers inside. I then rename the Group layer ‘All Adjustments’.

Click File > Save As, and a new window will appear. In the bottom left beside ‘File name:’, give your file a name that includes the words ‘Master File’, and under the ‘Save as type:’ drop-down menu, choose ‘Large Document Format (*.PSB)’.
Be sure to open the hard drive and folder where you want to save it, then click the ‘Save’ button in the bottom right of the window.
Your new master file can now be re-opened at any time in the future if you wish to change any of your edits and re-saved under the same name or a new one.
I sometimes do this when new technology arises, such as the new Denoise feature, for example, so older masters can be improved upon.
If you wish to post your photo to the web, simply open the master in Photoshop, then click Image > Duplicate, which will make an identical copy.
This copy can be flattened, changed to 8-bit, resized using 72 ppi as the resolution, sharpened, and converted to the sRGB profile for the web. Save it under a new name.
Similarly for printing, the master is opened, and a copy made which can be flattened, upsized, and sharpened using your own protocol.
In conclusion
Having the ability to print any of your images at unimaginable sizes all starts with making sure you have the best quality RAW files possible.
This all begins in the field by incorporating sound shooting techniques for capturing well-exposed, sharp, and clean images in-camera.

By implementing the post-processing techniques outlined here to edit non-destructively while creating master files for each image in your portfolio, you will gain the confidence of consistently delivering high-quality web images and prints for your customers.
Take the time to make your photography the best it can be, and be proud of your hard work. The results will speak for themselves.


