
How to Sharpen Photos in Lightroom
Lightroom comes with some great sharpening tools to really give your photos impact. As a rule; sharp, clear photos are much more desirable than blurry soft ones. However, sharpening an image too much will result in something called Over-sharpening. This is when too much sharpening has been applied, resulting in ugly harsh lines around edges, sometimes referred to as halos. Images that appear too textured have usually become susceptible to over-sharpening. Blocky pixels and artefacts are another side effect of too much sharpening. Also, it’s worth noting that most sharpening is done across the whole image, so if you have an image shot at a higher ISO which resulted in noise, the sharpening will also increase the visibility of the noise. The software sharpens an image simply by increasing the definition between edges found in the image. We’ll come to how to handle this and knowing what, and more importantly where, to sharpen in this tutorial.
Extra Reading: All You Need to Know to Process a RAW File in Lightroom


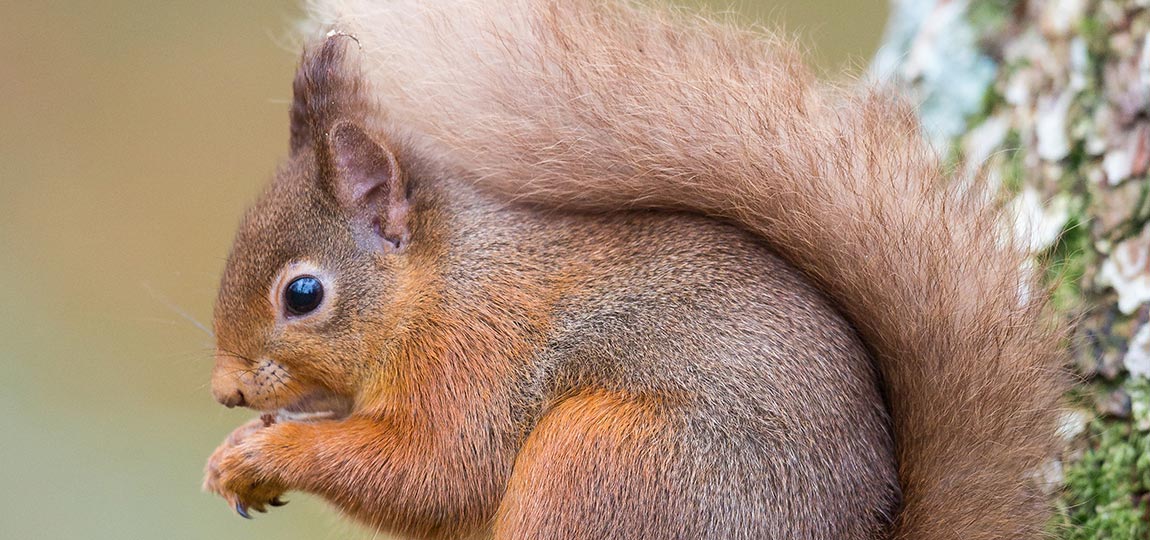
Here we have our original image: a RAW file downloaded from the camera and imported.

Then, using the techniques we mentioned in my RAW Processing tutorial, I’ve done a simple process of it. The main adjustments being: corrected white balance, contrast, clarity and vibrance.

On the right, scroll down and open your Detail panel – making sure the 1:1 preview window is expanded, and then click on the detail view button and click on the eye (or the main point of focus on your image).

Let’s go over what we have to play with. The Sharpening Tool is split four settings as follows:
Amount
This is the amount of sharpening you want to apply to the image. 0 means no sharpening, and 150 means full sharpening. On default it is set to 25. There is no magic number for every image, but I’d go for around 50 or 60 most of the time. Remember though, that increasing the sharpness will also increase the noise across the scene.
Radius
This is a number relating to the size of sharpening around each edge of the image. The default is set to 1.0, meaning that Lightroom will apply its sharpening over 1 pixel on each edge it finds. Increasing this value increases the spread where sharpening occurs. Generally, I have this at around 1.2 figure.
Detail
This tells Lightroom to apply the sharpening on the main details of the image, i.e. a lower value only sharpens larger edges in the scene, whereas a higher number will apply the sharpening to every edge. This is specifically useful for close ups of birds and animals where you can enhance the appearance of each and every hair and feather. Again, don’t go too high with this as it will boost any noise visible.
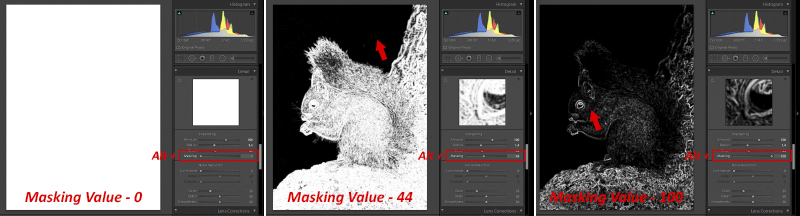
Masking
Masking is probably my favourite part of the sharpening toolset. This dictates where and what to sharpen across the scene. As many of you out there strive for clean backgrounds with your wildlife portraits the last thing you want to do is enhance any camera noise in those lovely backgrounds. Moving the slider up will only apply the sharpening to the main detailed parts of the scene, leaving the backgrounds, or out of focus, less defined parts, un-touched. A very useful tool to use!
Further Reading: Selective Sharpening in Adobe Photoshop
Tip: Using the 1:1 preview throughout this tutorial will give you a better idea of the changes you make and seeing real-time, how they will affect your image.
Pushing the sharpening up to 100 can make a massive difference.
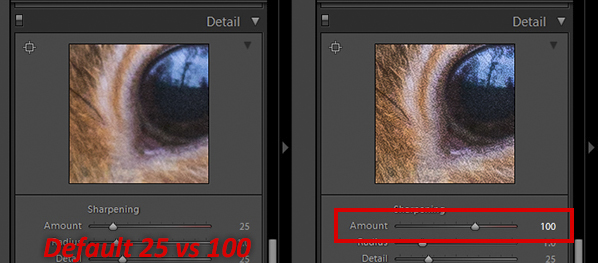
However, this is just to show the effect it can have, so for something more subtle we’ll reduce it down.
As you learnt in my Basic Raw Processing tutorial, there’s a handy magic button in Lightroom and it can be used in the Detail panel too! Holding down the Alt/Option button on your keyboard and clicking a slider turns the preview black and white. This is really handy in letting you see what is being changed.


In both of the above, with the Radius & Detail values boosted it’s really helping now to bring out some definition in the Squirrel’s fur.
Again, when using the masking slider, holding down the Alt/option is a fantastic way to see where the sharpening will be applied. Don’t go too far with it though, as you’ll start to mask off the subject where you want the sharpening applied. This will help to sharpen your scene, but not sharpen the out of focus parts where noise may be present.
It’s all about reaching a “Goldilocks” standard of sharpness. You don’t want it to appear garish, over-done or ugly, but you do want to bring out the clarity and definition of your photos whilst at the same time keeping those backgrounds clean.
As you can see, with just a few tweaks and a few minutes later it’s made a huge difference to the image!


