
How to Use Focus Stacking for Studio Macro Photography

Please be aware that only specimens that were found dead have been collected and photographed in the examples of studio images in this article, and it is important that this rule is followed if you would like to attempt this type of photography.
Focus stacking is a photography technique used to compensate for limited depth of field. This involves taking a series of photos of your subject while adjusting the focus through different focal planes, and later rendering that series down to a single image.


Each photo is a sliver of the full image. In landscape photography it can be subtly used to ensure the foreground detail pops just as well as the background. Likewise, in portrait photography it can be used to make your subject’s features superbly crisp, front to back.
In macro photography, where your depth of field can be limited to fractions of a millimetre regardless of your aperture, focus stacking can become an absolute necessity.
To match the level of image sharpness that comes naturally at other focal distances, a large quantity of photos must be taken at a wide aperture. Remember that aperture has an inverse relation between your depth of field and image quality.
Learning how to do this in a studio setting offers the advantage of specialised tools and programs designed to help you create ultra sharp macro images.

For the purpose of this tutorial we will go over the essential equipment for a macro studio, explain how to use the programs that streamline this process, and explore how this method will optimise your workflow.
Read more: How to Take Ultra Macro Insect Photographs
Studio vs. in the field
Every style of photography has its associated list of pros and cons when it comes to implementation. For focus stacking in the studio vs. in the field, you are exchanging your ability to shoot subjects out in their natural habitat, for greater control of your photo’s set and settings.
Having both your camera and subject on fixed mounts greatly reduces the chance of unintentional movement that may otherwise throw off your sequence. It gives you full choice with regards to the subject’s angle and orientation, and enables you to set up off-camera lighting however you please.

Managing these factors will lead to consistent and repeatable results from your shoots, and ease of mind that you can try again if results are not to your liking. However, compared to focus stacking in the field, the studio set up can take longer to arrange each time, and extra gear is required.
Read more: How to Focus Stack Macro Photos in the Field
Macro studio must-haves
Here is a list of the essential equipment you will need:
1. Your choice of camera, plus a macro lens capable of 1:1 magnification (or beyond!).
2. A rail system: either a manual focusing rail or an automated focus stacking rail, from companies such as We Macro or Cognisys, sometimes referred to as a ‘stepper’.
3. Stable mount of your choice that can support the weight of both the camera and rail system, such as a full-size or tabletop tripod or platypod, bolted into a board or platform.
4. Lighting: Speedlites, LED panels, lamps, along with diffusers and reflectors.
5. A computer: laptops will work, however they may take longer to render files.
6. Focus stacking programs: Helicon Remote and Helicon Focus, or alternatively Zerene Stacker or Photoshop.
Why use a focus rail?
Proceeding with a manual rail for focus stacking is possible. It will of course become increasingly tedious to shoot large sequences, as you attempt to move the dial one increment for every shot by hand. Mistakes will only appear after all that effort is spent.
For shorter stacks this should function just fine. If you have the patience, you could forgo the rail entirely, and make gradual turns of the lens’ focus ring by hand. However, using an automated rail guarantees that each movement, and therefore each frame, is equidistant to the last.
They are tuned and pre-programmed to move in individual ‘steps’. These ‘steps’ measure from as large as the rail itself, all the way down to the incredibly small size of 2μm (2 micrometres or 0.002 millimetres), smaller than the diameter of a human hair!
Automated rails come with a controller box, into which you can input where you’d like the focus stack to start and finish along the rail, how many shots you want in the sequence, and what size steps it should take. While you can control the rail from the control box, it is far easier to plug this system into your computer and operate it through the Helicon Remote program.
Setting up the rail and camera
The rail system will sit between your camera and choice of support platform; you can mount it on any standard tripod fitting, or bolt it to a board on your desk if you choose.
The main aim here is to create as much stability as possible. As you are trying to take consecutive photos, you really want to remove any source of potential vibration which will become surprisingly amplified at magnification.
Even accidentally leaning on the desk, typing on your keyboard, or walking past the setup as it shoots, can introduce levels of vibration that will throw off your sequence and require you to start over. Consider placing the whole setup in your basement or garage, or somewhere with a concrete floor.

Simply mount the camera on the rail, as straight as possible. Connect the rail to the controller via wire, have another wire going from the controller to the computer, and a final wire going from the computer back to the camera. Including the power cords, there will be wires everywhere, yes!
Integrating with Helicon Remote
There are a lot of details and hints to pick up along the way, and mistakes to be made too. That being said, once you have the automated rail and camera set up securely, it is as easy as plugging them both into your computer via USB. Plug and play.
Installing Helicon Remote makes this even more convenient, by allowing you to control both your camera’s exposure settings and the rail’s increments from a single panel. This keeps your hands free from the hardware, reducing unintentional movement and vibrations.
If you are using a manual focusing rail you will not have as much functionality from Helicon Remote. You could still use it as a remote shutter, and have the images immediately sent to your hard drive. Or you can skip this program entirely.
Upon launch, look to the right panel. Choose Camera Settings > Select a camera, and then select your camera and rail. If the connection is working, a live preview mode will appear and the rail will now respond to the arrow commands in the Focus Bracketing panel.

Set your preferred exposure now with the Camera Settings panel and take some test shots with the ‘Take picture’ button.

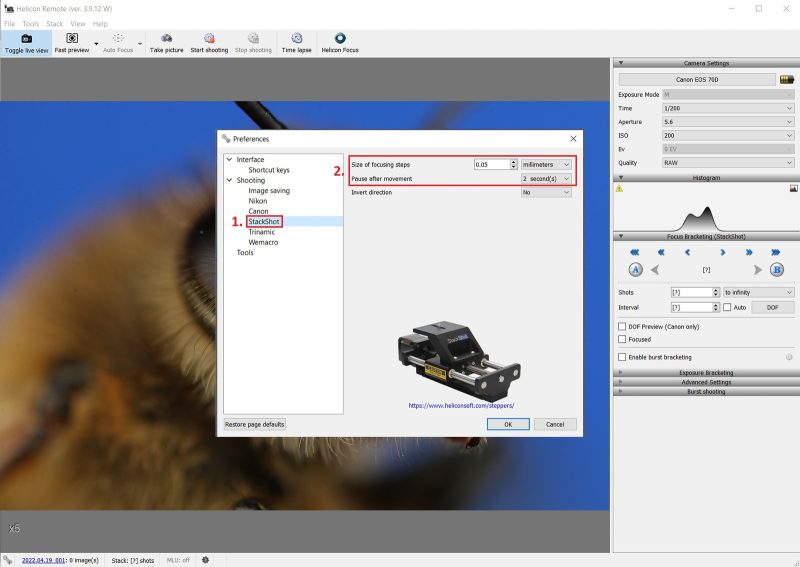
Next, go to File > Preferences > Stackshot (Or WeMacro) to adjust the ‘Size of focusing steps’ and ‘Pause after movement’ drop down menus.
A functional step size ratio is to set 3-4 steps within 1 depth of field measurement. So, if you have a depth of field of ~0.21mm, set your step size to ~0.05mm. Frame to frame overlap will ensure a sharp image.
Set ‘Pause after movement’ to at least 2 seconds, for vibrations to settle between shots. While in Preferences, go to ‘Image saving’ and choose the folder to which you will send your frames.
Once all that is confirmed, use the tiny arrows in the Focus Bracketing panel to move your frame to the front of your subject. Then select the ‘A’ button to ‘Define nearest point’. Repeat in the opposite direction, selecting the ‘B’ button to ‘Define furthest point’.
Right beneath these buttons, confirm that ‘Interval’ is set to 1. After this, you’ll see ‘Shots’ change to the number it will take to complete. Hit ‘Start shooting’ to run the sequence! It is best to give it some space for a few minutes.

Exporting to Helicon Focus
When your sequence has finished its run, select the ‘Helicon Focus’ icon from the top panel in Helicon Remote. This will automatically launch Helicon Focus with your fresh sequence. Much like the first program, Focus is simple to use after learning a handful of parameters.
The most important choice to make here is deciding which of the three rendering methods is right for your image. Sometimes this is best done by trying each method out to compare the results.
Method A takes a weighted average of pixel contrast. This option works well at maintaining colour for shorter sequences, but is prone to errors.
Method B creates a depth map based on the sharpest pixels per frame. This works great for larger stacks and retains colour well, but suffers with overlapping patterns.
Method C (pyramid) is best at overlapping complex patterns and sharp edges, but may lose some colour and gain contrast. A more in depth comparison can be found here (Helicon link).
Radius and smoothing are the only other adjustments to make. You will have to experiment with both of these sliders, as their results are dependent on context. The radius slider can help in removing the halo and ghosting glitch, while the smoothing slider deals with the sharpness of the fused area between frames.

Hit ‘Render’, sit back, and watch a live view of Helicon working the individual frames into a completed stack.

From here you can either click on the ‘Retouching’ tab to attempt spot cleaning and clone out trouble spots, or you can click on ‘Saving’ to choose your export settings.

Potential errors in Helicon
If you have run your images through Helicon Focus and the result does not look quite right, do not worry! Glitches, errors, and software artifacts are very common occurrences. Some will jump out at you immediately as a broken image, while others might only be noticeable when you pixel peek.
Here are some glitch symptoms, their causes, and potential treatments (it’s almost always reshooting).
1. Misalignment
This will be very obvious in the output image. You will see double copies of the same area, and sometimes more, due to frames that did not stitch together at all due to unintentional movement of the camera or subject.

If the effect is slight, some careful adjustment with the clone tool in Helicon’s retouching tab could save the render.
2. Missing frames
These can be subtle, and at first glance the image could look fine. Zooming in, you might see blurry bands rippling through it. These are caused by the step size slightly exceeding your depth of field. Reshoot in this instance.
3. Changes in lighting
Helicon will indicate a little red triangle, warning that your light levels were inconsistent between images: for example, if the LEDs gradually dimmed from a failing battery, or one of the Speedlites reached overheat and failed to fire. The resulting image will have shifting highlights or random dimmed frames.
The best choice here is unfortunately to reshoot, or get creative in post production.
4. Halos/1ghosting
This occurs when there are frames in your sequence that want to be in focus, but in the same position at two different depths. The problem is that, by the time the deeper image is taken, the foreground portion of the subject has become completely out of focus and obscures anything behind it, creating a blooming halo or haze throughout that area.

The greater the distance between these two points, the more pronounced the effect. Solutions include either changing the angle of your subject to avoid the parts from overlapping (and reshooting), or cutting out the deeper frames from the stack entirely, and running it through Helicon Focus as a shorter sequence (context dependent).
In conclusion
Integrating your equipment in this way will create a focus stacking setup that optimises your workflow. After the initial set up, the process is hands free and runs automatically, greatly reducing vibration and unintentional movement.
Working with the Helicon programs from start to finish makes this process truly streamlined to produce ultra sharp macro images. As a bonus, the images go directly to your hard drive and will be available to edit immediately.
While focus stacking in the field can be a fun experience, shooting in the macro studio can lead to more consistent and repeatable results.


