
How to Take Ultra Macro Insect Photographs

Macro photography enables us to capture the details of nature that elude the naked eye. In photography, the term ‘macro’ refers to images taken at a 1:1 ratio of the subject’s size, versus the camera’s sensor size.
If the ratio is 1:1, the size of the subject shown is equal to the size of the sensor, and can be considered 1x magnification. Anything up to 1:1 is known as close-up photography, and pushing past 1:1 brings us into the world of ultra macro photography. At 2:1 the subject becomes half of the sensor size, while at 5:1 the subject size is only ⅕ of the sensor size.


Glimpsing into this ultra macro realm can foster a new appreciation for how much of our world hovers ever so slightly below our natural perception. This might be the intricate details of insects, pollen on a flower’s anther, or the strange texture of fungi up close.
For the purpose of this article, I will discuss how to photograph insects with ultra macro in studio conditions, using preserved specimens, along with how focus stacking can help to create super crisp images.
Having the ability to fine tune these variables in studio will help you achieve a far closer, sharper, and well exposed image than you could generally accomplish outdoors. There are a number of fantastic tutorials on Nature TTL that dive further into some of the topics I will be covering, if they happen to spark your interest.
Choosing your subject, and the ethics of collection
Nature photography belongs out in the field. To me, there is no greater feeling than being fully immersed in an ecosystem, learning how to photograph these tiny, beautiful animals while they are content in their natural habitat.
Shooting in that environment is always preferable but, depending on where you live, it might not always be feasible. For example, in my hometown of Ontario, Canada, all insect life either goes dormant or dies off for the winter.
Finding a way to enjoy photography in these long, winter months was the drive behind learning these studio techniques.
This leads me to discuss how to collect specimens to photograph. I need to explicitly state that none of the insects in my series were alive when I found them, and it is incredibly important that this rule is followed if you would like to attempt this type of photography.
Some people hold a double standard towards insect life, believing that they are somehow beneath the protections we afford other creatures. However, killing any animal for the purpose of nature photography is completely counterintuitive and unethical.
It is no secret that collecting ethically will certainly require patience and an element of luck. It is not the most convenient way to proceed, as there is no way to control what species you will find. But, in the end, it is not about our need to take a photograph; it’s about respecting all life, and not just when it’s convenient to do so.

Consider, however, that insects live relatively short lives, and those lives play out in high pace and hazardous environments. If you keep your eyes peeled, you will find them already expired in many common places.
After heat waves, it is common to find insects that died from exposure along roadways and sidewalks. Conversely, after storms, it’s possible to find those that were swept away into standing pools of water. A raindrop is a monsoon to life at their scale!
Pro tip: Don’t forget to check places easily accessible to you, such as pool filters, greenhouses, window sills in houses, porch lights, and more.
Read more: Photography Ethics – Freezing Insects for Macro
Equipment for ultra macro photography
A dedicated macro lens is the primary specialised piece of kit you will need for this type of photography. Once you have the lens, almost all other gear can be adapted from your current kit, or acquired gradually as the need arises.
When I started out, I spent a great deal of time shooting solely with the Canon 100mm macro 1:1 lens, before recognising the need for higher magnification in my insect portraits, to get that super close-up effect.
A great first step in that direction is the Raynox DCR-250, a snap-on converter that effectively doubles your lens’ magnification. For its low price point, the level of quality it delivers is outstanding, coupled with the ability to switch from 1:1 to 2:1 in an instant. I still include it in my field kit for moments when there is no time to swap out lenses.

I am familiar with a few camera lenses that were designed specifically to photograph macro beyond 1:1. Those lenses are the Canon MP-E 65mm 1-5x, the Laowa 100mm 2x APO, and the Laowa 25mm 2.5-5x.
My camera body is the Canon EOS 70D, so my natural progression was to try the Canon 65mm, and I have no regrets in that decision. This lens is capable of shooting from 1:1 all the way to a staggering 5:1 magnification, and is the lens used for most photos seen in this article.
Many of my colleagues also have nothing but praise for the Laowa ultra-macro lenses, particularly for mirrorless cameras, thanks to the lenses’ outstanding sharpness, compact sizes, and build quality.
Depth of field
Any macro tutorial would be remiss without mentioning what to expect from your depth of field (DoF). You should expect to be working with just fractions of a millimetre in focus.
When using the Canon 65mm macro lens at 2:1, the apertures of f/5.6, f/8, and f/11 create a DoF of just 0.297mm, 0.420mm, and 0.594mm respectively. A table with all of these values can be found in the lens manual, and can be a helpful resource to check.

The smaller the aperture you use, the greater your DoF will be. However, you will sacrifice sharpness due to diffraction.

Sticking to a larger aperture, from wide open to f/8-9, will have you using a shallower DoF, but maintaining a sharper image. Finding a balance between these two points will become a matter of personal preference and practice. You’ll also need to consider how precisely you’d like to dial in your setup, and how much time you can invest per image.
Read more: How to Compose a Macro Photo
Focus stacking
To compensate for the incredibly shallow DoF available from a single ultra macro image, we must apply a technique known as focus stacking. This involves taking a series of photographs of the subject, while incrementally changing the focal plane. This effectively produces one sliver of focus for each shot.
Then, we must compile that series down into a single, full focus image using specialised software. It is possible to use this method handheld in the field, but be prepared for a lot of practice in order to master its application outdoors. It is all too easy for unintentional movement to cause missed frames or misalignment.
Read more: How to Focus Stack Macro Photos in the Field
However, when working in studio conditions, my current focus stacking method includes the use of the Cognisys Stackshot automated macro rail platform and its programmable controller. I operate the rail platform through my computer with the Helicon Remote app, which enables me to set where the focal plane should start and finish.
Additionally, I can set how many photos to take, and how small of a focus step it should take between shots. Using a set-up like this offers a level of precision that handheld/manual approaches lack, while also streamlining the process and removing much of the repetition that would otherwise be necessary.
The Stackshot is designed to take steps as small as 0.01mm. However, in practice I have yet to find reason to set steps smaller than 0.04mm, while working within the magnification range of 1-3x. I find incorporating a 20-30% focus overlap produces very sharp results.
This is where knowing your exact depth of field from the lens manual comes in, as it helps with calculating how many steps will be needed.

Once the sequence has completed shooting, it can be imported into Helicon Focus. This software is designed for the sole purpose of stitching together your focus stack. Comparable software includes Zerene Stacker and Adobe Photoshop.
The Helicon Focus program offers three methods of rendering your image. Each has its pros and cons, depending on the types of images submitted. The key factors in choosing which render method to apply can be found in an in-depth write up here.
Expect some post-processing to be necessary. Spot removal of dust and software artifacts can be done in Helicon directly, or later in your editing software of choice.
Lighting and diffusion
One advantage of shooting in studio conditions is having full control over your lighting, which beyond 1:1 becomes increasingly difficult. Approaching 5:1, the working distance on the 65mm drops down to just 4 centimetres, meaning the lens itself will get in the way of your light source.
Since our subject is static and not about to fly away, there is opportunity to experiment with your light placement, and incorporate multiple lights into the shoot. You will have the unique opportunity to mirror techniques used in product and portrait photography, such as the placement of key and fill lights.
The key light acts as your main light source, while the fill lights soften some of the shadows cast by the main. Or you could choose to ignore that concept entirely, and intentionally create a highly shadowed image with strong directional light.

I use a set of 3 x Canon 430EX III-RT Speedlites for my lighting set-up, as they are compact units that sync wirelessly with each other. Continuous light sources, such as led panels, can work wonderfully too. However, you may have to significantly slow down your shutter speed.
This will introduce more opportunities for accidental movement and vibration to interfere with your sequence. Flash eliminates that issue regardless of the shutter speed, as its quick strobe freezes your subject in place, even with minor vibrations.

Regardless of your choice of light source, I cannot stress enough: diffusion, diffusion, diffusion. Harsh light will easily ruin a photo. At this macro scale, light from the flash unit does not have enough distance to spread out evenly. Use small softboxes if you can, but I recommend building your own diffusers.
This allows you to control their size and shape. Excellent materials to try include tracing papers, translucent polypropylene, expanded foams like styrofoam, and other packaging materials. Basically, anything that will let some light pass, but only after interfering with its journey a little.
Read more: Backlighting in Macro Photography
Choosing a background
I have found a large part of this whole process to be experimentation, and that goes just as much for lighting as it does for your choice of background. Trying out fresh ideas to see what happens, and iterating from those results, is the best way to work.
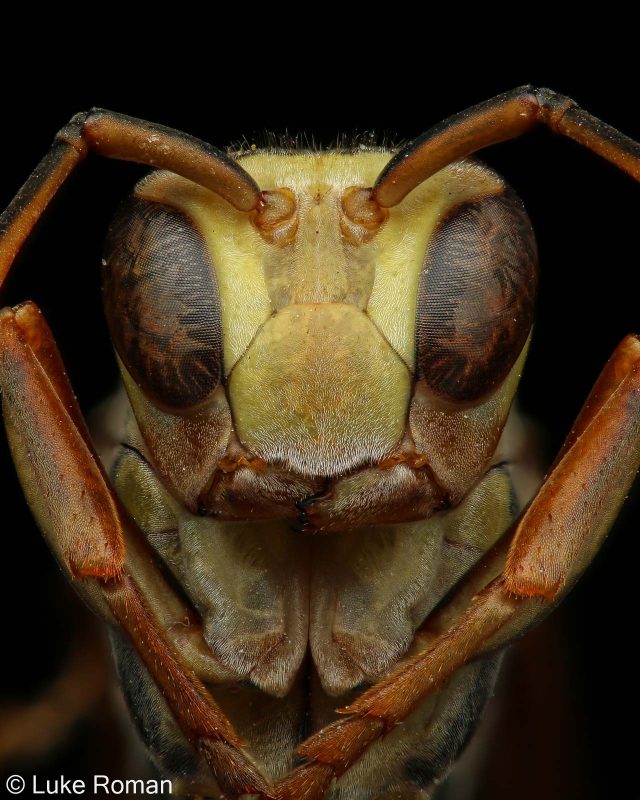
However, there are certainly conscious decisions you can make to impact the outcome or feel of your images. For example, shooting with a black or white background can produce images that leave a more scientific or educational impression.
For pure black (or close to it), I suggest using black velvet fabric. This is a quick and cheap solution, and its texture seems to absorb most light, even from multiple flashes. For pure white, try white acrylic, as outlined in this creative approach. Some post-processing may be required for both approaches.
One factor to consider when choosing a background for a macro shot is that the material can be very small! Remember our frame at 1:1 is just a few centimetres squared, and your choice of background does not have to be much larger.
This means you can use almost anything: leaves for their natural greens, pieces of card or fabric, or even books with unique patterns and gradients.
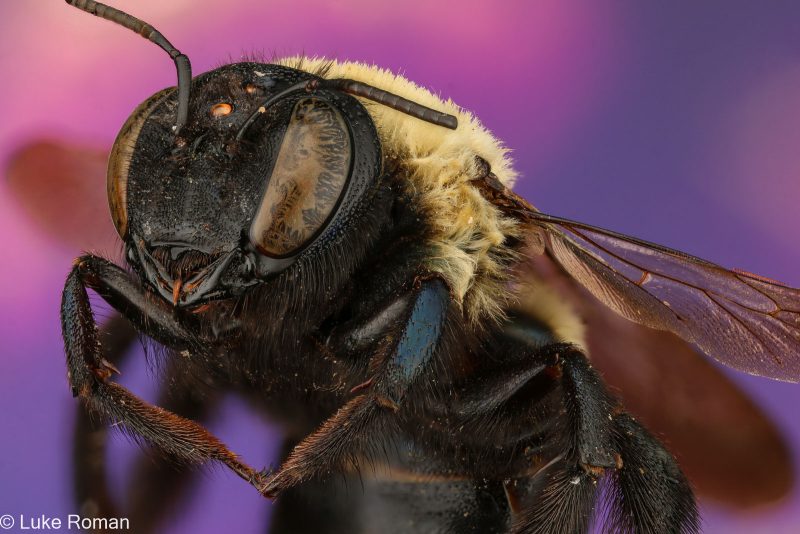
The best background tip I can recommend is to choose some paint swatch samples from a hardware store. They come in every colour you can imagine, and are the perfect size.
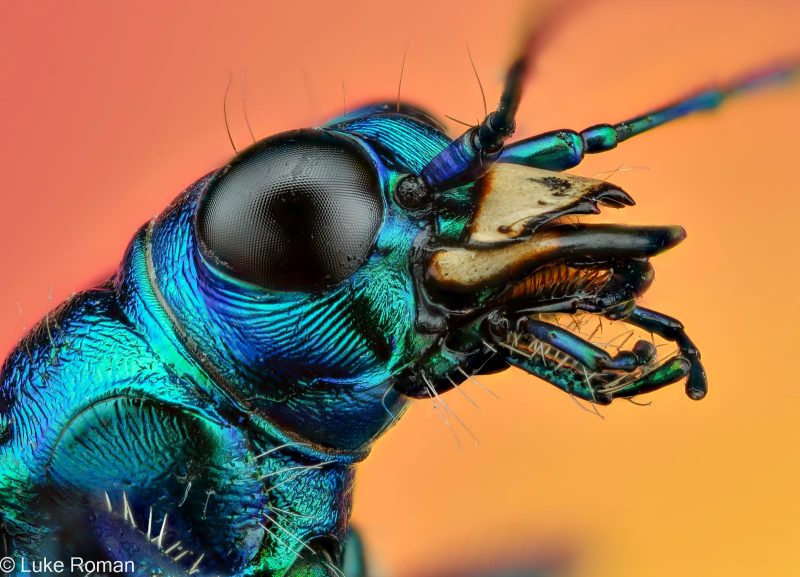
This makes it much easier to incorporate some colour theory into your shots, pairing off the complementary colour range of your subject with its background. This can create a more striking, vibrant, and modern effect in your portraits.
In conclusion
Learning to manage your depth of field, and using it to your advantage with focus stacking, can completely change how you might approach previously unattainable shots. Through careful placement and diffusion of multiple light sources, we can highlight a whole host of mandibles and antennae that will be novel to even the most skilful eye.
While the ultimate joy of wildlife photography is being out in the wild, using ethically collected insects for these pursuits will not only develop your photography, but can also aid researchers in identifying species.
Applying these techniques together for ultra macro insect photography enables us to showcase marvels of the natural world that remain just out of reach, and out of sight, of our everyday experience.


