
How to Focus Stack Macro Photos in the Field
Taking macro photos is great fun, and there’s nothing quite like exploring the tiny worlds of bugs and beasties. However, a typical complaint from photographing at high magnification is that the depth of field becomes very narrow and leaves the large majority of the image out of focus. Decreasing the aperture allows slightly more of the scene to be in focus, but sometimes this is still not enough. Perhaps you have the eyes of a spider in focus, but the rest of the body is out of focus. Too small an aperture and you have minimal light, along with the softening effects of diffraction.
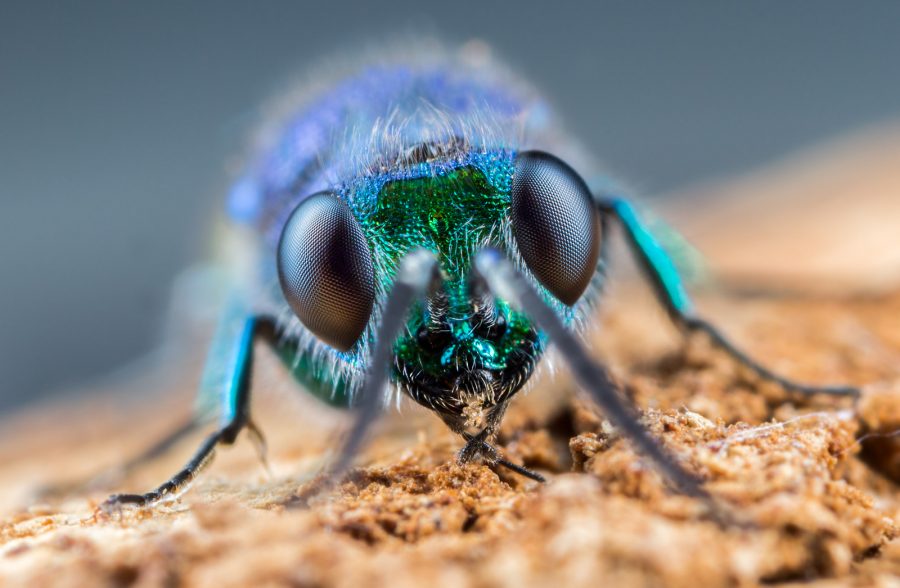
One way to combat this is by ‘Focus Stacking’ your image. This is where you combine multiple frames, each focused at different points, into one final image. The before and after slider below shows the difference between a normal and a stacked photo.


What is Focus Stacking?
Focus stacking, put simply, is moving the point of focus over a subject in a number of small increments. During each small movement, you take a photo, usually working from the front of a subject to the back, and then align and merge these photos in post-production.
It’s a similar idea to that of HDR, but instead of changing the exposure we change the point of focus.
What Gear Do You Need?
For macro focus stacking you’ll need:
- Macro lens or similar set up (extension tubes etc)
- Flash, Preferably diffused.
This tutorial will be based around the idea of stacking hand held, but you can use a tripod or even a macro sliding rail to make the process easier and likely more accurate.

How Do You Focus Stack a Macro Photo?
Put your camera in manual mode, using manual focus and a manual flash power mode. Normally we would be setting our f-stop to around f8 or f9, but as we are stacking the images we can go a little wider to about f5.6. This will ultimately give us a sharper final image, whilst also allowing more light into the lens, meaning we can lower the flash power for faster recycle times. This is crucial to allow you to maintain a quick firing rate. As always, shoot a few frames to make sure you have the correct exposure for the scene before starting the stack.
Ok – so we’ve got our gear set up and have a willing subject in front of us. This might be a flower to practise on, a coin, or a small insect.
Start with the front of the subject. In your view finder this is going to look odd, as you will be used to going for the eyes of a spider or the middle of a flower head, but trust me it will work. Once you’ve taken a shot, then move your lens slightly forward – this will move the depth of field towards the back of your subject – the tiniest of movements is sufficient to do this. Fire off another shot and repeat this until you have got to the back of your subject.
If the subject allows, start moving back to the front of the subject firing off more images as you go, just to make sure you have all you need. If you find that your flash is not keeping up with your frame rate then simply adjust your settings to compensate: for 1:1 macro I find between 1/16th and 1/32th flash power is enough.

It’s very important to ensure that you do not change the point of focus using your lens. Your camera stays set up the way you started, and it’s you that moves forwards and backwards.
You will need to be very steady if you are not using a tripod, as we want to keep the subject in the same place in the frame as much as possible. I prefer to not use a tripod as I can get down a lot lower and closer to my subjects. The number of shots you take depends on what f-stop you went for, and if your subject makes any drastic movements, or you do, then you will need to start again, especially if you didn’t get enough shots.
Stacking images with Photoshop
So, we’ve got all our shots and we’re ready to stack them in post production. My choice for this is Photoshop as it works well for my needs, but there is other stacking software out there like Zerene that may be better for you. But, for now, we will be using Photoshop.
Step 1
Open Photoshop and go to File > Scripts > Load Files into Stack.

Step 2
A new small window will open. Select browse and load in your images; make sure you tick “Attempt to automatically align source images,” and then press OK. Photoshop will now begin to align your images.


Step 3
Once the alignment has finished, select all your images in the right-hand layers tab. Select the top image and press and hold the shift key, and then select the last image. They will all now be highlighted in grey to show they have all been selected.
Go to Edit > Auto Blend Layers. A new window will open, check the Stack images option and tick the “Seamless tones and colours,” then press OK.
Photoshop will now begin to stack your images.

You will now hopefully have a stunning macro image with the subject sharp and in focus, front to back. Merge all layers together and then edit the final image as you see fit.
Focus stacking is an advanced technique and requires plenty of practice to get right. Start with small stacks, say between 7-10 images, and then try for bigger stacks. Once you stack, you will never go back.
What to Do When Images Don’t Align
If for any reason your images don’t stack correctly then it’s most likely you have moved too much when performing the stack. This is why it’s best to practise on flowers or ornate objects first.
If you are intent on using the non-aligned files, then you can also try and align them yourself file by file in Photoshop. Or, if that’s too complex, you can try other software like Zerene.
Don’t be disappointed if you don’t manage to succeed first time round – this is an advanced technique and takes some practice to get right!


