
How to Get Close to a Macro Subject

Despite my reputation, I am not really a macro photographer. Rarely are my images captured at a reproduction ratio of life-size or larger – in reality, the vast majority of my shots are simply close-ups. But I’m not too fussed about whether a photograph qualifies as macro shot or is a close-up. The definition is fairly immaterial in my eyes – an image will be judged on its contents and aesthetics, not on what the level of magnification happened to be. In truth, frame-filling shots can sacrifice valuable context and a sense of scale. Sometimes it is better to ‘get close, but not too close’.
Close-up and macro photography is growing in popularity, and insects are obvious subjects. While they might not be considered to be the sexiest subjects within the animal kingdom, invertebrates are hugely varied and photogenic things. In close-up, nature photographers can reveal exquisite miniature detail, design and colour that would otherwise go unnoticed and unappreciated. A dedicated macro lens is the best choice for insect photography – ideally with a focal length upwards of 100mm in order to provide a larger camera-to-subject working distance (to reduce the risk of disturbance). However, there are cheaper alternatives, like auto extension tubes. For more information about kit, read our Introduction to Macro Photography: Equipment. However, the aim of the game isn’t necessarily to just get as close as possible to your subject – there are occasions when a wider perspective will produce the better shot.


It is a common misconception that close-up photographers should always fill the frame for maximum impact. While frame filling shots of insects can undoubtedly prove striking, they are often unable to convey much about the subject itself, or provide context. While I enjoy photographing insects in isolation against an attractively diffused background, increasingly I like to include a degree of space and a hint of the subject’s environment. A tight crop remains the best option when you wish to highlight a subject’s intricate design and beauty, or when you are trying to exclude or disguise distracting or unattractive background detail. However, taking a step back and including a slice of the subject’s surroundings can produce far more compelling results, and even tell a story.
There are two obvious ways to include context. You can either take a step backward and simply capture your subject smaller within the frame – or switch to a wider focal length in order to produce a more environmental viewpoint. Both methods work well. There are practical advantages to taking a step or two back. By shooting from further away, you greatly reduce the risk of disturbing timid or flighty subjects, while you will also benefit from increased depth of field (depth of field appears to grow progressively shallower at higher magnifications). For more information about core close-up technique, read our Introduction to Macro Photography: Technique.

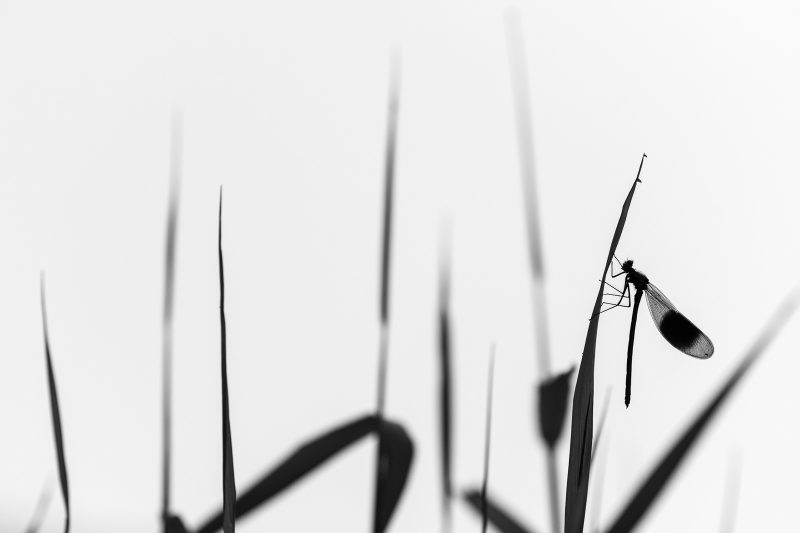
The situation and setting needs to be right of course. Background choice is everything with this style of close-up. You will only want to include space and environment if doing so provides genuine interest and strengthens the frame overall. For example, insects (particularly butterflies) will often rest or roost high up on the stems of grasses. These can provide a natural frame for your subject and by including them you will add interest and scale. Alternatively, if you discover a dragonfly or damselfly perched on reeds close to the water’s edge, why not attempt to capture this subject/habitat relationship, either by stepping back and selecting a smaller aperture (to provide a larger depth of focus and therefore better background sharpness), or by getting closer and wider?
Wide-angle lenses can be very effective for insect photography. Most have a very short minimum focusing distances, meaning they can focus very close and provide a relatively high degree of magnification. There are also dedicated wide-angle macro lenses, like Laowa’s specialist 15mm wide-angle macro. The big downside of a wide-angle approach is that the lens has to be within almost touching distance of the subject. This not only restricts light, but enhances the risk of frightening subjects away. You are unlikely to be able to achieve this type of environmental portrait during daytime when insects are busy and active. Wide-angle close-ups – which capture background detail and possess a fantastic sense of context – are best captured early or late in the day when subjects tend to be inactive and more approachable due to the cooler temperature.

By recording the subject smaller in frame and making it less dominant, you are generating negative space. The big question is, how much space do you include? This is impossible to answer unfortunately – it will greatly depend on the subject, its surroundings, and also the effect you wish to achieve. Composition is so subjective and how much space you include is very much a matter of personal taste. Trust your instincts and don’t be afraid to be bold. Minimalist compositions, where the subject is small in frame, can be compelling and create an exaggerated impression of solitude. However, with your subject recorded smaller in frame, you need to think carefully about where exactly you place it. You will normally want to include more space in front of your subject, than behind it, as the viewer’s eye will instinctively want to follow the direction of the subject’s gaze. The rule of thirds is a helpful guideline to follow when applying negative space to your insect shots. This is the most basic compositional guideline, but often very effective. Simply imagine the image space divided into nine equal parts using two equally spaced horizontal lines, and two equally spaced vertical lines. Where the lines intersect is considered to be power points. Therefore, placing your subject on (or close to) these points will often produce more striking compositions when your subject is small within the frame.
Its been a great summer for insects, so there is no better time to venture out with your close-up kit to photograph insects. Just remember to ‘get close, but not too close’!


