
How to Take ‘Studio’ Macro Photos with a White Background

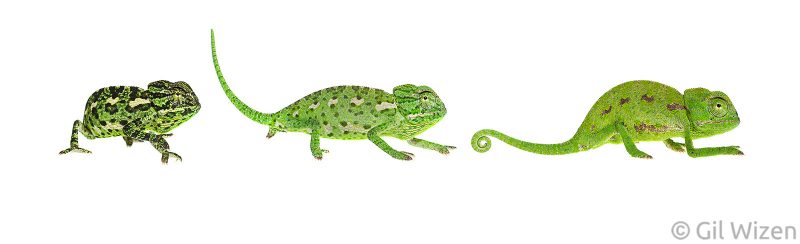
Wildlife photography is often attributed to animals photographed in a natural setting. However, there are times when photographing against a solid white or black background is beneficial. Not only is the result pleasing to the eye, but it also strips the subject from its natural background. This can be a useful tool for cataloging biodiversity, showcasing colour patterns and textures, and for emphasising special features important for species identification.
Like most things in photography, there are several ways to achieve the same result. Even within the style of white background photography, there are many different looks depending on the source of light and the way it is manipulated during the shoot.


In this article, I will focus on backlit white background photography, which is different from other methods by achieving a pure white background around the entire subject and thus eliminating its shadow. This method is sometimes confused with the light box (or white box) method, in which the light is bounced from the walls of a box towards the subject, creating a soft shadow underneath it.
Backlit white background photography is very suitable for photographing small animals like insects, arachnids, amphibians, and reptiles. It can be done indoors or out in the field. Regardless of the location, it resembles studio photography because the subject is photographed in a selected and relatively controlled environment. Therefore, some attention should be given to proper collecting and handling of a subject, as well as ensuring it is released back into the wild at the end of the session. I will cover these aspects at the end of the article.

Equipment to shoot macro photos with a white background
- Digital camera and lens with macro capabilities. The lens can be a dedicated 1:1 macro, a standard lens with an extension tube, or a wide-angle lens that allows for close-ups
- Diffused flash for front-lighting the subject
- Speedlite flash for backlighting
- Means of controlling and synching both flashes wirelessly (internal or external)
- White acrylic sheet at least 2x wider than the subject, and a stage or a base to place the sheet on
- Small container for keeping subject while awaiting for its photo session
When it comes to equipment, the good news is that you probably already have what is needed to produce white background photography. Most modern cameras and speedlite flashes have built-in wireless capabilities, but in case it is missing from your system a set of radio triggers is inexpensive. For most of my work, I use a Canon 7D Mark II, two 580EXII speedlites, and a Yongnuo YN-622C trigger with a couple of receivers.
The rest of the gear can be obtained quite easily and with minimal investment. An integral part of the backlit white background photography is the white acrylic sheet (or perspex). There are many different types of acrylic varying on their translucence (the range is usually between 50%-70% opacity). All of them can be used for our purpose, but you will have to adjust the output of your backlight speedlite accordingly. A sheet of A4 size is most suitable and easy to carry.
Read more: A Guide to Using Flash with Wildlife
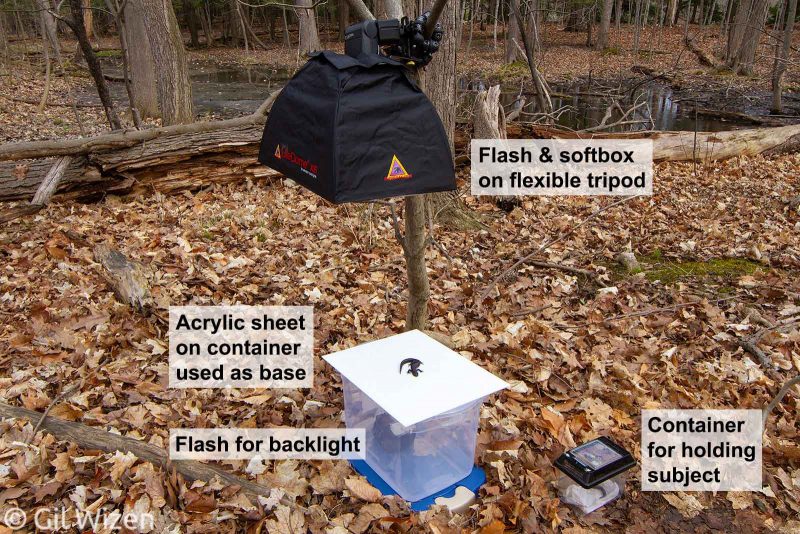
Setting up the shot
It is best to set up close to the subject’s location, as this minimises handling time and stress to the animal.
Begin by creating a stage or a base for your acrylic sheet. The sheet needs to be elevated 30-40cm above ground level, where the backlight speedlite will be placed. Anything can be used as a base – for example a plastic bin, your backpack, or even a couple of wooden logs or rocks found nearby. If you want to invest a little more, you can make your own stage from PVC pipes and some connectors.
Next is the front-light speedlite. Your diffused flash should be placed directly over the acrylic sheet using a tripod or handheld as close as possible, while still allowing you access to photograph.

Once all the components are in place, it is time to take a test shot of a random object (like a stone or a leaf) and manually tweak the lighting. Start by setting the aperture in your camera to allow for a good depth of field. Values between f/13 to f/16 are ideal, depending on the magnification used and the size of your subject. Shutter speed and ISO can be set to your personal preference, but it is recommend to use the highest flash synch speed and the lowest possible ISO level. Then, adjust the backlight speedlite. You want to use the lowest output that blows out the highlights in the background. You can verify this by turning on the highlight clipping alert to blink on your camera menu.
Once the backlight speedlite is set, adjust the light output (power) on the front-light speedlite. You want just enough light to reveal details in your subject without overwhelming it. I start with 1/8th power on both speedlites and fine-tune it for every subject.
Note that semi-translucent or white subjects require more attention when adjusting lighting. You might need to reduce the output of your flashes or distance them further from the subject to avoid blowing it out completely and fusing with the white background – something you cannot fix later in post-processing. Only when your lighting is sorted out should you place the subject on the acrylic sheet.
With some skittish insects and reptiles you will get only one shot at photographing. It is sometimes helpful to cover a hyperactive subject with a container for a minute or so until it calms down. Others will stall for a bit, allowing you to experiment and try different angles. In any case, try to be quick to reduce stress to the animal.

Feel free to be creative with your photography. You can take multiple photos of the same subject at different angles or different body postures and combine them later in post processing. You can use a wide-angle lens to create an unusual perspective of the subject. With extremely three-dimensional subjects I often focus-stack to get a pinpoint sharp image of the animal.

Post processing
Normally, post processing in backlit white background macro photography is pretty minimal. Out of the camera, the photos often look washed out but details in the mid-tones and blacks can be restored as long as the lighting was set correctly. First, make sure that the background is pure white across all colour channels (R 255, G 255, B 255). Clone out any particles that made it into the background: sand grains, dirt, scales, or hairs. Only then you should contrast and colour-correct the subject.

Notes on ethics
Whether you use the method described above indoors or in the field, it is important to remember that the subject’s well-being should be the top priority.
- Before collecting and shooting, research your subject. Some animals are extremely fragile or sensitive, whereas others can be dangerous. Make sure you know what you are dealing with
- Do not keep the subject in the collecting container for an extended period of time. Remember that the goal is photography, not domestication
- Do not refrigerate or cool down animals to make them sluggish and easier to photograph (see this ethics article)
- Do not harass the animal to elicit a photogenic response
- Be as brief as possible during the shoot
- At the end of the session release it back into the same area it was collected from.
Following these simple guidelines will ensure you are rewarded with many stunning photographs of your subjects for years to come, while also reducing the impact on wildlife and natural habitats.
Good luck!


