
How to Edit Star Photos: First Steps to Processing in Astrophotography

The most common question I get on social media is what camera am I using for astrophotography. Then, very close after that, comes “How do you edit your astro photos?” The answer is not easy and, for many people, is a very sensitive issue.
There’s no universal recipe that works for all kinds of astrophotography. There’s not even a recipe for, let’s say, photos of the Milky Way. Every image is taken in unique conditions and needs to be treated individually. The presence of things such as light pollution, airglow in the sky, and the ambient temperature are all factors that contribute to that.
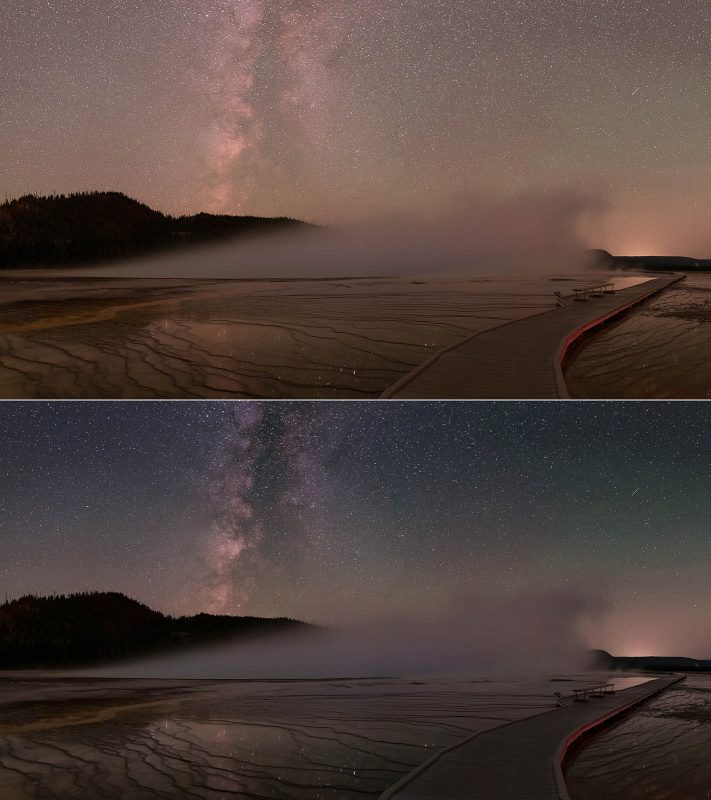
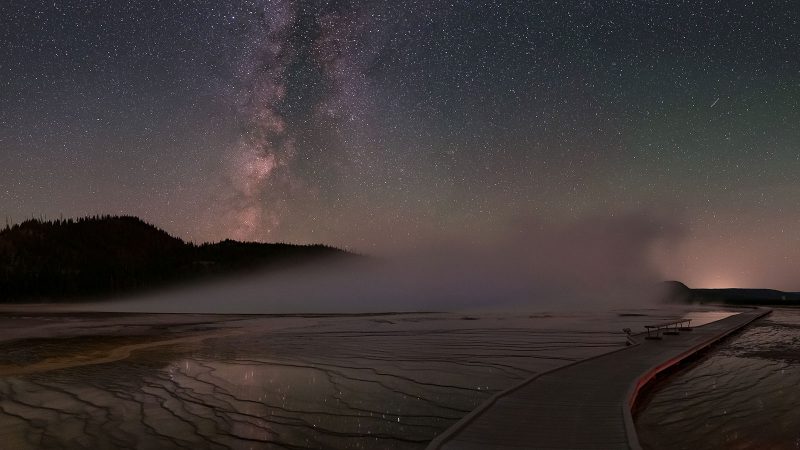
In this guide for how to edit star photos, I will go through the editing steps I use for any nightscape photo. I will use a panorama of the night sky above Grand Prismatic Spring in Yellowstone National park.
It was taken with a Canon EOS 6D modified for astrophotography and a Sigma 24mm f/1.4 Art lens. The same steps can be applied to pretty much any wide field, untracked astro photo taken at night.
Keep in mind that this is the way I do it; not the only way to do it. You might have different preferences when it comes to the final outcome of your image processing.
I like my astrophotography to have a natural look, so I will not add to much contrast in the sky and I will definitely not go crazy with saturation. You are free to do whatever you want with your photos. I would only suggest maintaining a “real” look.

Getting it right in the field
The first step in successfully processing your star photos happens in the field, when you take your photo. In order to be able to end up with a great image, you need to start with a good raw file.
Follow the guidelines in my article about histograms, and more than half of the work is done. I strongly believe that the initial image is a lot more important than what you do to it in post production. A bad raw file cannot be saved, no matter what post processing routines you try.
One thing to remember when you take your photo: be really careful with focusing. You can change exposure, white balance or reduce noise in the image, but you will definitely not be able to fix an unsharp image in post processing.
Read more: How to Get Sharp and In Focus Stars in Starscape Photos
Processing star photos in Lightroom
When it comes to software, you need a raw file developer first. I have tested most raw developing software available on the market today and I came to the conclusion that, for astrophotography, there’s no better alternative than Adobe Lightroom or Adobe Camera Raw.
Practically, they are identical. If you want to do some more in-depth tweaking, Adobe Photoshop is also useful.
1. Lens corrections
After importing my files in Lightroom and selecting my favourites, the first thing I do is to apply lens corrections. Just by ticking a box, you will remove chromatic aberration in your image. All those ugly blue, green or purple haloes around brighter stars will vanish.
I will also tick the box saying “Enable Profile Correction”. This corrects for field distortion and vignetting. Sometimes, vignetting is a bit overcorrected by the software and I will adjust that manually. I did not use profile correction for this photo as it is a panorama and would not work properly.
2. White balance
Scrolling back to the upper part of the control panel, we get to the White Balance (WB) adjustment. This is one of the most important steps in post processing your astrophotography. It can really make or break a photograph of the night sky for me.
During your astrophotography session, it really doesn’t matter what white balance setting you use on your camera, as long as you shoot raw. Shooting in raw format allows you to easily adjust white balance in post processing with no negative effects.
What’s the right white balance? Easy: there’s no such thing. The colour of the night sky will be influenced by twilight, light pollution, airglow (a faint emission of light by Earth’s atmosphere; usually green or reddish), moonlight, the presence of the aurora etc.
Play with the Temperature and Tint sliders until you are happy with the result. Just don’t set the white balance to Tungsten as many so-called astrophotographers recommend. You will end up with an image that is far too blue.
At night, the sky is not blue unless the Moon is present or you shoot during twilight. Otherwise, the sky will have shades of green, yellow, dark grey, navy etc. The sky is definitely not purple as I see in many popular images nowadays.
When it comes to sky colour, I really think that going for a 100% natural look is the way to go. For a stock camera, when shooting from a dark place, your WB will most likely be in the range of 4000K to 4500K. If you shoot from a location where light pollution is very strong, WB might be around 3500K.
These numbers have no relevance when shooting with a camera modified for astrophotography, as modified cameras have a very different spectral response than stock cameras.
Be careful with the Tint slider. In the beginning you might be tempted to slide it a bit too much to the purple side. There was a lot of airglow present when I took the photo, so part of the sky has a vivid green tint.

3. Basic adjustments
If I find the image too dark, I will add a bit of exposure. In this case, I lowered the exposure a little. I usually don’t touch the Contrast slider in Lightroom. I might use it later for local adjustments, but I don’t add contrast to the whole photo. I also don’t bring up the blacks and shadows too often. That adds quite a bit of noise in dark areas of the photo.
4. Presence panel
The Presence panel is usually a favourite of many night sky photographers. Unfortunately, this panel is used excessively. I’m not a fan of the Clarity slider as it is very easy to overdo it.
If I add any clarity to my photos it will always be less than 15. Above that value, I believe that stars start looking unnatural. On the other hand, Dehaze is a tool that can enhance some details in the Milky Way. I prefer to use it for local adjustments, though, and at low values.
5. Hue, saturation, luminance
I never use the Saturation slider. Instead, I use selective saturation in the HSL panel. If I want to enhance colours in the whole image, I might add a very low amount of Vibrance. By low, I mean below 15.
I will go then to the HSL panel and adjust various sliders until I am happy with all colour hues in the photo. I will revisit this panel after some adjustments that might affect colours in my photo.
This is probably the panel where I spend the most time when post processing star photos. As I said, I am very picky with colours and I really want my sky to look as natural as possible. If I process photos of the northern lights, I will definitely lower saturation for the greens as I find digital cameras to oversaturate them.

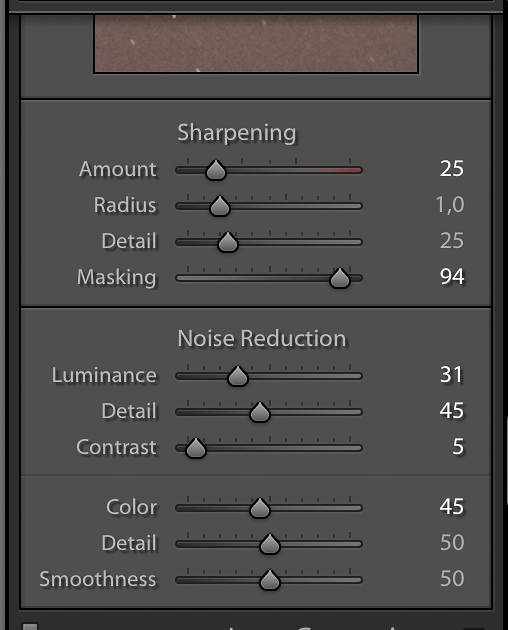
6. Detail panel
Let’s focus on the Detail panel now. Here we can set Sharpness and perform Noise Reduction. In the Sharpening section of the panel, there’s a slider that lots of people miss: the Masking slider.
This slider allows you not to apply sharpening to certain areas of the image; you definitely don’t want to sharpen noise. Noise will always be more visible in the darker areas of the image, so you will want to mask those.
But how do you know where the mask is applied? Hold the Option key (Alt on a Windows computer) and slide the Masking slider. Suddenly your image turns to black and white. Sharpening will not be applied in the black area, but only in the white area.
Now, move the slider until you are happy with the masked area of your image. I find that values around 90 are the most useful in astrophotography.

Adjust the noise reduction slider until you are happy with the level of noise in your photo. Be careful not to go overboard with this as the final image will have a “milky” feel. Also, don’t go to very high levels with colour noise reduction as that might remove colour in some stars. Keep it below 60.
7. Local adjustments
In order to enhance details in certain areas of our images, we will need to apply local adjustments.
We can use the gradient tool if we want to make the foreground a little brighter, or we want to apply certain settings to the whole sky area in the photo. Be very careful with the amount of brightening you apply to the foreground. Astrophotography is usually done at night and you don’t want your foreground to look like daytime. Also, trying to brighten dark areas will reveal a lot of noise.
Here I applied some Dehaze to the photo. The Dehaze slider is very useful in bringing up details in the Milky Way. But, like any other slider, use it carefully. You might be tempted to make the Milky Way very contrasty. Resist this temptation. I also added a gradient to the lower part of the image and increased exposure by 0.1.

Another tool that can be used for local adjustments is the brush tool. In this case, I brushed over the Milky Way and made some fine adjustments. I added a little bit of Dehaze only to the Milky Way. Not too much as I don’t want it to look very different than the rest of the sky. You can also experiment with the Texture slider.
The previous application of Dehaze turned my Milky Way a bit on the purple side, so I corrected that using the Tint slider. I also turned down shadows and blacks a little bit to have more texture in the dark clouds of the Milky Way.

If I have a series of similar images taken in the same conditions, I will use the Synchronise tool in Lightroom to apply the same settings to all of them.
Moving into Photoshop
That’s pretty much my routine in Lightroom. I then take the photo to Adobe Photoshop to do a bit of star reduction. Due to various edits you apply in Lightroom, stars might look a little unnatural and too bright in your image.
All those settings are great for enhancing structures in the Milky Way, for example, but some of them harm the aspect of stars. By applying some star reduction, you will get rid of bloated stars. Don’t apply star reduction to photos taken with a diffusion filter, though. Here’s a very easy star reduction algorithm that I’m using:
Open your image in Photoshop and duplicate the base layer. Pick the eyedropper tool and select the colour of a white star. Go to Select > Colour Range. Using the Fuzziness slider, adjust the selection until all stars are selected. You can use the + and – eyedroppers to refine your selection.

When you are done, press OK. Your selection will be marked with “marching ants”. If you don’t like seeing the “ants” you can just press Command (Control on Windows) and H. Now, go to Select > Modify > Feather and set a feather radius of 1 pixel.
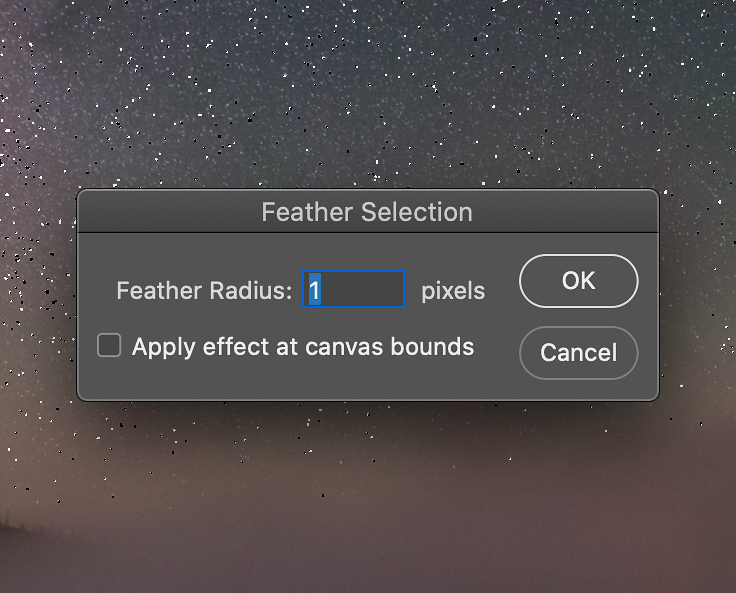
Go to Filter > Other > Minimum. First, check that Preserve Roundness is selected. Set a pixel radius between 0.3 and 0.8. I would recommend sticking to 0.5. You might like a sky with even more reduced stars, but I believe that after a certain value it starts looking weird.
Press OK, merge down your layers, and you are done.
If there are cables, satellites or airplanes in your shots, leave them there. Cloning such objects out will, most likely, result in duplicating stars in the sky.
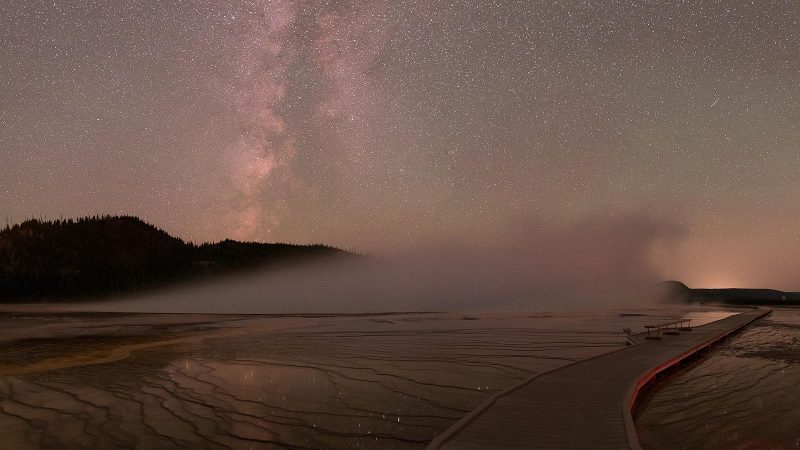
Here’s the final image:
In conclusion
Of course, there are some more advanced techniques like image stacking to reduce noise or specific processing algorithms used for star trail photography. About that, in future articles.
Clear skies!


