
How to Get Sharp and In Focus Stars in Starscape Photos

Nightscape photography can seem extremely daunting at first, due to the extreme pitch-black darkness that can turn even the simplest task into a frustrating one. However, the basics of nightscape photography can be broken down into just two big challenges: exposure, and sharpness of stars. Getting sharp stars in photos is the foundation to any great night photo.
Once you realise how basic the techniques for overcoming these two obstacles are, nightscape photography will become just as easy as shooting a traditional landscape at midday! This will free up more of your energy for creative thinking, and making exciting images that go far beyond merely pointing your camera upwards and hoping for the best.
This article will help you master the four basic principles that are required to ensure that you always get perfectly sharp stars in all your starscape photos!
Infinity Does Not Always Mean Perfect Star Focus
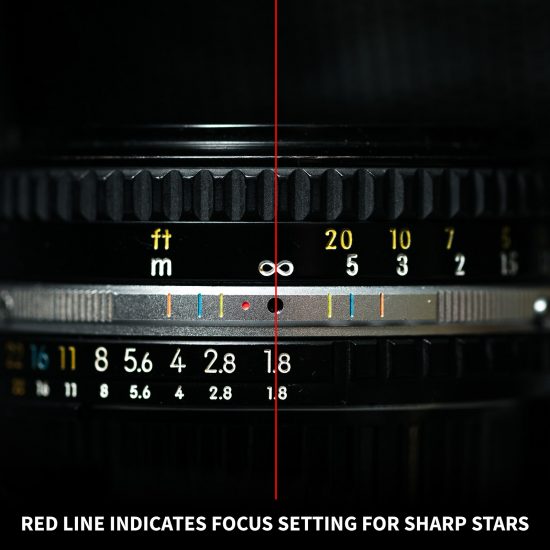
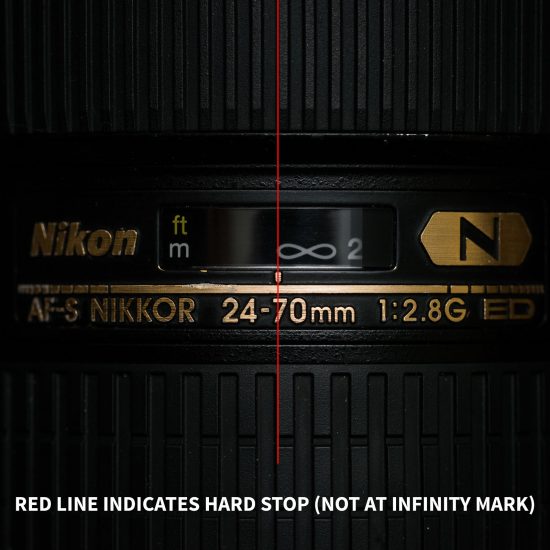
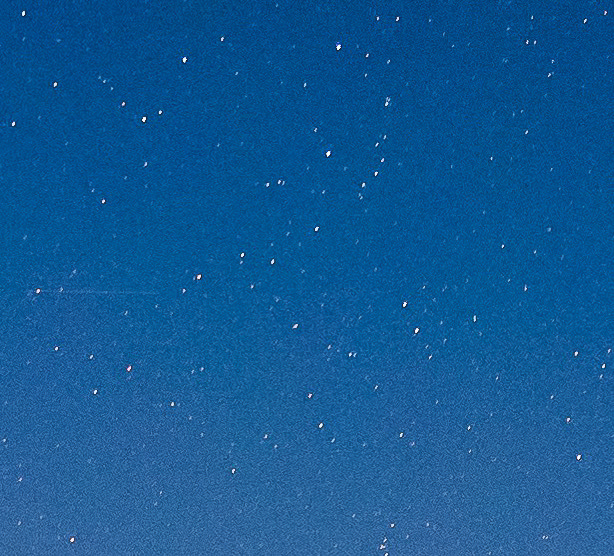
An important thing that you need to know about getting sharp stars in nightscape images is this: unfortunately, the infinity mark on your lens isn’t always the right spot to focus your lens. Most lenses require very, very precise focusing in order to get the absolute sharpest stars possible.
On some lenses, especially modern autofocus lenses, moving the focus ring even a fraction of a millimeter can make the difference between perfect focus, and enough blur to make your images barely usable on Instagram. Here are some diagrams to show you exactly what I mean:

Since you can’t trust the infinity mark on your lens, how do you ensure that you achieve perfectly sharp stars in the first place? There are two ways to ensure that your lens is focused perfectly for sharp stars:
Method 1: If you have a lens that is f/2.8 or faster, and your camera body has good high ISO image quality, you can simply use Live View to focus on whichever is the brightest star in the sky! Then re-compose your shot afterward (without bumping your focus ring! Some people put tape on their lens’ focus rings after they focus – just remember to keep checking focus throughout the night; don’t get lazy!)
Personally, when I am using Live View to focus on stars, I rock focus back and forth at least 5-10 times right near the stars, to be absolutely sure it is set perfectly.
Method 2: If you have a slow aperture lens or a camera body that is very noisy at high ISOs, then the best way to ensure perfect focus might simply be trial and error. First, set the camera exposure to give you a bright enough image of the night sky. Then shoot a series of photos with very, very minuscule focus bumps right around the infinity mark on your lens. This method may take some time, but I have found that such a brute-force “for dummies” method can be very helpful in the long run, as you start to memorise *exactly* where to set each particular lens you use for astrophotography or astro-landscape work.

There’s one last obstacle to remember: unfortunately, some lenses can actually change focus if there are dramatic differences in the ambient temperature. Therefore, even if you’re absolutely certain that you’ve memorised exactly where to set your lens for perfect star focus, be sure to re-check it if it’s a hot night in the middle of the summer, or a freezing night in the middle of winter.
Fortunately, there’s also one last super-helpful tip to remember: if you’re having trouble seeing if stars are perfectly sharp or not on your camera’s LCD screen, try turning your in-camera sharpening all the way up to its maximum setting. While this would utterly ruin any JPG images or video you might capture, it is harmless to raw images. Having your in-camera sharpening turned all the way to the max will make it VERY obvious when your captured images are sharp or blurry, during image playback at 100% zoom, and it may even help a little bit during live view focusing!
Balance Your Shutter Speed for Sharp Stars
Unfortunately, you cannot just pick whichever shutter speed gives you a good histogram and expect to get pinpoint sharp stars on any lens you choose. Due to the fact that the Earth is rotating, the stars “move” in the sky during your exposure.
What this means is that the more you zoom into a scene, the more your long shutter speeds will see the Earth’s rotation begin to affect the stars. They’ll stop being pinpoint dots, and turn into star trails.
Further Reading: Star Trails – How to Take Captivating Night Sky Photos


To avoid this, photographers previously relied upon a simple rule-of-thumb, which is to take the number 500 and divide it by your focal length. Say you have a 30mm lens, then 500 divided by 30 equals a ~16-second exposure.
However, this rule of thumb was originally created for camera bodies with much lower resolutions and is obsolete today for anyone who wants to shoot 20-30 megapixel images or higher, and then make very big prints from those images.
The solution to this problem is to instead try dividing the numbers 400, 300, or better yet 250 if you really want to ensure pinpoint stars.
The results might be totally indiscernible on social media and the internet in general, however zooming to 100% will reveal the difference:

Of course, if you are still practicing and learning about nightscape photography, then you’re probably not going to be making huge prints of your very first images. The important thing is to simply learn how to get sharp stars, and how to get a good exposure too, so if you have to break this rule a little bit, nobody will ever know when you share your results on social media. But, be prepared to eventually add some fast, sharp lenses (or a new camera body) to your wish list, as you get more serious about making big prints!
Further Reading: 3 Telltale Signs You Should Upgrade Your Camera Equipment

The above image is an example of what happens when I forget to do the math for my safe shutter speed and under-estimate the resolving power of a 36 megapixel camera.
I told myself, “6 seconds sounds good, right? It worked for my 12 megapixel D700, and it worked for my shots at ~35mm, how bad could it be on my new D800e and my 85mm?”
Well once again, the image looks fantastic on the internet, but zooming in at 100% will reveal the motion.

I would still put this image in my portfolio of course, or enter it in a contest, or even make a large print of it. However, I definitely kicked myself when I realised my underestimation.
The good news is, if you’re creating a timelapse of stars instead of a high-resolution print, then you can usually go back to doing your math using the “old” 500 number in the equation because the motion inherent in a video helps to mask the slight movement of stars. You might see it if you hit pause during a 4K timelapse and look closely, but otherwise you’re safe.
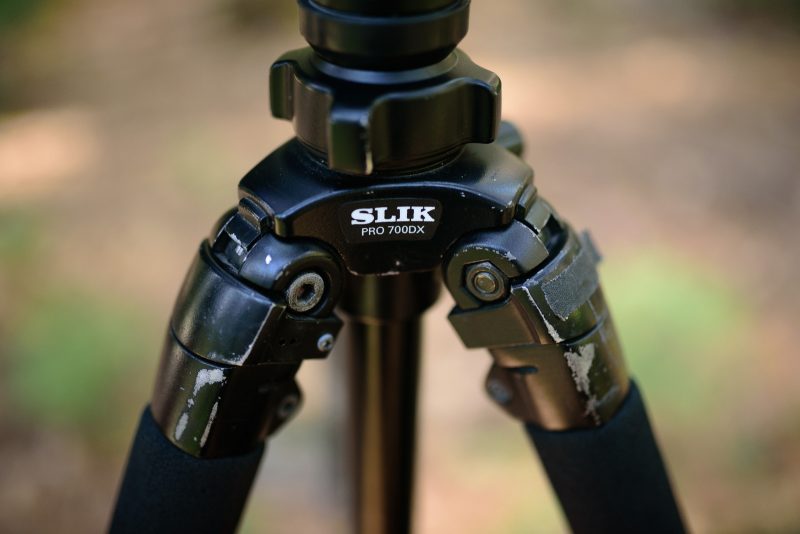
Get a Heavier Tripod
The first and easiest obstacle that I recommend dealing with is the camera support, which makes sharpness even possible in the first place. If your tripod is a flimsy, cheap piece of junk that you bought from a knock-off brand, there’s a good chance that either the legs or the head (or both) will not allow you to get sharp photos no matter how well you might master the other tips.

Personally, I recommend a 2 or 3 tripod solution to any serious nightscape photographer. Get one big heavy tripod that is almost “overkill” for you, and one lightweight tripod that is more “travel-friendly” yet still sturdy and reliable.
If you’re only walking a short distance from your car, for at least some of your photography, then having a very heavy tripod can actually be a good thing. I don’t know about you, but I could use the exercise anyways. If your tripod weighs less than 5 pounds, you’re probably not going to be able to survive certain adverse conditions such as strong winds.
Conversely, if any of your photography involves a lengthy hike, or travel in general, then you’ll want a tripod that breaks down small and yet can still support a full-size professional camera and lens, preferably at eye level.
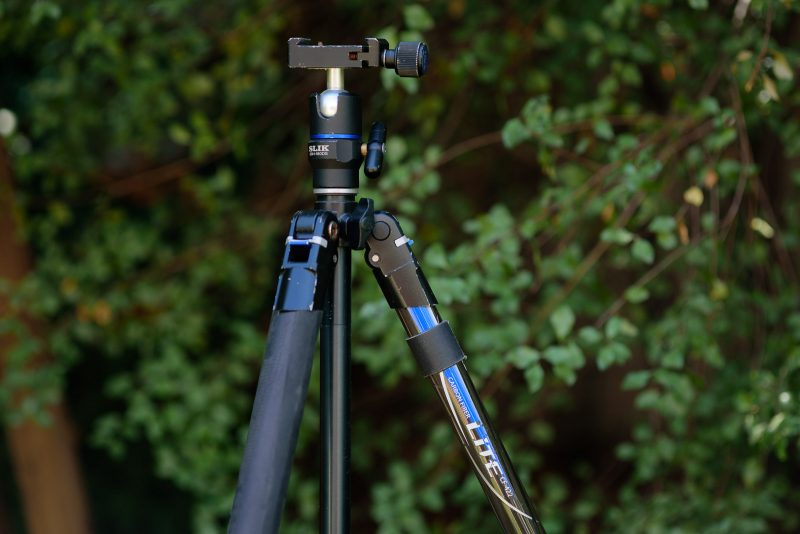
If you’re a lightweight backpacker, a tripod like the Slik Lite CF-422 weighs just about 2 lbs, (0.9 kg!) …yet costs only about £/$300, and also stands quite tall at a downright impressive 70 inches / 178 cm with the centre column up. There are other models that are even more compact, but since the Lite CF-422 fits in an airline overhead compartment, I have little reason to buy something even smaller. It’s folded length is 18.7 inches / 47.3 cm.
If you have lots of money to spend, you might be able to find a single tripod that perfectly balances weight and strength, in the 3-4 lb (1.8 kg) range, however the trustworthy leg-and-head kits can exceed $1000 very quickly. Personally, I prefer not to spend that much money on a single accessory, and I’ve destroyed far too many cheaper tripods already, so the two-tripod philosophy has served me well for many years now.
Check Your Lens Periodically for De-centering and Field Curvature
Last but not least, let’s say that you’re an absolute master of astro-landscape photography, after a year or two of practice. Congratulations! Unfortunately, if you use your gear very heavily, your most-used astro lens may actually become soft over time.

This occurs more often in certain lenses that are not designed very well from a mechanical standpoint, because they allow the glass elements to literally move out of alignment. Unfortunately, even the best lenses can become soft, …if you drop them hard enough.
The most common manifestation of lens softening will happen off-center in your images, usually being most noticeable on the left or right (or both) edges. This is important to know because you might still be checking sharpness in the center of the image, and think that it is perfect, only to get photos on your computer and find that the edges are so badly out of focus, it looks as if you used a tilt-shift lens!

So, every time I go on another big adventure, whether it involves a hundred miles of brutal dirt road washboards, or a dozen miles of hiking with all my gear crammed tightly into a backpack, I remind myself to check the stars at the edges of my images, just in case any recent abuse has caused the lens to become de-centered, or affected by any other type of optical alignment issue.
Unfortunately, there is nothing you can do about this except to spend hundreds of dollars to have the lens serviced, unless you’ve purchased an extended warranty. Even then, often the repair technician will take one look at the test images from your lens and insist that it suffered “impact damage”, no matter how much you argue with them.
For this reason, I try to buy lenses that are known to be very good at “staying sharp” after years of heavy abuse, such as the Nikon 14-24mm f/2.8, and avoid lenses that are widely known to have serious de-centering issues (like the older Canon 16-35mm f/2.8 – Mk I & II).

Conclusion
With each of these four items fully mastered and tucked away in your mental toolkit, you should find yourself able to repeatedly and easily achieve perfectly sharp stars in your astrophotography nightscape photos!

Don’t sell that big “old clunker” heavy tripod, keep it around for roadside shooting. Or, if you never owned one before, pull a mere $100-150 out of your wallet and go shopping at your favorite source of old used camera gear. Avoid cheap, junky travel tripods that have wobbly legs or a sloppy ball head; instead invest in a quality brand, and you’ll be happy for years to come.
Test your lenses thoroughly to find exactly where “true infinity” lies, in both hot and cold temperatures, and continue to check your lenses (all around the frame) as the months and years roll by to ensure that they’re staying sharp.
Last but not least, get around to printing your photos if you can! The best way to give yourself confidence that you’ve actually mastered astro-landscape photography is to actually see a photograph hanging on a wall, with a sharp, detailed night sky.


