How to Photograph the Northern Lights (Aurora Borealis)

The Northern Lights, also known as the Aurora Borealis, are a breathtaking sight that many photographers dream of capturing on camera. To photograph the Northern Lights effectively, it’s important to be prepared and have a good understanding of the technical aspects involved.
The peak of a good aurora display can be fleeting, so it’s essential to think and act quickly to get the perfect shot.


Follow these tips to learn how to photograph the Northern Lights and preserve the memory of this awe-inspiring natural phenomenon.
Equipment for Photographing the Northern Lights
Modern technology is improving at an impressive rate. Even certain models of mobile phones can produce good images of the Northern Lights, however the visual and reproducible quality of these images can be questionable. To preserve images of good, usable quality, it is important to use a DSLR or Mirrorless camera when photographing at night.
- Cameras with a full frame sensor are preferable, these sensors deal with low light situations well.
- A lens with a wide field of view (10-24mm) and a large aperture (f/1.4-f/4) is ideal.
- A sturdy tripod and tripod head is vital.
The Aurora Borealis is visible in the northern hemisphere, between September and March. On clear nights when the Northern Lights are visible, you can expect cold temperatures in most viewing locations. It is essential to dress warmly, particularly prioritising extremities like your ears and fingers.
Make sure you pack a thermal hat and gloves. When you are photographing in extreme temperatures, merino wool is a particularly effective material. The most important clothing items include:
- A thermal base layer, multiple thin layers (shirt and fleece)
- Warm down jacket
- Mittens
- Wool socks
- Insulated boots
Another piece of equipment often overlooked when photographing the aurora is a head torch. Moving around in potentially uneven terrain, adjusting settings and preparing your tripod, all require efficient manoeuvrability, this is only possible with good visibility. When you are exposing for an aurora image, be sure to turn your head torch off.
Be sure to include hand warmers as an essential addition to your list of equipment. Not only will hand warmers serve their obvious purpose, but they can be used to prevent your lens from succumbing to condensation and subsequent ice crystal formation. This can be particularly problematic when photographing long exposure images of the aurora, or time lapses, in sub zero temperatures.
Settings for Northern Lights Photography
When setting up your camera to photograph the Aurora Borealis, it is important to suit these settings to both the nature of the display above you and the composition you wish to achieve.
1. Use manual mode
This will give you full creative control over the three major settings, and improve your future judgement when photographing the Northern Lights.
When setting up your camera to photograph the Aurora Borealis, it is important to regularly change your settings in line with the nature of the display above and the composition you wish to achieve. Prior to an aurora display, preparation is everything. Impressive moments during a powerful aurora display can be over in a matter of seconds, so achieving the optimum settings is key.
Here are few condensed steps, which you can follow when anticipating an aurora display:
- Mount your camera on a sturdy tripod and point it facing north. You can use your smartphone’s compass application to double check your orientation if you are unsure.
- Turn off your head torch and try your best to escape light pollution as best you can. This will allow your eyes to adjust to the low light levels and spot potential auroras as they are forming.
- Focus your lens to infinity (see below).
- Take a test shot to reveal any faint aurora on the horizon, if it isn’t already visible. I would recommend experimenting with your shutter speed for this step (between 5 and 30 seconds). This is often an excellent way of revealing precisely where the aurora will appear. Keep in mind that weak auroras are likely to be closer to the horizon; appearing more distant.
- Stay warm and be patient!
2. Setting the focus
Before you program the settings, be sure to switch your camera and lens to manual focus. Open the ‘live view’ function on your camera’s LCD, and magnify the live image – use any distant artificial/natural light source to manually focus your lens to infinity.
It is essential not to forget this crucial step, as you could easily capture soft images. To check your focus is perfect, take a test image after focusing, and magnify the image to view the stars present. If these stars appear as small pinpricks, you have successfully focused to infinity.
Further Reading: How to Get Sharp Stars in Night Photography
3. Choosing an aperture
When it comes to aperture, the larger the better – letting in as much light as possible is essential, so keep this variable constant. Using apertures from f/1.4 – f/4 will do a sufficient job. A large aperture will produce a sharper image, as shutter speed can subsequently be reduced.
4. ISO speed
If shooting with a full frame camera, set your ISO at anything between 1600 and 3200. If you’re using a crop sensor camera, be careful not to set your ISO much greater than 1600, as digital noise/fuzziness will become noticeable.
All cameras are different, though, so try and experiment with your equipment before you have the Northern Lights in front of you.
5. Shutter speed
The most important setting to perfect when learning how to photograph the Northern Lights is your shutter speed. The shutter speed must be balanced to best capture the Aurora you are watching, and to attain the correct exposure
A weaker, more slowly moving Aurora is much easier to photograph well. A shutter speed of anywhere between 5-30 seconds will capture the colour and smooth shape of a slow moving arc or curtain. These longer speeds give the photographer time to expose the image correctly and capture a single colour.
Make sure the shutter speed isn’t greater than 30 seconds, as stars will begin to noticeably trail (and possibly before this, depending on the equipment you’re using) in your images. Lower ISOs can be used during these longer exposures, to produce ‘smoother’ images, with the correct exposure. As an Aurora builds in strength, it may begin to move more quickly.
The Northern Lights can change colour and shape very quickly, which requires a change in settings. It is during these powerful, colourful displays that higher ISO values of up to 3200 and greater are used. By pushing your camera to its ISO range limit, faster shutter speeds as low as 0.5-5 seconds can be achieved. This is essential when freezing the motion of fast moving pillars and curtains of light, as they dance and shimmer above.
6. Set the white balance
Don’t be afraid to alter the white balance when processing images. This setting can be neglected when capturing colourful auroras.
A white balance which is too great can produce overly vivid, orange images. A cooler balance, and the image can appear much more blue and unrepresentative of the display you observed. Similarly, you may sometimes wish to reduce the saturation of an image to retain the true feel of the aurora.
If you want to program a custom white balance in camera, I would recommend a figure between 2800 and 4000 kelvin. This offers a cooler range of colour which will give your images more of a ‘Dark sky’ feel.
Composition and Creativity
When photographing the Northern Lights, it is important to be confident with your settings and be creative with your compositions. When observing one of nature’s most overwhelming spectacles, it is easy to throw your camera onto a tripod and take hundreds of images, especially when an Aurora appears out of nowhere.
Instead, spend some time during daylight looking for compositional features and focal points which make for a more pleasing composition.
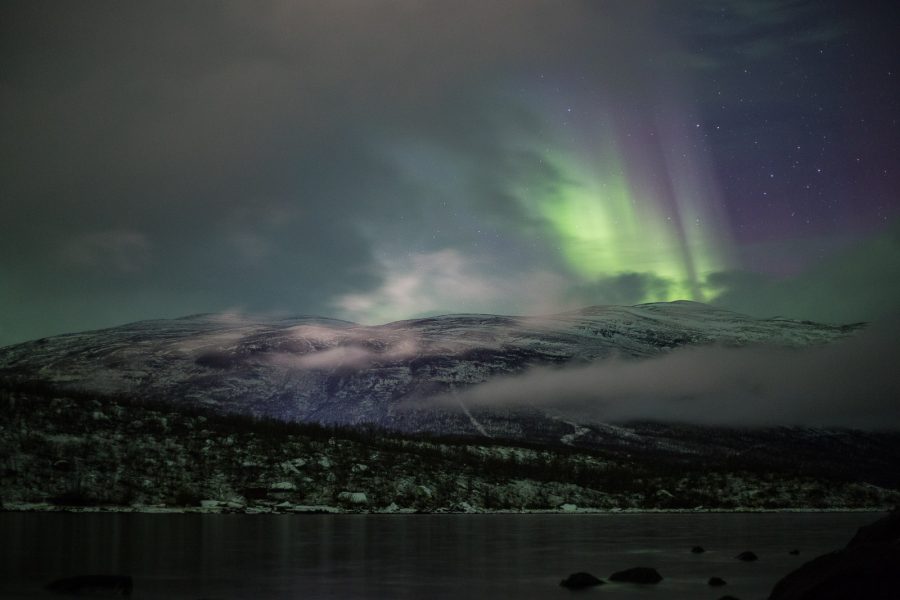
An image of the Aurora alone can be good, but a well planned and visually satisfying composition combined with the Aurora can make for a far more impressive image. Man-made structures, ice formations, rocks, mountains, and trees are all examples of focal points which can work well in a composition.
Be sure to experiment with the orientation of your camera, and shoot the Aurora in both landscape and portrait. A long horizontal arc of the Aurora Borealis may suit a landscape image, whereas a vertical stream of lights might be better suited to a portrait image.
Don’t be afraid to experiment with different lenses. If you have the luxury of experiencing more than one aurora display, maybe it’s time to get creative. Try shooting with a 50mm f/1.8 lens, for example, which offers a creative way to approach aurora photography. A slightly longer lens will compress the landscape and introduce/emphasise new elements, focusing on more specific compositional details.
When composing an image, be sure to use the internal spirit level function in your camera, or if your camera lacks this function then use the spirit level on your tripod to be sure your image is perfectly level. Use the conditions to your advantage and try to be creative with composition, using the shape of an Aurora to complement the composition you have in mind.
Although a full moon will slightly alter how bright the Aurora appears, this really isn’t too much of an issue when trying to capture it. Instead, use this extra brightness to your advantage and include the illuminated foreground and any shadows cast by the moon.
Keep an eye on sites like www.spaceweather.com, as you may find you can combine shooting the Aurora with additional celestial interest, such as the Milky Way or a meteor shower.
Where to go to photograph the Northern Lights
There are so many options when deciding where in the world to go to view the Northern Lights. The reality is that the Northern Lights can be viewed anywhere in the world between 55 and 75 degrees north of the equator.
The likelihood of viewing them successfully depends entirely upon the intensity of the solar wind interacting with the Earth’s magnetosphere (magnetic field). A powerful solar wind will penetrate deeper into the Earth’s upper atmosphere along field lines, making these interactions visible further south. When the solar wind is at a regular level, auroras will only be visible in northerly latitudes.

Here is a quick list of some of the most well known aurora watching locations in Europe, including a short summary to consider when deciding on which location to visit:
- Northern Sweden – Abisko: Well known for its unique microclimate and subsequent clear skies and the aurora sky station.
- Iceland – Grótta: Conveniently close to the city of Reykjavik, but far enough away to give excellent views.
- Iceland – Snæfellsnes peninsular: Stunning and dramatic volcanic landscape, home to the iconic Kirkjufell mountain. The peninsular has a unique localised microclimate, where cloud coverage can be very different in the north and south.
- Norway – Senja and the Lofoten islands: Both of these locations offer arguably the most impressive scenery in Europe and are both incredible locations to photograph auroras.
- Norway – Tromsø: This city is located between fjords and offers one of the highest probabilities of viewing auroras in Norway.
- Finland – Inari: Renowned for its northerly remoteness and frozen lakes, this is the most reliable region for aurora watching in Finland. Other reliable aurora viewing locations include Ivalo and Rovaniemi, both in Lapland.
Keep an Eye on the Sky
It is important to keep and eye on both the physical weather, and space weather forecasts, if you want to photograph the Northern Lights. If you have access to a car, aim for locations where clear skies are forecast and escape light pollution as much as possible.
Aurora prediction sites will give a vague probability as to how likely it is to observe the Northern Lights – this is known as the KP index. Although helpful, this index may not always be accurate as the Northern Lights can show on a local scale and vary from location to location. For a better idea, keep an eye on the live solar wind speed and solar wind density.
Here are some links to help you further your Northern Lights photography:
- Weather forecast: https://www.yr.no/
- Light pollution: http://www.lightpollutionmap.info
- Space weather/Aurora forecast: www.spaceweather.com & https://www.swpc.noaa.gov/


