
How to Photograph Moonscapes

When you hear the word “Moonscape,” you might think of an imaginary, sci-fi scene of spaceships landing on the barren rock of a lunar landscape. Of course, such an image would certainly qualify as a moonscape, but for those of us stuck here on Earth, the term carries a meaning that is almost as exciting and probably even more beautiful to photograph. I’m referring, of course, to traditional landscape photography that uses the light of the moon instead of the sun to illuminate a scene. If you’ve never tried to photograph moonscapes, then you’re missing out on a whole new realm of landscape photography!


What is a Moonscape?
Moonlight can be just as diverse as sunlight. It can be just as harsh as noon-day sunlight, and surprisingly bright too. It can make for stunning light at moonrise and moonset, and it can filter beautifully through clouds. Basically, any type of light that you might photograph as an outdoor photographer during the day, that same type of light exists under a full, waxing, or waning moon.
To photograph moonscapes, the moon itself doesn’t have to actually be in the frame in order for it to be classed as one – it merely needs to be illuminating the landscape. Also, most people would consider any image that prominently features the moon, even if its light is not very bright, to be a moonscape too.

In fact, if you ask me, moonlight and the moon itself add up to create even more great, beautiful photographic opportunities than the sun alone does!
Moonscapes and Landscapes During Blue Hour
One of the most tricky moonscape images to capture is one made during blue hour, just after sunset or before sunrise, when the sun’s light is also still affecting the ambient light. Combining this light, known as astronomical twilight, with the moon and moonlight can be difficult to plan and expose for, yet if done properly the results can be truly stunning.

How to Photograph a Moonscape
So, how do you capture a moonscape image? The key is to understand the moon’s phases, the timing of where and when conditions will be perfect, and how this will affect your camera settings. Here’s the quick breakdown of everything you need to know:
A full moon is so bright, you don’t even need a fast lens or a fancy full-frame camera, all you really need is a good tripod and a long shutter speed!

Beware: shooting by the light of a full moon will often result in images so bright that if you use ETTR techniques (Expose To The Right), your moonscapes will look like they were captured during the daytime.
An approximately half moon (a waxing or waning crescent moon) is still bright enough to fully illuminate a landscape, but you’ll be able to capture a lot more stars in the sky, and see the Milky Way quite easily too. You’ll need a relatively fast aperture lens, such as f/2.8 or faster, and you’ll greatly benefit from having a camera body that offers good image quality at ISO 1600 and 3200.
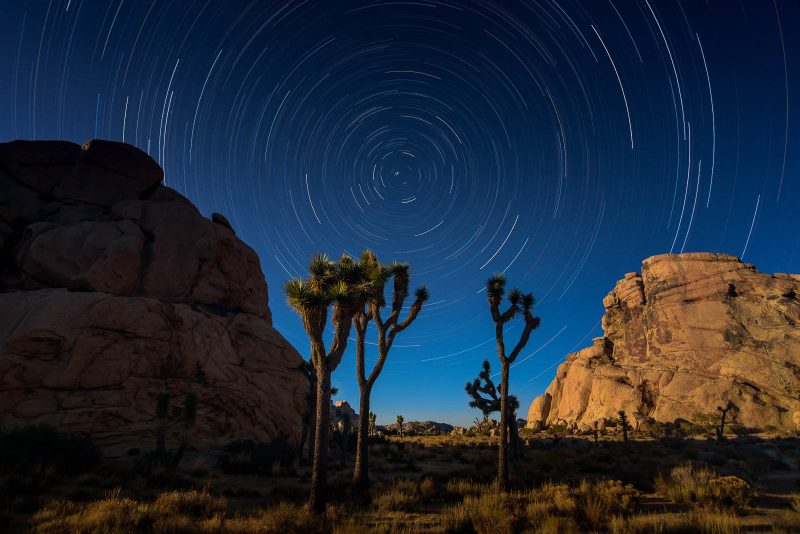
Read more: How to Photograph Star Trails
One of my favourite times to photograph moonscapes is when the moon is very low on the horizon, and the moonlight is creating a “golden hour” type effect on the landscape. If the moon is a waxing crescent, look for this amazing opportunity to happen some time after sunset and earlier in the night. If the moon is a waning crescent, look for a similar type of moonscape lighting to occur in the early morning before sunrise.

A small, faint crescent moon will usually cast barely any light in a nightscape image, however it still makes for a beautiful photographic opportunity, whether you’re including the moon in the scene, or just using its faint kiss of light in the hour or two just after sunset or before sunrise.
Of course, you must pick the exact day and time for the type of light you’re looking for, so let’s talk about that next!
Best Time for Moonscape Photography
For about half of every month, moonlight is both present and relatively strong during at least some part of the night. This affords you many different photographic opportunities!

Also, almost the entire rest of the month, (literally every other day except the ~1 week around a new moon) a faint crescent moon makes a great subject, even if its light isn’t very prominently illuminating the scene.
So, how do you predict specific moonscape photo opportunities? Apps such as Sun Surveyor, The Photographer’s Ephemeris, and Photopills are perfect for this. They allow you to see the exact position of the sun, the moon, and even the Milky Way.
For example, if the landscape you wish to photograph by moonlight faces East, you might want to photograph it by the light of a waning crescent or gibbous moon in the East. If the landscape faces west, you might want to photograph it by the light of a waxing crescent or gibbous moon, as it sets in the West.
Read more: How to Photograph and Predict a Moonrise
Creative Ideas for Beautiful Moonscape Photography

A full or nearly full moon can be so bright that it appears much like the sun in your image, yet with stars still visible above. If the clouds and conditions are right, this is one of my favorite phenomena to photograph!

Another way to create unbelievable (yet totally real) images is to photograph portraits by moonlight! With a fast enough aperture and a high enough ISO, a full or nearly full moon is bright enough that your shutter speed can be as fast as 1-2 seconds, which is just long enough for human subjects to hold perfectly still in a (wide-angle) photo!

Suburban moonlight is another one of my favorite “outdoor” photography subjects. Using light pollution to illuminate clouds below, and moonlight to illuminate the sky above and the tops of the clouds, amazing colour combinations can be achieved.

Star trails are always a great creative photographic idea for shooting during moonlight. The moonlight allows you to shoot at longer shutter speeds, smaller apertures, and/or lower ISO’s, which are all extremely beneficial in nightscape photography, and particularly star trails.
Equipment & Camera Settings for Moonscape Photography
You don’t need a super-fast lens for most moonscape images, actually. A “kit” lens that is f/3.5-5.6 is more than good enough for photographing a night scene that has a 50% or brighter moon! Actually, the most important piece of equipment is, of course, a sturdy tripod. If you don’t have a rock-solid platform to shoot from, your images won’t be sharp no matter how good your camera or lens is.
Having the right focal length for your creative idea is certainly important, too. So, even if all you can afford is a kit lens in the 10-20mm or 10-18mm APS-C range, or a 16-35mm f/4 full-frame lens, you’ll be fine! Just start by shooting wide open at f/4 with a relatively high ISO such as 3200 or 6400, and go from there using this guide for nightscape camera settings.
When photographing moonscapes by a dimmer, fainter moonlight, you’ll need to start considering aperture as more of a priority, as well as the camera body that you’re using. Because the ambient light is getting much less, it’s time to get out a f/2.8 lens (or faster), and maybe even a full-frame camera that gives you killer image quality even if you start to get underexposed at ISO 6400.
How to Edit a Moonscape
Moonscapes can be even more fun to edit than traditional landscapes, because they are much more open to creative interpretation. You can process them to be very bright, as if the landscape is illuminated by daylight even, with clouds or a blue sky and just a few stars. Or, you can process a moonscape to be very dark and mysterious, after all it is nighttime!

The same post-production guidelines goes for white balance and your overall colors. You can process a moonscape with ordinary daylight white balance, (about 5000 Kelvin) and render the image neutral or even warm in appearance. Or, you can dial the Kelvin WB way down to 3000 or 4000, and create a moody, cool/blue looking image, to enhance the feeling of the nightscape.
The creative possibilities are very diverse indeed, however, keep in mind that such great subjectivity will inevitably lead to subjective opinions from the viewers, too. Just remember that your photography is your own artistic craft, and you can do whatever you want!

It can be beneficial if you disclose at least a little bit of information about the scene itself, and how you processed it. This will help viewers understand what they’re looking at, which usually leads to a wider appreciation of the image.
Sharpening & Noise Reduction for Moonscape Photos
Whatever creative decisions you make when editing your moonscape photos, you’ll have to pay extra special care to the sharpening and noise reduction of the image, especially if you are shooting at high ISOs and/or shallow apertures, both of which are very common for any shots that aren’t made under the brightest full moon.
In Lightroom, my personal preference is to keep noise reduction subtle, with no more than 10-20 on the main Luminance slider. I leave all the other settings at their defaults, unless I’m using an extremely high ISO in which case I’ll crank up the Color slider up to about 50. Basically, I’d rather have plenty of detail in my image, even if there is a little bit of noise/grain, instead of a mushy, smooth image with no noise but also significant detail loss.
When it comes to sharpening, I usually prefer a higher intensity on the main Amount slider, anywhere from 100 to 150, but a lower Radius, such as 0.5 to 0.7. However, sharpening methods will vary greatly depending on your intended final usage of the image; if you’re only going to share the image on social media, feel free to use both a larger radius and a high overall Amount.

Conclusion | How To Photograph Moonscapes
From all the right gear and camera settings, to a correct understanding of the moon’s various shooting opportunities and creative ideas, hopefully you now have everything you need to go create some amazing moonscapes!
Please leave a comment below if you have any questions, or creative ideas of your own!


