
The Best Settings for Night Photography

Night photography can be truly exciting and rewarding, but only after you get past the extremely confusing, frustrating bits. So, let’s be honest- some types of photography have a learning curve that feels like you’re climbing a sheer cliff. If you don’t even know where to start, then why bother?
Nightscape photography can seem truly impossible at first, if you don’t know where to even begin. Fortunately, it’s easy to learn where to begin! We can cover everything you need to know very briefly, and give you the confidence you need to go out, start shooting, and share your awe-inspiring images with the rest of the world!
In this article, we’ll cover the exposure settings that give you a perfect starting point so that your images actually turn out well, and we’ll also cover the other camera settings that you’ll need to know in order to capture professional quality results, even with basic camera gear.

What are the best settings for night photography?
First, let’s get the overall method out of the way: You’re going to be shooting manual everything. Manual exposure, manual focus, manual white balance – everything.
The ideal white balance for night photography

To keep it simple I’m going to suggest setting your White Balance to Kelvin, and then trying anything from 3500 Kelvin to 5000 Kelvin. What looks “right” to you will depend on if there is any light pollution or moonlight in your image, as well as personal preference. We have another article that mentions WB as it relates to night photography, which you can read here.
Getting sharp stars in your nightscape

Focusing on stars is best done using manual focus and live view with magnification over the brightest star or planet in the sky. As long as your camera has a lens that is f/2.8, or even f/3.5, you should be able to see that bright star/planet in live view at 100% magnification, allowing you to carefully focus on it.
If your lens has an infinity mark, you can start there, but the exact mark may not be perfect for stars, especially for lenses less wide than 14-20mm. Also, a lot of newer lenses have no focus markings whatsoever, so look in the menu of your camera to see if you can turn on a focus scale that will help indicate where infinity is, again just as a rough starting point.
I’ve already written a substantial article on how to get sharp star photos on Nature TTL, as well as YouTube video on the subject, that will help you in more depth.
Exposure: Best settings for night photography
The correct exposure settings for nightscape photography are, to be honest, very simple. You’re going to be shooting in extremely dark conditions, so obviously you’re going to be pushing the limits of your camera and lens’ low-light capability. That means a very high ISO, a rather long shutter speed, and a fast or wide-open aperture.

Before we go any further I want to stress one point: please don’t feel like you can’t go out and shoot just because you don’t have a camera with great high ISO image quality, or a lens with an ultra-fast aperture yet! You absolutely can go out and learn, and practice, with any camera and any lens.
Even a beginner Canon Rebel or similar type of DLSR and a “kit’ lens, with an f/3.5 aperture, will be enough to let you learn and practise your night photography, and come home with some impressive images!
How to determine the correct exposure at night
Simply put, never trust your camera’s LCD to show you the right level of brightness in your exposure, it will fool you every time. This is because whenever you’re trying to look at the stars with your own eyes, they are going to want to adjust to “night vision.” If your eyes have adjusted and you can actually see the night sky, then looking at the camera LCD will feel extremely bright.
Therefore, you should always check your histogram. It will show you exactly how your exposures are turning out, no matter what brightness your camera LCD is set to. Personally, I like to turn my LCD brightness all the way down to its dimmest setting, which is -5 on Nikon cameras, and this allows my night vision to be preserved quite well. However it still doesn’t mean I can get away without checking my histogram!
Exactly what should your histogram look like, though? Should you use ETTR (Expose To The Right) technique, like you do during the day? Actually, not necessarily.

If you did achieve a perfect ETTR histogram, it could cause quite a few stars to blow out. The stars just don’t show up on your in-camera histogram simply because the majority of the image is dark. Of course, if you do use the ETTR method it won’t be the end of the world, as long as you don’t mind having stars that are slightly bigger and pure white, instead of the pin-point, coloured dots that they might be in a more scientifically accurate image.
A good histogram for the night sky would be if the night sky itself was about 1EV below the white (right) edge of the graph.
Read more: Understanding and Using Histograms
Choosing the right aperture for night photography
You’ll want a fast aperture lens, f/2.8 or faster, of course. However, if you have an f/3.5 kit lens, that’s more than enough to at least learn the techniques, and share images online.

The best prime lenses, usually f/1.2 or f/1.4, are really sharp by f/2 or f/2.8 (stopped down 1-2 stops). That doesn’t mean you always need to shoot stopped-down, though. I always start shooting at my fastest aperture, if only to check my exposure at a faster shutter speed, such as 1 or 2 seconds (instead of 10 or 20 seconds). If your prime lens is an f/1.8 or f/2 prime, you may very well have to shoot wide-open most of the time, or at f/2.8 sometimes.
The best zoom lenses are really sharp wide open at f/2.8. Yes, an f/1.4 prime lens might be even sharper when stopped down to f/2.8, but you’d be surprised how little the difference is. For example, most f/2.8 zooms are much sharper wide-open than an f/1.2 or f/1.4 prime lens is wide-open.
All in all, your aperture setting is going to be very simple: Shoot wide-open to begin with, and only stop down if you absolutely have to.
Setting the ISO speed
Which ISO you should use for night photography is one of the more complicated discussions that you may have seen in photography groups on the internet. The fact is, everybody has different standards for ISO noise, and everybody will give slightly different advice regarding which cameras have “acceptable” noise levels at this-or-that ISO.
So, we’re going to keep it simple, based on many years of experience with almost all the cameras you might be using:
- For most full-frame cameras, ISO 3200 or 6400 are great for night photography.
- For most crop-sensor cameras, ISO 1600-3200 are great if it’s a relatively new camera, or ISO 1600 if it’s a much older camera.
Just like your aperture, try starting at an even higher ISO, just to check your exposure and get your histogram dialed in.

Then, once your histogram is looking good, you can try changing your ISO or aperture to a better setting, for good image quality, (less noise, more sharp detail) …but only as long as your shutter speed can give you an ideal histogram, of course.
Choosing the shutter speed
The shutter speed is usually the last setting you tackle with night photography, because on the one hand it’s the easiest way to get a perfect histogram. Unfortunately, on the other hand, if your shutter speed gets too long, (say, 5 minutes) your image will be a star trail, and not an image of pin-point stars. For now, let’s put that thought aside, and finish talking about exposure itself. Then, we’ll come back to this issue of the Earth’s rotation causing stars to “move” in the night sky.

Basically, if there’s no light pollution or moonlight in your scene, it’s going to be very dark and you’ll need a rather long shutter speed, especially if you want to use a good aperture and ISO.
If you started with a wide-open aperture and a very high ISO, then test your exposure with a shutter speed of just 2-4 seconds, just to get your histogram started. Or, if there’s moonlight or light pollution, maybe just 1-2 seconds!
However, be ready to go up to 15-30 seconds, or maybe even 60 seconds using your camera’s Bulb exposure mode, depending on how dark it is. If there is some moonlight or light pollution, you might actually be able to get a great histogram with just a 10-20 second shutter speed, depending on your aperture and ISO.
So, let’s say you do have a full-frame camera and a sharp f/1.4 prime lens. Well, you might find that a perfect night sky photo is somewhere in the range of f/2-2.8, ISO 3200-6400, and 10-20 seconds. Of course, if you wanted to, you could use the moonlight to get a correct exposure at a smaller aperture and a lower ISO, and continue using a relatively long shutter speed.
If you have an f/2.8 or f/3.5 lens, or a camera that you don’t want to use higher than ISO 1600 or 3200, you might need to use a shutter speed as long as 20-30+ seconds, which may cause the stars to turn into trails. Don’t worry, they won’t even be noticeable if you’re just sharing the image on most social media platforms; the important thing is that you’re getting out there and practising, and experiencing the outdoors in general!
The NPF rule
Lastly, let’s talk about this trouble with shutter speeds. There is a very specific rule that you can follow which will tell you exactly how long your shutter speed can be, and still have stars look like pin-point dots in the image, instead of trails.
Read more: How to Get Sharp Star Photos
This will vary depending on your focal length, because an ultra-wide or fisheye lens sees such a wide angle of view that it doesn’t reveal moving stars until the shutter speed gets very long. A medium or telephoto focal length, however, is much more “zoomed in” on the stars, so it will capture star motion very easily.
The 500 rule used to be how you would determine what shutter speed you can use without stars turning into trails. Just take the number 500, divide it by your focal length, and that is the shutter speed in seconds. For example, 500 divided by 14 (for a 14mm lens) would give a shutter speed of about 35 seconds.
Unfortunately, modern digital cameras with lots of megapixels are making the 500 rule obsolete. Personally, if I’m in a rush, I just follow the 500 rule like I always have, and then go one stop faster. So, let’s say, about 15 seconds in this case.
If you’d like to achieve real accuracy, however, the NPF rule takes into consideration all factors that could cause stars to go from pin-points to trails, including your megapixels, sensor size, and focal length. A mobile app such as PhotoPills has an NPF calculator built-in, that considers everything, and even your GPS location plus the direction you’re pointing your camera! This will give the most accurate shutter speed possible.
Blending two exposures
With all three of these exposure triangle constraints in mind, you might simply find that your exposures are too dark even if you’re using optimal settings.
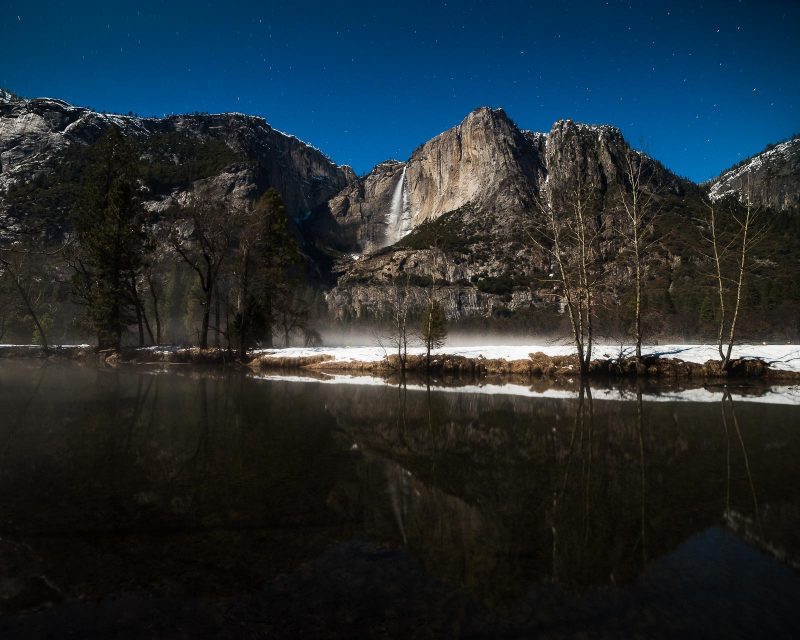
One solution to is to combine multiple exposures: one exposure for the foreground, and another for the sky. For the landscape part of the scene, you can use a very long shutter speed of maybe 1-4 minutes, at a good low ISO (800-3200) and a sharp aperture, (f/2.8-4). Then, adjust the ISO and aperture to both be bright enough to allow for a shutter speed that is quick enough to avoid stars moving.
In the example above, I simply used the exposure triangle to achieve the same overall exposure, while capturing good image quality in both the sky and foreground.
Shooting star trails
Of course, if your goal is to create a star trail image, instead of an image with pin-point stars, then your camera settings get a lot more flexible! You can try shooting at a very low ISO and a smaller aperture, such as ISO 400 and f/4, and a shutter speed that is 15-30 minutes long.

Or, since ultra-long exposures can cause a whole different type of image noise even at low ISOs, you might instead try shooting slightly shorter exposures, perhaps 1-4 minute exposures at f/2.8 and ISO 800-1600, and then you can stack/layer all the exposures together in Photoshop, with a layer blending mode such as “Lighten” that will turn each layer into a part of one nearly seamless star trail, as long as your exposures were captured back-to-back. A remote interval timer is essential for shooting long Bulb exposures, of course!
In conclusion
Alright, now go out and practice! Don’t worry about whether or not you have saved up for a better lens or camera yet; you’re going to enjoy being outdoors and seeing the night sky either way. Practising the technique of setting focus, shooting test exposures to check your histogram, and dialling the different settings back and forth so you understand the outcome are the most important aspects of getting good at night photography.
Good luck! Please comment below if you have any questions about specific settings, or which settings to use for a specific camera or lens. Thanks for reading!


