
How to Photograph the Moon: An In-depth Guide

Out of all objects that can be seen in the sky, the Moon is the one that fascinates the most. It inspired poets and songwriters, painters and lovers. And, of course, photographers. This tutorial will show you everything you need to photograph the moon.
You might want to have the Moon present in the sky in your photos, just like Ansel Adams in a number of his images. Depending on the phase of the Moon, and what you want to achieve in your final image, there are different techniques of capturing the Moon.


Recommended camera gear for Moon photography
First of all, let’s talk gear to have it out of the way. Basically, any camera can be used to photograph the Moon -even your phone camera! I would recommend a DSLR or mirrorless camera for best results, though.
For high resolution lunar photography, you have the option of buying dedicated astronomical cameras, but hardcore lunar photography is not the subject of this article.
In terms of lenses, it really depends on what you want to photograph. If you want to photograph the Moon and the landscape illuminated by it, a wide-angle lens might be the best choice. But, of course, the Moon will be just a tiny, bright circle of light.
You will need at least 200mm of focal length to see some details on the surface of the Moon, and you definitely need a telescope if you want those details to actually make some real “sense”.
We will talk more about focal length choice when discussing different types of lunar photography. But, for now, here’s an image showing you how the Moon looks like at different focal lengths between 200 and 2000mm. The outer frame is for a full frame sensor. The yellow rectangle is the Nikon APS sensor, while the red rectangle is the equivalent of a Canon APS-C sensor. The green rectangle is for Micro Four Thirds sensors.

You will also need a sturdy tripod and head to shoot the Moon. It is possible to photograph the Full Moon at ISO 100 handheld, even using a 500mm f/4 lens, but definitely not the other phases. When using the tripod, don’t forget to deactivate image stabilisation, if available.
A cable release is also very useful in lunar photography as using one will minimise vibration. If you don’t have a cable release, use the 2 second timer available on almost all cameras. For focal lengths longer than 400mm, I strongly recommend using the mirror lock-up function on your camera, too.
A photo-planning app might be very useful if you want to take photos where, for example, the rising Moon is aligned to a certain landmark. Try Photographer’s Ephemeris and PhotoPills.
Quick moon photography basics
Here are some things you’ll want to ensure that you are doing when photographing the moon – this will give you a good foundation for the rest of this article:
- Shoot in manual mode
- Shoot in raw file format
- Always use manual focus – use Live View to magnify and fine-tune
Now let’s see how and what to photograph when pointing your camera at the Moon.
1. Photographing the Full Moon
Most astrophotographers actually hate the Full Moon as it shows the least amount of details on the surface, as well as making stars much less visible. That happens because the rays of light coming from the Sun fall perpendicular to the lunar surface, and there are no shadows on the surface of our natural satellite making its disk look fairly flat. For astrophotographers, the Full Moon is usually interesting only if it is eclipsed or close to the horizon and distorted by Earth’s atmosphere.
If you want to take a photo of the Full Moon when it’s high in the sky, I would suggest using a lens of at least 500mm in focal length or, even better, a telescope. The exposure time is shorter than you might think. I meet lots of very experienced photographers trying to photograph the Full Moon using long exposure times, but that is not needed.
You should treat the Full Moon exactly like any other object lit by the Sun at noon on a clear day. Believe it or not, you can use the Sunny 16 rule to shoot the Full Moon. If you’re not familiar with the Sunny 16 rule, it states that “On a sunny day, set aperture to f/16 and shutter speed to the reciprocal of the ISO setting for a subject in direct sunlight.”
For example, if you want to take a photo of an object in direct sunlight on a bright day, without any clouds in the sky, you set the aperture to f/16, the ISO to 100 and the exposure time to 1/125. Using this rule you can compute the correct exposure time for any combination of aperture and ISO.
The same rule is true for the Full Moon. If you want to be really accurate, you can use the Looney 11 rule which implies using f/11 as your aperture setting. The problem is that, using these settings, we will most likely turn the landscape very, very dark. But even an overexposed Full Moon looks nice above a correctly exposed landscape.

You will have both the Moon and the landscape properly exposed when shooting at dusk and dawn, as that’s when the landscape gets enough light.

When the Moon is close to the horizon, you will have to experiment with the best combination of aperture, exposure time and ISO as there are too many factors that can influence the final result of your image to have a set of standard values.
I would suggest that you set an aperture of f/8 and play with the exposure time and ISO until you are happy with the results. If you are using a telescope, you will not be able to change aperture.

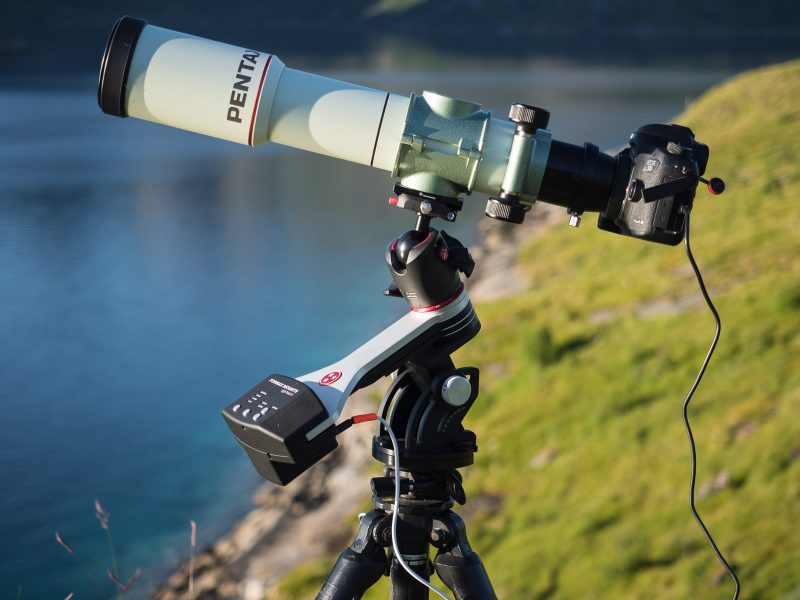
Using a telescope to photograph the Full Moon
If you want to use a telescope to shoot the Moon, you will have to connect the camera to the focuser of the telescope, so that the telescope will become the lens of your camera. For that you will need an adaptor from your camera mount to the focuser tube. Such adapters are widely available from astronomical equipment vendors. Always use mirror lock-up when shooting through a telescope.
As atmospheric turbulence will render some of your frames useless, the best idea is to take multiple photos one after the other (or even take a video clip and extract individual frames out of it – just be aware of the resolution drop). Select the best photos you have taken, align, stack and then median combine them using specific software, like Registax or AutoStakkert!.
I would suggest shooting through a telescope, especially when the Moon is not full as the details visible on its surface will be far more interesting. You can see beautiful shadows behind mountains or below the rim of a crater. Adjust your exposure time depending on the phase of the Moon.

2. Capturing Conjunctions
Conjunctions are apparent gatherings in the sky of two or more objects. As our article is about photographing the Moon, we will discuss conjunctions between the Moon and the bright planets of the Solar System: Mercury, Venus, Mars, Jupiter and Saturn.
It’s quite often that the Moon is in conjunction with one bright planet, but having more planets in the same part of the sky as the Moon is even more exciting. Conjunctions look more spectacular when photographed close to the horizon, and when the Moon is in the phase of thin crescent.
Photograph during twilight when the sky has not yet turned black. For wider conjunctions, use focal lengths between 24 and 70mm, and for very close conjunctions you can even use a telescope.


For conjunctions happening at dusk or dawn, a good starting point in terms of settings is 4 seconds, f/4 and ISO 800. If the photo is too dark, double the exposure time. If it’s too bright, half the ISO.
If you use a lens longer than 100mm, start with 2 seconds, f/4 and ISO 1600 and change only the aperture and the ISO. Extending the exposure time will cause star trailing.
Read more: How to Get Sharp and In Focus Stars in Starscape Photos
Sometimes conjunctions can be very close and a telescope will offer some really impressive views, like in the next photo where planet Saturn is exceptionally close to the Moon.

3. Earthshine and the Moon on camera
You have certainly seen a very young (at dusk) or a very old (at dawn) Moon. Most probably you noticed a dull glow on the part of the lunar disk that was not directly illuminated by the Sun. That glow is called “earthshine” and we see it because the Sun’s light reflects off of the Earth’s surface and back onto the Moon. With a wider crescent, the earthshine is harder to observe or photograph as the light of the crescent will be too strong.

Earthshine looks best at medium to long focal lengths. For exposure parameters, you can use the settings from shooting conjunctions. Earthshine can be extremely spectacular at long focal lengths, especially if there’s a planet around to spice up the scene.
4. Photographing a Lunar Eclipse
We already have an article on capturing a Lunar Eclipse, so I will not delve too deeply into this topic. However, here are some of my top tips.
If you plan on photographing a total lunar eclipse, go out of the city to a place where there is not a lot of light pollution. The sky will get fairly dark during totality, and you will be able to see and photograph a rather surreal sight with lots of stars surrounding the eclipsed Moon.
If the total eclipse happens during one of the summer months in the Northern hemisphere, you can photograph the eclipsed Moon and the Milky Way in the same frame. You can treat this type of photography as a normal shot of the Milky Way and expose accordingly.
Read more: How to Photograph the Milky Way

Total lunar eclipses are also the only time when you can photograph, in a single frame, the Full Moon surrounded by lots of stars using a long focal length. I would recommend something in the range of 500 to 800mm.
For that, you will also need a pretty solid and accurate star tracker, as taking a long exposure from a static tripod will result in a blurry photo.

Lunar eclipses can also be photographed from the city. They look very special when placing the eclipsed Moon next to a nice building or another landmark.
Here, a photo-planning app comes in very handy, especially if you are a beginner in this field of photography. You will have to experiment a lot with the settings in order to get the photo that you want.

5. Photographing the Moon during a total solar eclipse
You read that right. You can actually photograph the Moon during a total solar eclipse. You are maybe used to the dark disk of the Moon surrounded by the solar corona, but with a longer exposure the dark disk will start to show details.
During totality, the Moon is right between us and the Sun, but it still gets some light on the face oriented towards the Earth. It is actually earthshine covering the whole Moon.
The best moment to photograph the earthshine during a total solar eclipse is in the middle of totality. An exposure of 1 second at f/4 and ISO 400 should do it. Here’s the Moon photographed during the total solar eclipse of August 21, 2017.

Read more: Bracketing & HDR – Photographing Landscapes Without Filters
Mobile phone and telescope
Using a mobile phone at the eyepiece of a telescope can produce some very beautiful photos of the Moon. You can handhold the phone at the eyepiece, or you can buy a special adaptor that will allow you to attach your phone to the eyepiece. This latter solution is preferred as holding the phone still on top of the eyepiece will prove to be quite challenging.
The bigger the telescope the better. This way of imaging will be visibly affected by atmospheric turbulence, and some frames will turn out unsharp because of that.
Again, my advice is to take a series of photos in burst mode, select the best ones and align, stack and then median combine them using specific software (mentioned earlier).

In conclusion
As a final note, I strongly advise you to keep things as true to reality as possible when photographing the Moon. Compositing a Moon taken with a long focal length in a landscape taken with a wide-angle lens won’t make a beautiful astro photo – and it is very obvious!
Clear skies!


