
How to Photograph a Lunar Eclipse
We admire the moon, gaze at the moon, and wonder about the moon – so it is no surprise that many photographers want to learn how to photograph a lunar eclipse.
This article will teach you how to photograph a lunar eclipse. There are many types, such as a Blood Moon. My goal is to guide you from the initial capture through to the presentation of your images of this special lunar event. So check the calendar and grab your camera!
As an avid photographer, chances are you already have all the gear you need to make beautiful eclipse images. If you’re fond of shooting grand landscapes with wide-angle lenses, a little research on the profoundly awesome Photographer’s Ephemeris application will show you in what direction and at what angle the moon will appear during the eclipse.

This will give you an opportunity to scout for a compelling landscape scene to compliment the event. Unlike a solar eclipse, where totality lasts around two minutes, lunar eclipse totality can last for an hour. This allows for ample time to get a composition mastered, try a few different exposures, and actually enjoy the view while taking your shots.
Frankly, if you employ your usual techniques for shooting the night sky and use a wide angle lens for lunar eclipse photos, you will have good success.
So let’s focus on making the moon itself the star of the show. It’s time to round up your telephoto lens, your tripod, your cable release (and in my case, some cookies) and look skyward.
Camera settings for photographing a lunar eclipse
The rules of photography can often be broken with fantastic results. The rules of physics and geometry? Not so much.
While trying to ascertain the best camera settings with which to photograph a lunar eclipse, we must remember that the moon moves. So, we need to select a shutter speed that will freeze the motion of the moon and the stars, while still maximising the amount of light that will reach the sensor.
In order to do that, we must learn and obey the #1 rule of night sky photography: The Rule of 400. The rule of 400 is this: divide 400 by the effective focal length of your lens, and the resulting number is the maximum shutter speed you can select without having the stars or moon start to trail.
As an example, I shot the recent Blood Moon eclipse with a 400mm lens on a full-frame camera. So 400/400 = 1. My maximum shutter speed for the night was therefore 1 second.
If you’re using a 200mm lens, 400/200 is 2 seconds. This math only works for a full frame camera, so if you’re using a crop sensor first do the conversion to see what the effective focal length of your lens is. For example, with a Canon T6i having a crop sensor factor of 1.6 and a 200mm lens, your effective focal length would be 200 x 1.6 = 320mm. 400/320 = 1.25 seconds for your maximum shutter speed.
Before you grab your pitchforks to come skewer me, it should be noted that you will see several references to the Rule of 500, or even the Rule of 600 to determine a maximum shutter speed. In my experience, it works better to use 400 when shooting stars with the longer lenses in order to ensure that the stars will be static, as it is more conservative.
Read more: How to Take Sharp Star Photos
Now we can easily complete the rest of the exposure triangle. If you’re shooting a bright full moon like a Super Moon, Blue Moon, Snow Moon, or a Super Blue Snow Moon, light will not be a problem. Chances are you can select a good sharp aperture for your lens, like f/8, and shoot with a short shutter speed while still keeping a low ISO
During the totality of a lunar eclipse, however, things get a little more spicy. By definition, the moon gets quite dim as it is in the Earth’s shadow, and your camera will be pleading for you to give it as much light as possible.
Since the shutter speed must stay constant, we are going to want to open the aperture of the lens all the way up. Unless you’re a serious nature photographer with a serious budget to match, you will probably be wide open at f/5.6.
We have now maxed out our shutter speed and our aperture, leaving the ISO as the last piece of the puzzle. If you’ve done any astrophotography before, you may know that an ISO of 1600 and up will be required to give you any chance of capturing real detail in the night sky.
Thankfully, modern DSLRs are capable of capturing images at extremely high ISO speeds while keeping noise levels reasonably useable.
How to set up your lunar eclipse shot
Now that we have a general idea of what settings we are going to choose, it’s time to get down to the business of capturing some images. Our objective, as always, is to get the cleanest, sharpest file we possibly can. The same techniques you are used to deploying in your landscape sessions will work marvellously:
- Shoot in raw format
- In-camera noise reduction off
- Use a cable release or self-timer to minimise camera shake
- Turn lens VR off
- Shoot in manual mode to control the exposure
- Mount your setup on a good tripod with a good ball head
While this checklist is helpful for shooting wide-angle scenes, it’s absolutely crucial when photographing a lunar eclipse. At 400mm or similar focal lengths, coughing too hard can cause the camera to shake enough to ruin your exposure. If it’s windy out, do you best to find shelter, or you’ll be quite disappointed when you get home and check your files.
Focusing can be a challenge during night photography, but in this case it’s a breeze. If you’re shooting any variety of full moon eclipse, there will be ample light during the beginning stages of the show to get your lens to autofocus on the moon.
Once you’ve got your focus set, don’t touch it! During eclipse totality, the light get dim enough that autofocusing becomes next to impossible. In those cases, using zoomed-in live view on a bright cluster of stars will usually allow you to sample enough light to be able to tell when the stars get crisp and in focus – particularly if you’re shooting with a Canon camera.
Otherwise, focus on infinity and take a test shot. Zoom in to 100% on live-view play back, and see if the stars are sharp. If not, focus in slightly and repeat until you get tack sharp results.
We are now set up, we have our preliminary exposure settings dialed in, we are focused, and the eclipse has just begun. It’s time to begin shooting in anger. As the moon slowly slides behind the earth’s shadow, it’s wise to document the full event by making images at regular intervals.
It can be fun to create a composite image of all the phases of the entire eclipse in Photoshop. The last seconds before totality is a beautiful scene all on its own.
The lunar eclipse begins
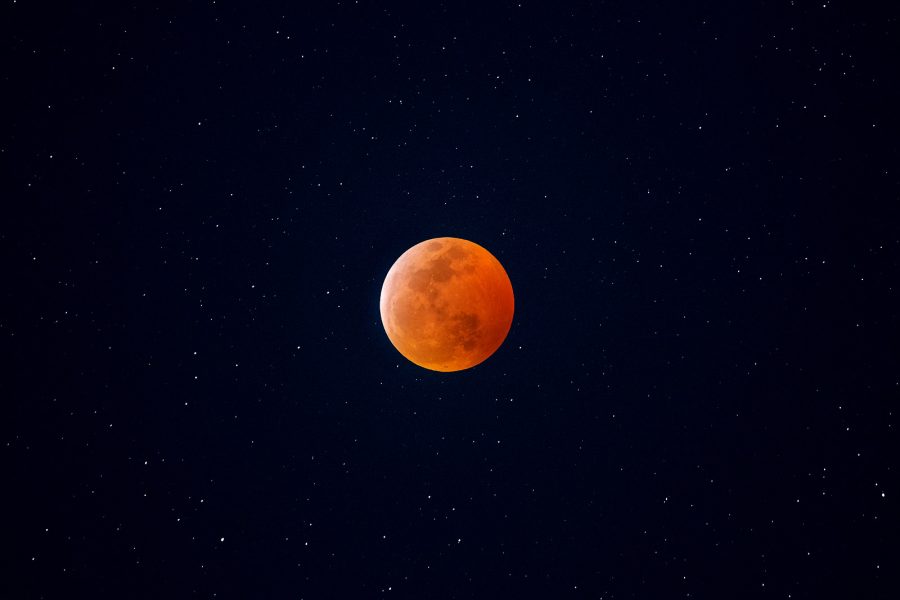
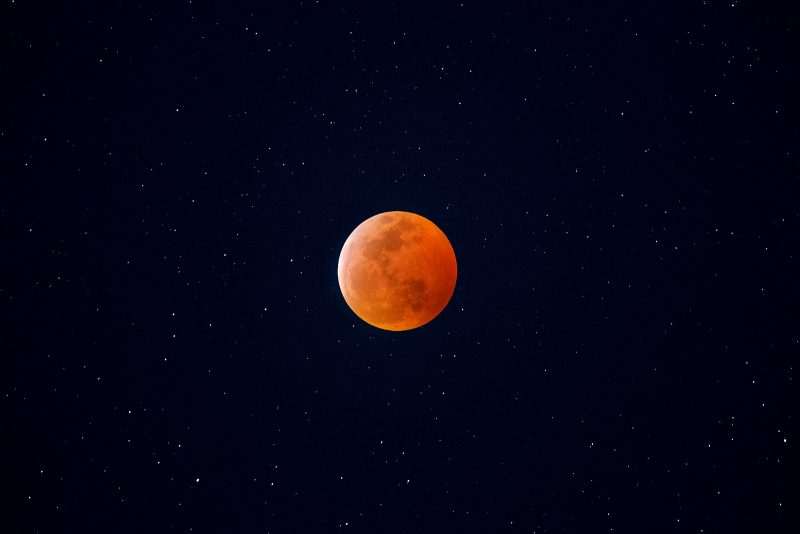
Totality. The triumphant apex of the lunar eclipse is marked by the moon turning a reddish orange color which inspires the nickname “Blood Moon”. To the naked eye, the moon looks dim, and the rest of the stars become more vivid than you’ve ever experienced on a full-moon night.
With the changing light conditions, you will notice that you’re having to make radical changes to your exposure as well. Since we’ve fixed our shutter speed and aperture, we are solely focused on our ISO setting for these changes.

A good place to start is ISO 800 if you’ve got a 1 second shutter speed at f/5.6. Checking the histogram from that exposure should reveal that you have no blown highlights, but that the rest of the exposure is rather significantly under exposed. The next step is ramp up to ISO 1600, ISO 2000, and ISO 3200 and see how that looks on the histogram.
Most likely, you’re finding good exposure across the face of the moon, with darkest areas being a bit noisy, but otherwise a good shot. It’s imperative at this point to playback the image at 100% and zoom around to the stars at the edge of the frame. Are they trailing? If so, you will want to shorten your shutter speed to ensure that the stars are static and your file is as clean and sharp as possible.
By now, you’ve now captured a sharp, well-exposed image of the lunar eclipse. With some very basic processing, you will have a wonderful picture to document the event. But there’s a lot more that can be done to improve your shot even further…
Shooting more than one exposure of the lunar eclipse
Photoshop is a wonderful tool. You can get extremely creative with your photography, and how far you want to divorce the final result from reality is entirely dependent on your preferences and skill level. But sometimes Photoshop can be used to more accurately recreate what the eye sees than what the camera can capture in a single frame due to the limitations of modern DSLR’s dynamic range.
Even with an ISO of 3200, your camera’s sensor will not be able to capture enough light from the surrounding stars for many of them to show up. What’s an aspiring astrophotographer to do? You can continue to crank up your ISO and push the limits of the camera.
Taking a series of shots at ISO 6400, ISO 9000, ISO 12800, and ISO 25600 (if your camera can manage it) will show you a rapidly increasing number of stars, but also a rapidly increasing level of noise. Additionally, it won’t take long to lose all the detail in the moon, leaving a big white blob of light.
Fear not about these two issues, as we will sort them later in post processing.
Playing back my series of exposures, I settled on ISO 3200 as a good exposure for the moon, and ISO 12800 as a good exposure for the number of stars that looked “natural” to my eye. Once you’ve got those two numbers sourced, it’s time to make what we expect to be our useable exposures.
Something to keep in mind as we get ready to work: at the focal lengths we will be using, you will notice that after every few frames the moon will try to escape out of the viewfinder. The idea is to try to keep the moon generally centred in your viewfinder. This will require you moving the camera angle on the tripod after every few shots.
ISO 3200, f5.6, 1 second. Click. Now take 9 more of them just like that. If you really want the best results, after you’ve captured these 10, you can take 10 frames with the same exposure settings and the lens cap on. These are called dark frames, and they can be used for a technique called dark frame subtraction later.
It’s essentially another tool to reduce noise. For our example, we won’t geek out to that level and just the 10 light frames will do.
Next, we will crank up the ISO to our selected setting for the stars (12,800 in my case). Repeat the process of taking our 10 light frames of the same exposure, keeping the moon as close to the middle of the frame as possible. Depending on how fast you work, you can probably get away with adjusting your tripod once after the first 5 frames if you have a 400mm lens.
Since memory is cheap, I typically will shoot 10 exposures at several different ISO settings, just to have the data in case I discover that a different setting was superior once I’m reviewing the files on the computer.
Unless you’re after a composite image of the full lunar eclipse event and all its phases, we are effectively finished, which leaves you plenty of time to just enjoy the night sky.
Processing your files
Back in the “lab”, it’s time to whip up a batch of astrophotography. The secret sauce for this recipe is going to be the multiple exposures you captured in the field. Start by selecting the 10 high ISO light frames that you are going to use for the stars (ISO 12800 in my case). Bring them in to Lightroom or Adobe Camera RAW, and do your basic adjustments except for noise reduction, so that they are all the same.
From here we have two options. If you have a PC, you can use Deepsky Stacker to align and stack your files. Mac users, like myself, have the option to purchase and use Starry Landscape Stacker to output a finished product.
The other way to achieve the results we are looking for is to manually stack, align, and average the files which will give us a single image with remarkably low noise. DSLR sensors create random noise particularly at short exposures and high ISOs, so by comparing similar files and averaging the result, the excess noise can be isolated and discarded. The results are remarkable. The process to get there is a tad painstaking, so don’t say I didn’t warn you! But sometimes great art requires great patience.
Aligning your images in Photoshop
You would think that Photoshop would be able to auto-align files that have a giant moon in the center of them, but that task proves problematic for the software. So the first step is to manually align the files in Photoshop. We start this by opening all the files as layers in Photoshop.
This can quickly be done by opening each file in Photoshop. Next, go to Files > Scripts > Load Files into Stack. Then select Add Open Files, and OK. Once the layers are established and stacked, we click the eyeballs to the left of the all the layers except the bottom two to turn them off. Click on the upper of the two layers, and change its blending mode to Difference.

The image will change to black and white, allowing you to see the “difference” between the current layer and the one below.

From there, move the Difference Layer around until you see nothing but black, meaning the layers are perfectly aligned. The most effective method is to use the Move Tool (V) until you get close, and then use the arrow keys on your keyboard to “nudge” the files into place.
This may required you to transform the Difference Layer (Ctrl + T on a PC, Cmd + T on a Mac), to get the entire frame to be perfectly aligned (black). Once the entire image is lined up (checking all corners), press Enter, and the changes will be accepted.

The blending mode on the Difference Layer will go back to Normal, and you can turn on the eyeball of the next layer up. Now THAT layer becomes the Difference Layer; rinse and repeat. By this point, you are probably thinking that it’s crazy to do this to 10 different layers, and you would be right!
Starry Landscape Stacker recommends at least 10 images, which is why we secured those in the field. But manually aligning 10 layers is about as much fun as having your hand chewed off by a water buffalo, so don’t fret if you decide it becomes too much work.
In the example I’ve used for this article, I aligned and stacked only 4 images. Even that will yield a substantial improvement over a single shot.
Reducing the noise in your shot
Once we have all the images aligned, we are ready to average out the noise. Select all the aligned sky layers, right-click on any one of them, and choose “Convert to Smart Object”. Once your computer has churned through that task, we can blend the resulting files by selecting “Layer > Smart Objects > Stack Mode > Median”. Shazam.

Now compare the noise in this final averaged image to any one of the original files. You should find fantastic noise reduction with no loss of detail. This new low-noise star file is now ready for you to save and put aside.
Our moon has been patiently waiting for some attention while we focused on the stars. Open your 10 (or 4) moon files in Lightroom or Camera Raw, and give them some adjustments to get them ready to combine. I recommend keeping the adjustments quite close (particularly in color and contrast) to what you did with the star files so that there is consistency across the two.
Again, leave the noise reduction alone even though the shadow areas of the moon will be noisy. Bring your adjusted moon files into Photoshop again and repeat the process you just used on the stars to align and generate a median.
Putting it all together
Your heroic efforts now result in two excellent (in terms of low noise and good luminosity) images. All that is left to do is combine them together into one cohesive lunar eclipse photograph. On the moon file, select the moon using your favourite method (the Magic Wand tool is, well, magic here because of the huge contrast between the moon and the night sky).
Copy that selection (Ctrl + C PC, Cmd + C Mac), click on the star file, and Paste (Ctrl + V PC, Cmd + V Mac). From there, move it to exactly align the centre of the two moons. At this point you’ll see that surrounding the Blood Moon is a blown-out ring of hot pixels from the overexposed moon in the star file below.

To solve this, with the moon layer that you just pasted in selected, go to Edit > Transform > Scale.

Hold down the Option key to keep the moon centred, and simply size the moon up until it just covers the edge of the hot pixels below. You now have a single resultant file to which you can add any “night sky” adjustments that you enjoy. It has substantially lower noise than any single image you took all evening, and the plethora of stars surrounding your Blood Moon closely match what your eyes witnessed during the actual event.
You’ve used a little knowledge and understanding of the limitations of your camera to capture the data you needed in the field to produce an image in Photoshop that is far superior to anything anyone could put forth in a single shot.
In conclusion
You don’t have to be an advanced astrophotographer to make a compelling image of a total lunar eclipse. This doesn’t have to be intimidating, either, and you can produce a stunning shot that will look fantastic printed large and hung on your wall.
Finally, with totality of a lunar eclipse lasting almost an hour, there is plenty of time to farm the images you need from the sky.
But make sure you also take a few moments to enjoy the event for what it is: celestial awesomeness.


