
10 Top Tips for Sharper Landscape Photos
It doesn’t matter how good the light is or how expertly you’ve composed your shot; if your photos aren’t sharp, they will be ruined. Unless you are practising intentional camera movement, or have some other creative justification, landscape photographers normally desire everything within the frame – from front to back – to be acceptably sharp.
Extensive sharpness helps provide depth and give photographs a more lifelike appearance. If you wish to print, enlarge or market your images, you need critical sharpness – tack sharp images that do justice to the landscape and your skill. Investing in a good landscape camera and quality optics is a good start, but image sharpness is more dependent on good technique than it is equipment. To help you achieve bitingly sharp landscapes every time, here are my top tips to keep things in focus:


[easy-tweet tweet=”10 Top Tips to Get Sharper Landscape Photos” user=”NatureTTL” usehashtags=”no”]
1. Use a Tripod
The most obvious – but important – thing you can do to aid stability and sharpness is use a tripod. They might be fiddly to use, and a pain and weight to lug about, but nothing else will help you achieve consistently sharp landscapes more than a good camera support. Budget, weight, and maximum and minimum height are all things that will help determine your choice.

Feisol, Gitzo, Induro, Manfrotto, 3-Legged Thing, and Really Right Stuff are among the leading brands and each provide a wide choice of designs. Don’t scrimp. Compact and lightweight legs might suffice in good weather, and are ideal when travelling – when weight is a key consideration. However, landscape photographers are often shooting in inclement weather and you need a set of legs capable of withstanding the elements. Manfrotto’s 055 legs are a popular choice. If your budget allows, opt for the carbon version, as carbon fibre tripods are lighter, yet remain just as stable. Make sure that everything is tightened-up properly too – for example, that legs are locked and the head hasn’t loosened.
2. Turn Off Image Stabilisers
It is worthwhile switching off optical image stabilisation when your camera is securely fixed to a tripod. With some designs, if image stabilising is left on, it can actually do the opposite thing – softening image quality as a result of searching for motion that isn’t there. Besides, leaving stabilisation on will only waste battery life, so, unless you are shooting handheld, switch it off.

3. Opt for a Small Aperture
To capture landscapes with front-to-back sharpness, you will require a large depth of field. Although focal length, camera-to-subject distance, and point of focus all influence perceived depth of field, the aperture is the primary method of control. Therefore, your choice of f-stop is a very important consideration when shooting landscapes. Depth of field refers to the zone of acceptable sharpness in front and behind the point of focus. Small apertures generate a wider depth of field than large ones. However, due to the effect of diffraction (see below), do not simply opt for your lens’ smallest aperture of f/22 or f/32.
Instead, it is good practice to select the largest aperture that is still able to provide the depth of field you require. A good starting point is a mid-range aperture in the region of f/11, but many optics actually perform best at around f/8. The depth of field you require is very scene dependent – so adjust your aperture accordingly, on a shot by shot basis.
Try the eBook: A Practical Guide to Landscape Photography
4. Calculate the Hyperfocal Distance
Calculating and applying the hyperfocal point sounds more complicated than it actually is. What is it? Well, a lens can only focus precisely on one plane – sharpness gradually decreases either side of this distance. Roughly speaking, depth of field extends one-third in front of this point and two-thirds beyond it. Therefore, if you focus too close or far away, you will waste some of the depth of field available to you.
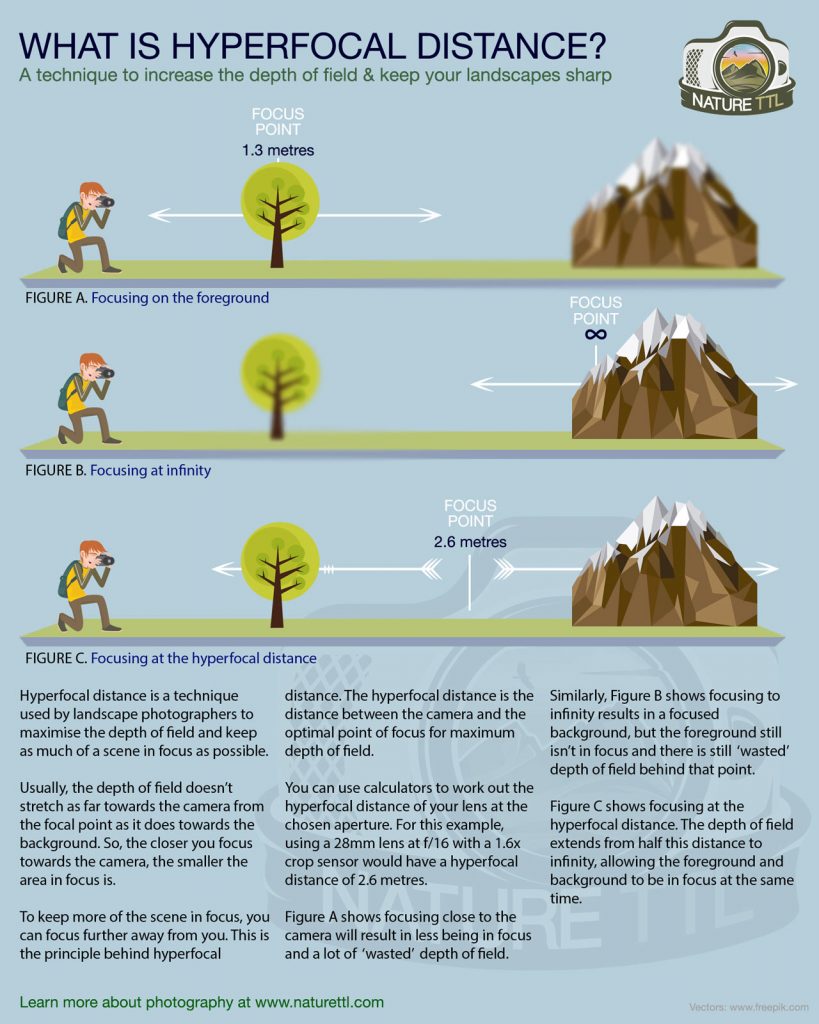
However, for every focal length and aperture combination, there is one distance that will maximise depth of field – the hyperfocal distance. By carefully focusing on this point, you will take advantage of the full extent of the depth of field. There are hyperfocal charts and apps available (for different sensor sizes) to help you calculate this optimum point. An App like PhotoPills is a good choice. Just enter the selected focal length and aperture, and the app will calculate the distance you need to focus on and also show the near and far limits.
Further Reading: How to Use Hyperfocal Distance
5. Focus via LiveView
As with any subject, precise focusing is a prerequisite for achieving sharp results. Some photographers will recommend the sophistication of auto-focus, while others would evangelise about the benefits of focusing manually. It doesn’t really matter which method you prefer, though, as long as you focus on just the right place within the scene. Regardless of whether you favour manual or autofocus, it is best to focus via LiveView.

The latest generation of digital cameras boosts high-resolution screens. Using the Magnify (+) button you can zoom into the LiveView projection in order to place your point of focus with remarkable accuracy. On some cameras, LiveView also provides live depth of field, so you can preview the extent of sharpness (for any given aperture) before you trigger the shutter. On other models, depress the depth of field preview button in order to see if the selected aperture provides sufficient depth of field or not. Again, use the magnify button and scroll around the scene, from front-to-back, to check everything will be recorded sharp throughout. If light reflecting off the screen is making it hard to use, try using a Loupe.
6. Don’t Physically Trigger the Shutter
Using a good tripod doesn’t completely guarantee shake-free results. Even the smallest movement can soften image quality – this includes the action of physically depressing the shutter. Therefore, use a remote trigger, cord or infrared device to release the shutter. Basic devices are relatively cheap, but devices which have multiple timer and shutter functions are more costly. Alternatively, select your camera’s delay or self-timer option – set to a short delay of 2 seconds – in order to eliminate any risk of you causing movement when taking photos.
7. Mirror Lock-up
If you use a mirrorless camera, or you take photos with LiveView activated, you can skip to the next tip. However, if you are a digital SLR user who normally switches off LiveView (to conserve battery life) once you’ve focused, read on. When you take a photo, the internal reflex mirror has to abruptly swing up and out of the light’s path just prior to the shutter opening. This can cause tiny internal vibrations, commonly known as ‘mirror slap’, which can degrade critical image sharpness. To prevent this, select your camera’s Mirror Lock-up function – found on many SLRs, but not all entry-level models. With Mirror Lock-up enabled, two presses are now required to take a photo. The first click locks up the mirror, while the second press actually takes the photo. Pause briefly between locking up the mirror and taking the photo to enable any internal vibrations to deaden. When the mirror is in the locked-up position, you can no longer view the scene through the viewfinder. Using Mirror Lock-up is a useful method to really maximise critical sharpness.
8. Avoid Diffraction
As touched upon earlier, it is often assumed that a lens’ smallest aperture will produce the sharpest results, as it is the value that generates the widest depth of field. This is not the case, though. There is an optical effect called diffraction that softens overall image quality when very small apertures are used. Why is this? Well, to put things simply, when image-forming light passes through the aperture, light striking the edges of the diaphragm blades diffracts or scatters, affecting image quality.

At small apertures, the percentage of light getting diffracted is proportionally much higher. Therefore, while depth of field is extended, image quality actually deteriorates. Each lens tends to have an optimum aperture – a sweet spot where it performs at its sharpest. You might want to do your own lens tests to discover this. You will want to select an aperture that provides sufficient depth of field yet remains greatly diffraction free. You often have to employ a degree of compromise when selecting the most appropriate f/number for a scene, but a value in the region of f/11 often provides a logical balance.
9. Consider the Weather
Even when using a tripod, the weather can play a role in whether your images are sharp or not. Very windy weather can destabilise your camera, particularly if you are using a long lens or have a filter system and filters attached to the front of the lens (which can act like a sail and catch the wind). Try and stabilise your tripod as much as possible by splaying the legs wider and pushing them firmly down into the ground (providing the ground is soft).

You can buy and attach spikes to the feet of some tripods, which will help provide a stable platform. Some tripods have a hook you can hang your camera bag from in order to add weight and stability to your support when it is windy. Don’t let your bag just swing about freely, though – this will only increase the likelihood of unsharp results. Instead, attach the bag via a bungee rope so that it acts like an anchor. In very windy weather, it is normally impractical to employ creatively long exposures. In fact, if necessary, be prepared to select a higher ISO speed to generate a shutter speed fast enough to combat the windy conditions.
10. Always Review Image Sharpness
Even if you’ve followed all the relevant steps above, still take time to review image sharpness afterwards. With camera monitors being high resolution, you can now scrutinise image sharpness with great confidence. Replay images on screen and use the Magnify button to zoom into the image and check images are acceptably sharp.

With landscape photos, scroll from the foreground through to the background to check the depth of field is sufficient and your point of focus is correct. Having done this, you can feel assured and satisfied that your landscapes are definitely sharp enough!
[easy-tweet tweet=”Here are 10 ways you can get sharper landscape photos!” user=”NatureTTL” usehashtags=”no”]


