How to Quickly Find & Remove All Dust Spots in Lightroom

Those out of focus black dots in the background of your photos are dust spots. They’re artefacts on your camera’s sensor, or less commonly on the lens, which are picked up in the photo itself. They’re seriously irritating, and even when you think you’ve got rid of them all during editing, you could well find more later. This is particular inconvenient if you’ve just paid to print out your photo, only to find the dust spots are subsequently more obvious.

You’ll pick up dust on your sensor overtime, no doubt about it. We’ve already written a tutorial on how to clean your sensor, but you can’t change the past and some photos will have them no matter what you do. Normally, you may spend time viewing your photo at maximum magnification, painstakingly checking inch by inch. Luckily, Lightroom has a rather handy tool that highlights even the most obscure dust spots. It’s the Visualise Spots tool – let’s take a look at how it works.


Step 1: Take Your Photo Into Develop Mode
You’re most likely to see dust spots on photos with a lot of sky in the background, or white areas. Photos with lots of detail tend to hide away any dust spots to the point they are undetectable. Even so, it doesn’t hurt to check. Open up your photo in Adobe Lightroom, and move to the ‘Develop’ window. You can just select it in your library and hit ‘D’ on your keyboard for quickness.
Step 2: Select the Spot Healing Tool
The shortcut for this is ‘Q’ on your keyboard, or you can select the spot healing tool from underneath the Histogram window. This is the tool you will use to both find and remove the dust spots.
Step 3: Switch On Visualise Spots
Next up you have to switch on the Visualise Spots mode. You can do this by select the checkbox as shown below in the screenshot. Or, you can just tap ‘A’ on the keyboard to alternate the mode on and off. It’s much quicker this way!
If the toolbar isn’t showing up by default, navigate to ‘Window > Show Toolbar’, or use the shortcut ‘T’.
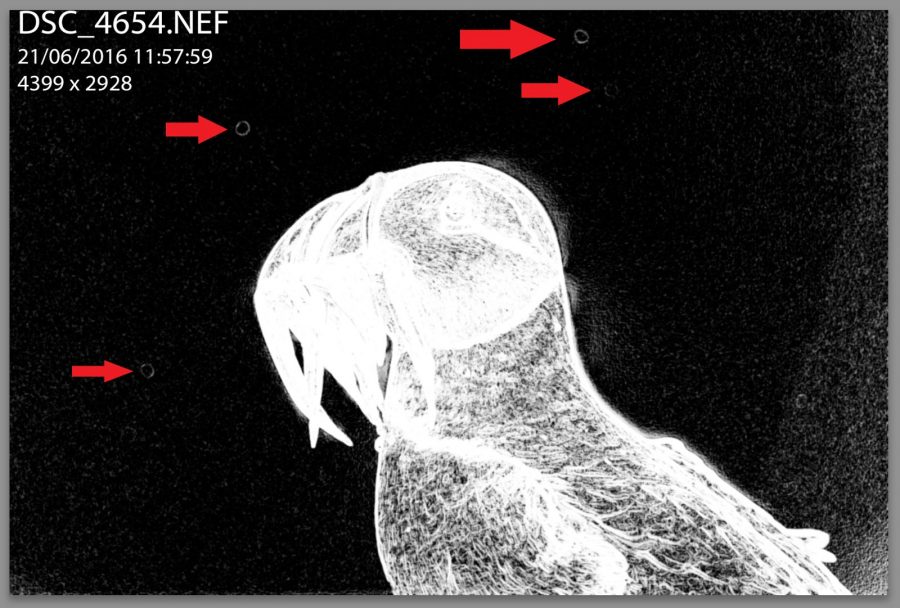
You will now see that the picture has been inverted. The slider in the toolbar at the bottom will increase or decrease the sensitivity. What you’re seeing is the areas of contrast in the photo, so the higher the sensitivity then the more likely it is to pick up the very slight contrast of dust spots in the background.
All those little rings you see in the background (there’s 4 in this photo) are dust spots. They need removing.
Step 4: Remove the Spots
This is easy. Just click on each spot with the spot removal tool that you’ve already selected, and they’ll be removed automatically. Lightroom will choose a similar area to blend over the dust spot, although you can drag and move this selection around if you wish.
The tools you see on the right (size, feather, opacity) adjust the spot healing brush. Size is pretty self explanatory – it changes the diameter of the selection. Feather adjusts the hardness of the selection’s border (so a solid circle or one that fades into the surroundings), and opacity is the translucency of the adjustment. For this, I am set to 77, 58 and 100 respectively. Opacity should always stick to 100 for spot removal.
Simple! You’ve now removed all the spots and you can print with the knowledge that you won’t be spotting anymore dust spots later on. Excuse the pun.


