
How to Clean Your Camera’s Sensor
Have you ever reviewed a photograph on your computer and spotted little black marks on the image? These are dust spots on your sensor, and they are extremely irritating. Using your camera and continually changing lenses increases the risk of dust getting on your sensor. In fact, it is inevitable that this will happen. In this tutorial, learn how to clean your camera’s sensor.
You could always just remove the dust spots in editing software, but more substantial marks are harder to get rid of (especially if they occur in complex areas of the image). Most people take their camera to a local dealer, who will charge you £30 ($50 USD) or more to clean it. This is expensive, especially considering it takes around 10 minutes to do. I clean my camera’s sensor myself, and it’s not a scary process. The rumours about easily damaging your sensor are untrue, provided you use the correct equipment. Follow this guide, and you’ll save yourself a lot of time and money.


This method describes a “wet clean”, which is used to remove the most persistent of dust spots from the sensor. There are also methods for “dry cleans”, however I have heard reports of gel pads and other items leaving residue and causing damage. Plus, when your camera is serviced this is the method they will use. If you do it correctly, it’ll give you the best finish.
What You’ll Need to Clean Your Camera’s Sensor
It is important you use the correct equipment for cleaning your camera. Never use a cloth or your t-shirt, as that will damage the camera. Sensors are very delicate, and such materials will simply scratch it and ruin your camera.
Firstly, buy yourself this Rocket Blower. It will come in handy a lot, including other situations than just cleaning your sensor.
To clean the sensor, we’ll be using specialist cleaning fluid and swabs from the brand Visible Dust. Take a look at this chart on their website, and determine the swab size of your camera.
Visible Dust make three different types of fluid, but the one you are likely to need is called “Sensor Clean”. You can use these links to navigate to the correct product:
- VD Sensor Cleaning Kit – 1.0x swab size
- VD Sensor Cleaning Kit – 1.3x swab size
- VD Sensor Cleaning Kit – 1.6x swab size
(If these product links aren’t working for you, you can find them listed on this page).
Essentially, that is all that you need to buy: the rocket blower and the cleaning kit. However, it makes life a lot easier if you also buy this Visible Dust Quasar Sensor Loupe Focussing System. It sounds very fancy, but in essence it is a high quality magnifying glass with LED lights that you can use to inspect the sensor. It will show up dust particles that you can’t see clearly with the naked eye. It costs £72.99, but considering that just a few professional cleaning services will cost you around £100, it is definitely worth it.
Step #1: Prepare a Clean Working Area
Dust particles are tricky. They seem to have a habit of getting everywhere and as hard as you try, you can never avoid them. So, it is important to prepare a clean working area to clean your camera before you start. Find a table in a well-lit area, and wipe it down with a damp cloth. You should also wash and dry your hands first, to avoid any unwanted dirt getting onto the camera. Finally, lay all the items you need out next to your camera on the table and proceed to the next step.
Step #2: Lock-up Your Camera’s Mirror
DSLR cameras use a mirror system when taking a photograph; they allow you to see the image through the viewfinder. When you press the shutter, the mirror lifts and then lowers again – this is the “clunk” sound you here when taking a photo. To access the sensor, you need to make the camera lock the mirror in the upright position.
For Nikon users, navigate to the Setup Menu, and it should be one of the first options called “Lock Mirror Up for Cleaning”. Select it, and then press the shutter button to lock it up. Remember not to turn off the camera yet, otherwise that will lower the mirror again.
For Canon users, it should be under Custom Menu Function 8, called “Mirror Lockup”.
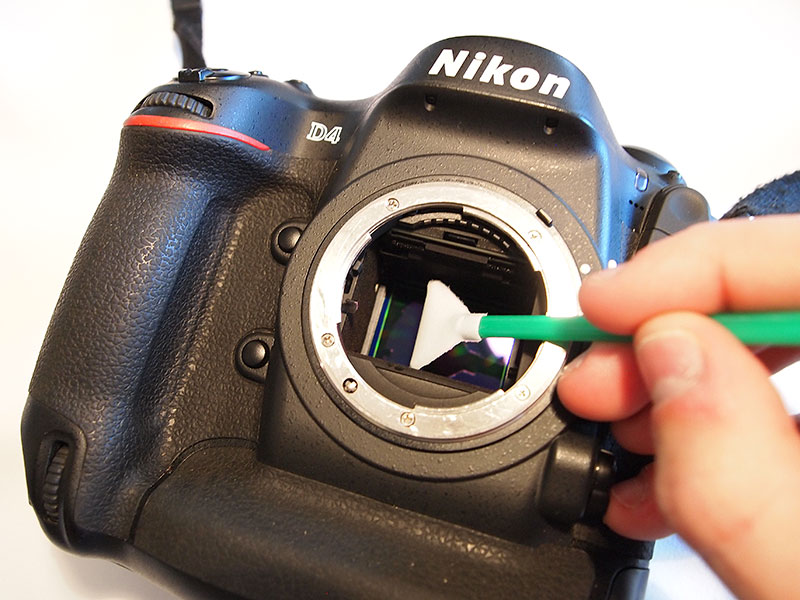
Lay your camera down facing upwards, and take off the cap. Take a look at the sensor and see what you are dealing with. You should be able to see the dust spots. Be very careful not to breath on the sensor, as water droplets cause irritating marks that are harder to remove.
It is possible to remove some dust spots using a rocket blower, so before using the fluid try this. Turn the camera upside down so gravity is in your favour, and pump a few blasts of air onto the sensor. Do a visual check with the sensor loupe or take a test shot to see if the dust has dislodged.
If not, then it’s time to get out the cleaning kit.
Step #3: Apply the Fluid to the Swab
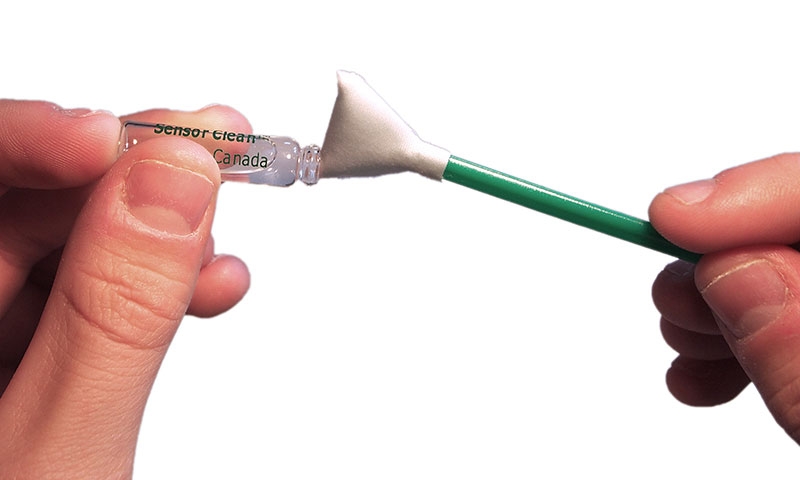
Your Visible Dust cleaning kit will include a small bottle of fluid. You need to apply this to the swab gently, as too much may cause smears. Place the corner of the swab in the bottle opening, and carefully tilt it so some of the liquid is absorbed. Once it looks slightly damp, repeat this process on the other corner of the swab.
The most important part of this process is to ensure that the swab is not too wet. You don’t want it to be dry, and you don’t want it to be saturated – it must be damp. If your swab is too wet, you may find that there is fluid left behind on the sensor. It may sound scary with my warning in bold text, but just dab the swab with the fluid and don’t drench it.
It is worth noting that you can buy larger bottles of this cleaning fluid which come with a dropper. In this case, use 3-4 drops of fluid on the swab.
Step #4: Get Cleaning
This is probably the most simple part of the process. You will find that your swab perfectly matches the size of your camera’s sensor, provided you chose the swab size correctly!
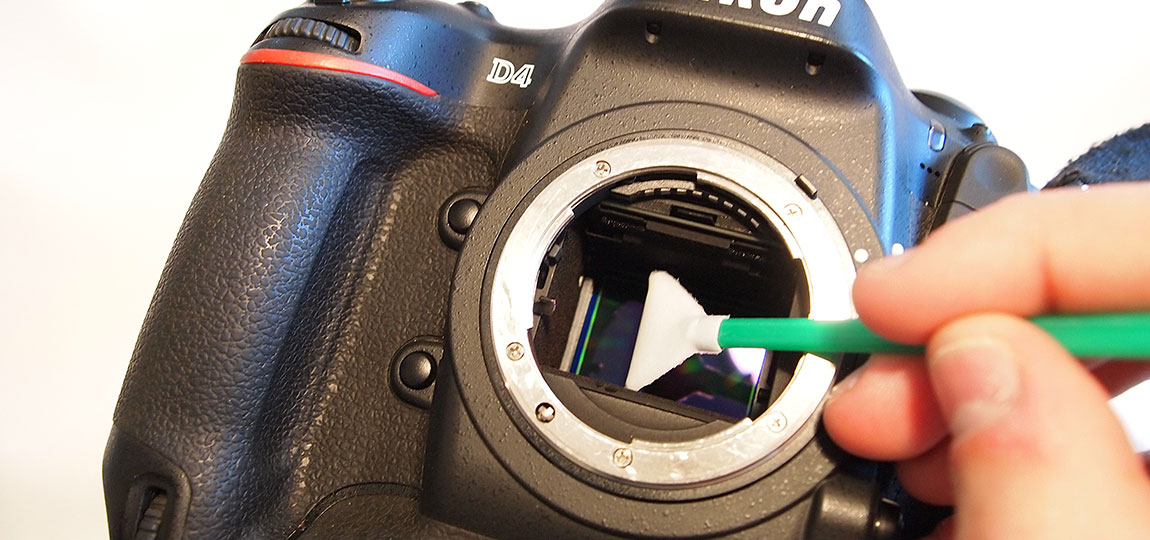
When entering the chamber, hold the swab in a horizontal position. Then, simply rotate it and line it up at the top of the sensor, as shown in the picture below, and wipe across it. You shouldn’t need to do more than one wipe, unless you have some very stubborn marks (if that is the case, you may need to use the Visible Dust Smear Away fluid which is made for more oily marks). If you do go for a second wipe, rotate it 180 degrees to use the other side of the swab, and repeat.
When removing from the chamber, rotate to a horizontal position again and remove. This stops the swab catching on the narrower sides of the chamber and dislodging more dust.
If you bought the sensor loupe, do a visual check and take a look at your sparkling clean sensor.
That’s it – you’re done! Now, replace the cap and turn off the camera to place the mirror back into position.


