
How to Find and Use Light in Landscape Photography

Photography is the capturing of light, and without light you have no detail, no contrast, no dynamic, and no life. One of the most powerful skillsets that a landscape photographer can have is the ability to identify, plan and adapt to the lighting conditions.
You can spend countless days at a beautiful mountain scene with an extraordinary composition, but without the proper light that image will be unlikely to come to fruition. Unfortunately, light and the weather are the two elements in which we cannot control.


In this article, I’m going to highlight some of my favourite tips and tricks for how to best find and use light in landscape photography, in both optimal and not-so-optimal conditions.
Finding a vision
When I’m out in the field scouting for an image, I often remind myself of the great Bob Ross. If you’re not familiar with Mr. Ross, hop on over to YouTube and do a search for his videos… you won’t regret it.
Bob Ross was an incredible wet oil painter and when he would create his videos, he would always talk his audience through the painting he was about to create. He would talk about how the light would work through the scene, what kind of foreground he’d have, what kind of mountains would be in the background, and of course where he’d place his “happy trees.”

Once you tuned in beyond Bob’s soothing voice, you would quickly identify what he was doing. Before a single drop of paint hit his canvas, Bob knew exactly what it was he was going to create. He described his vision and then executed.
Be like Bob. Have a vision for your image that you want to create before you even pull the camera out of the bag. Think quality over quantity.
For me, I try to go out on every shoot to create just one great image, not a handful of mediocre images, and by having a vision I find myself more successful than not. Having a vision allows you to plan for and anticipate the light you want to flow through your scene.
Tools of the trade
So now that you have a vision in your mind of how you want to create the perfect landscape photograph, you must now understand how and when the light will work through your scene.
This can be particularly difficult if you are in a new landscape that you are unfamiliar with. Each day is different in how the sunlight moves across a landscape. Time of year and cloud cover are two of the biggest factors for this. Let’s start off by discussing how to plan for the sun or moonlight in your scene.
Read more: How to Photograph Moonscapes

Positioning of the light
There are two apps that I use in order to understand how light will be moving across my landscape. These apps are The Photographer’s Ephemeris and PhotoPills.
I tend to use TPE to understand the placement and direction of the sun or moon during any point in time. TPE allows you to see exactly where the light source will rise and set, and also how it will transition throughout the day. Knowing and understanding this helps with planning for that sunrise or sunset glow. You can also see if your scene will be side-lit, front-lit, back-lit, and more.
I utilise PhotoPills for its great augmented reality feature. This app allows you to essentially pull up a date and time and overlay the sun and moon placement over the current scene in front of you by using your phone’s camera. This plays an extremely vital role in my planning.
Working with cloud cover
You can utilise either of the two apps we just discussed to plan for your scene’s light, but sometimes nature has different plans.
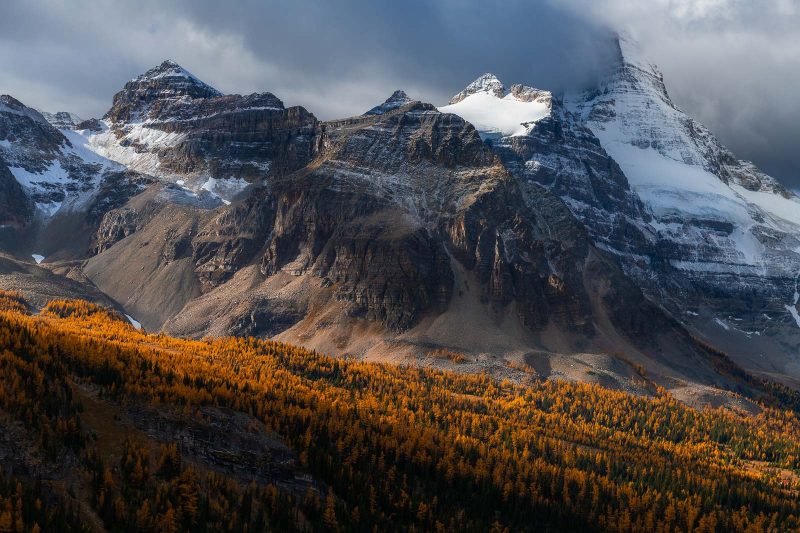
For me, a landscape photograph needs clouds. Clouds add dimension, texture, depth, and an overall mood to the scene. There is such a thing as too much cloud cover, or too little cloud cover, though.
Some terrain can create its own clouds, and clouds can spontaneously form with the warming or cooling of the day. Obviously, clouds move, so what may be there when you first show up at your location, may not be there when the light is primed.

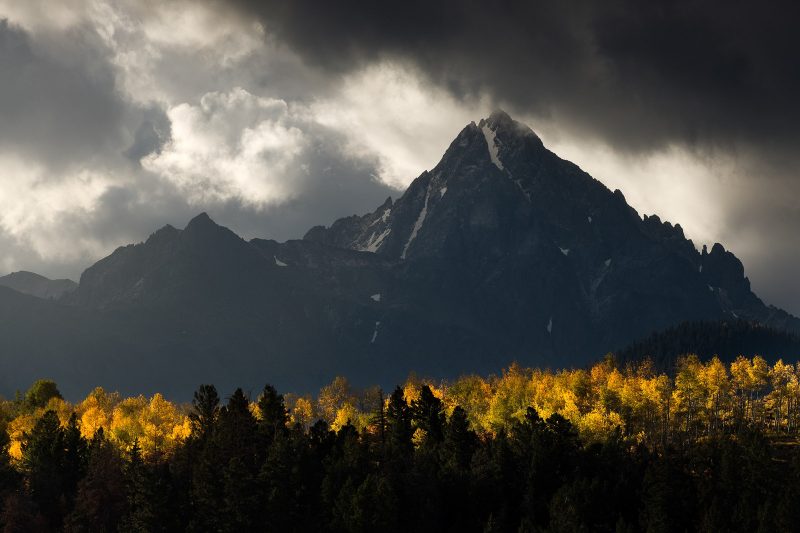
The first thing I do before heading out to shoot is check the local weather forecast to see what is predicted to happen that day. If the forecast calls for clear skies, I may not head out to shoot sunrise or sunset but instead focus on the night sky.
If the forecast calls for anything else but clear skies, I will head out. Rainy and stormy days can yield to dramatic scenes, and partly cloudy skies lead to speckled light and texture.
A little tool that I like to use while out shooting is the visible satellite image and loop for the location I am in. This allows me to get an idea of whether or not the skies I have upon my arrival will be sticking around or clearing out, or to see if a gap in the clouds will be coming in.

To find the visible satellite image for your area, simply Google “visible satellite loop” and then your state or region. Visible satellite data is only useable during daylight hours, so it’s best for sunsets.
Anticipating the conditions
Light can come and go within the blink of an eye, so having the ability to anticipate where and how light will work within your scene gives you a huge upper hand. Utilising the tips above – having a vision, gaining knowledge of where your light will be coming from, and the conditions in which your light will be in – will help you take advantage of each fleeting moment that the light is primed within your scene.
Some of my best photographs have been captured with only a small window of light available. By small, I mean seconds to maybe a minute of available light. It’s not the quantity of images you capture while out in the field, but the quality.
One moment; one frame; one glimpse of light can make or break your outing. I always do my best to arrive at least an hour or two prior to when I believe the best light will be occurring within my frame.
This time gives me the chance to scout for the perfect compositions, get a feel for how the environment is working, and adjust for any planning mistakes that I have made (let’s be real, mistakes happen no matter how long you’ve been doing this).
A tip for cloudy scenes is to take a few minutes to understand how the environment above your head is different than the one at your feet. Wind direction and speed changes with height, so if the wind is at your back it could be completely different a few thousand feet above, and therefore cloud motion and direction may affect how you think the light will work through your scene.

Getting creative and thinking outside the box
1. Using long lenses
In landscape photography, we seem to immediately throw on our wide-angle lenses and shoot as big of a scene as possible. Sure, my Nikon 14-24mm is my main squeeze out in the field, but I have a secret crush on my Nikon 70-200 and Nikon 200-500mm lenses as well.
I like to challenge myself to use every piece of glass in my bag while I’m out shooting. It forces me to think outside the box and look at the smaller, more intimate details of the landscape as well.
In a perfect world, we would have beautiful light flowing across our entire landscape from horizon-to-horizon, but that rarely happens. Instead of stressing over the light not being in the perfect place, throw on a telephoto and focus in on the smaller areas where the light is working in your favour.
A longer focal length can allow for scenes that would often be missed to be captured, and even some beautiful compression shots to be created.
2. Working with a tripod and blending layers
If you are dead set on capturing a frame that is at a wider focal length, but aren’t getting your fill of beautiful light throughout the scene all at once, attach your camera to a tripod and try this method.
With your camera steady, get your composition set up perfectly and take multiple frames as the light progresses through the scene. Take note on where the light has hit and where it has missed as you shoot.
The goal is to capture enough frames to be able to layer and mask the images together in Photoshop into one complete scene with the light in all areas you wish it to be. I prefer to use this method to capture scenes that have very mackerelled looks to the light.
3. Long exposures
In certain conditions, I really enjoy using a ten or six-stop filter to create dramatic scenes with light and motion.
Read more: The Essential Filters for Landscape Photographers
I’ll typically try this long exposure technique when light is minimal, low on the horizon, and I have quick moving clouds that are blowing either towards or away from the camera.
With minimal light, a long exposure (anywhere between 30” to 180”) really allows the light to “bleed” into the scene, creating a dramatic dark-to-light contrast within the frame.
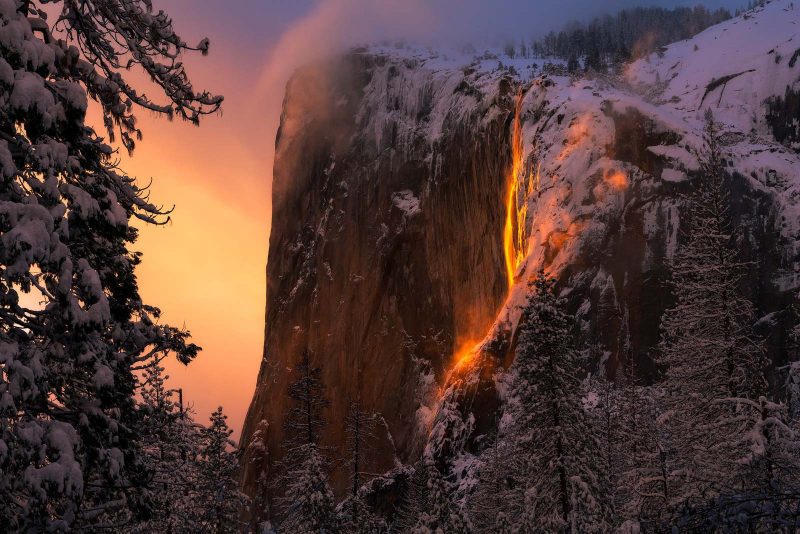
4. Sun bursts
I often get asked how I capture those beautiful sun bursts of light within my frame. Basically, there are two things you need to pay attention to if you’d like to capture a sunburst.
Firstly, you want to make sure you are shooting at a higher aperture, preferably anywhere between f/11 and f/18. A higher aperture brings the blades within your lens closer together and thus they help shape the structure of your sun burst. Each lens produces different intensities of sun bursts.
The next thing you need to be aware of is that you only have a small window to capture a sun burst. Your sun burst will be created as the sun moves over an edge and flares. For example, the sun rising over the ridgeline of a mountain or peeking out behind the branches of a tree. You will want to shoot a handful of images as this takes place, because with each passing second the intensity of the sun burst will change.
Read more: How to Create Sun Stars in Landscapes and Avoid Lens Flare
In conclusion
Light plays a vital role in any photograph, especially in landscape photography. Take time to understand it, plan for it, and take control of it.
Landscape photography is one of the few genres where we must rely on nature for light and accept that sometimes the light just won’t come. Don’t let opportunities with less than optimal light disappoint, but instead use it to inspire and encourage you to be persistent in your attempts to capturing that perfect frame.
Perseverance and patience are key, and make that moment when you get the perfect light in your frame so much more appreciated.
Read more: A Practical Guide to Landscape Photography


