
7 Tips for Photographing Mountains

There is no other place that I’d rather be shooting than in the mountains. Simply put, they are a magical place – jagged peaks, and each uniquely decorated. Some are topped with glaciers, others dressed with cascading waterfalls. There are even some that are coloured like rainbows, towering out of the landscape and taking your breath away with every view.
These landscapes are places that can provide endless photographic opportunities. The beauty of the mountains isn’t something that can be put into words, but yet can almost be captured and conveyed through a photograph.


I spend a lot of my year traversing mountain ranges throughout various countries, and I have learnt so many things along the way.
With that said, I’d like to share seven of my favourite tips for mountain photography. I hope they will help to expand your skills, enhance your creativity, and allow you to see the mountains in a different light.
1. Use foreground to create the scene
One of my favourite elements to include in a mountain scene is some sort of foreground. Regardless of the time of year, the mountains are always full of fantastic opportunities for foreground interest.
Some of my “go-to” foregrounds are as simple as a patch of tall grass in the summer, colourful wildflowers in the spring, icy edges of the lakes in the fall, and frozen methane bubbles trapped in the winter ice.

As you’ll learn later, foreground isn’t always a necessity for your mountain images. However, if you want to use mountains as more of a backdrop of your image, incorporating foreground can be quite beneficial.
For me, I tend to rely on foreground for colour contrast, leading lines, or repeating patterns – all compositional elements that will create flow and depth in a scene.
It is important to keep in mind that with foreground you may want to utilise focus stacking to create tack sharpness from your closest element to furthest.
Read more: Where to Focus in a Landscape Photo
You want your foreground to make sense, too. Don’t just include something in your frame for the sake of it. Make sure everything within your shot helps tell a story and helps the image. My general rule of thumb is if it is distracting, it doesn’t belong there.
2. Watch the edges of your frame
I like to encourage my students to treat mountains as people: they have feelings too! You would never want to cut off the head of a person in a portrait, so make sure to keep the peaks of mountains within the frame.
Now the question is, how much room do you keep above the mountain and between the frame? Well, it all depends on if you have clouds or not, or if you are shooting the night sky. If you are cursed with a blue sky day, try to keep the sky (which is negative space) above the mountains to a minimal. I usually suggest maybe about a quarter of the frame.

If you have beautiful clouds floating above your mountain, utilise those to help bring in some detail in the sky. For these scenes, I typically keep the sky to about a third or so of the frame; the same goes for the night sky if you are capturing stars in your scene.
Another key compositional element to watch out for is to make sure that your mountain slopes are either both descending out of the frame, or converging inward, if possible. This visual helps to lead the eye inward towards the centre of the frame and not out of it. Sometimes it is not possible to do this however, so don’t drive yourself too crazy over it.
3. Try different focal lengths
It’s quite easy to never take your wide-angle lens off while out photographing the mountains, but don’t forget to give some love to your longer focal lengths.
I often find myself wielding my Nikon 70-200mm or Nikon 200-500mm to create images of the mountains. Don’t get me wrong, my Nikon 14-24mm is my main mountain photography lens, but a longer focal length can open your eyes to some different compositions.
Read more: How to Take Landscapes with a Telephoto Lens

I typically rely on these lenses when there is something interesting occurring on the mountain’s summit. For example, strong winds blowing the snow off or beautiful morning light skimming across an area of textured rock.
If you can catch a sunrise or sunset with the mountain during these conditions, try a long focal length for some great details.
4. Provide scale
It’s hard to convey just how big some mountains are, but by incorporating a person or structure into your frame you can create a sense of scale.
You don’t just want to randomly throw a person in a colourful down jacket into your scene – make sure you add them in with intention. Here are a few things to keep in mind:
First, place your subject in a spot where they will be clearly seen. You don’t want to hide them in the brush – you’ll never convey scale if they aren’t visible! Next, I like to have that person wearing something that creates colour contrast: bright colours do a great job.
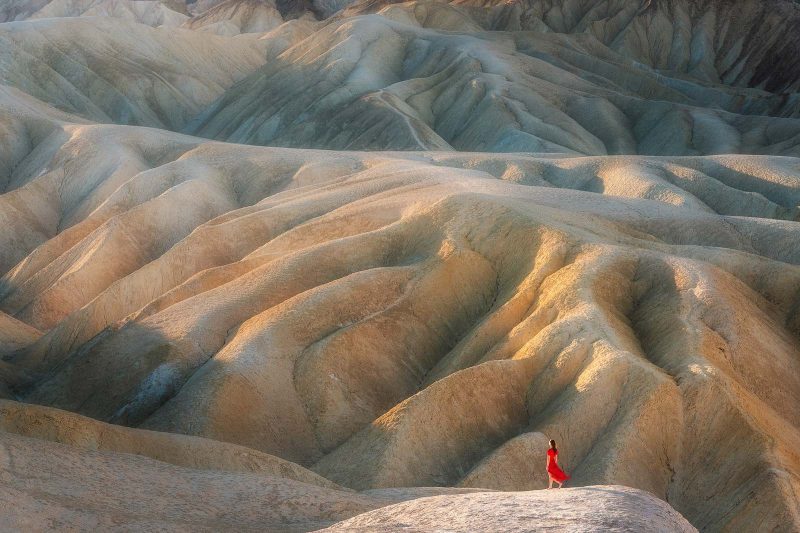
You also want your person to look, well, like a person. Ask them to stand or sit in a way that shows shape. You don’t want that person to look like a ball of clothes in the scene. Make sure that there is some separation between the legs and arms in order to create shape.
Finally, make sure that your subject is a good distance away from the camera. If they are too close, they will appear larger and your sense of scale isn’t quite there. I typically place my subject a couple of hundred feet away, and that distance allows them to become quite comparable to the scene.
5. Don’t be afraid of trying bracketing
Depending on the time of day in which you are out shooting, you may be dealing with some mountain shadows and brighter skies. The dynamic range in some scenes may be too much for one single image, so some bracketing may be required.
I typically find myself bracketing three-to-five images for most scenes and then utilising luminosity masking in Photoshop to compile the image.
Read more: Bracketing & HDR – Photographing Landscapes Without Filters

Graduated filters can also help balance your exposure, but they may do more harm than good in your mountain scenes. Considering the transition zone of a graduated filter is linear, if any part of your mountain is sticking into that area it will be darkened while the rest of the mountain will remain bright. This can be quite the pain to fix in post, so I prefer bracketing and masking the image together.
6. Mountain weather is dynamic and always changing
If you’ve sat and watched the mountains, you’ve probably noticed how they create their own weather. Depending on winds and moisture, what may be beautiful day on one side of a mountain can be a rainy or snowy day on the other. The key with photographing the mountains is to be patient and flexible.

Scenes can change very quickly and one gap in the clouds can lead to some very beautiful, but quick, light flooding your scene. This has happened to me countless times while photographing the Rockies.
If you find yourself not having the best light or dealing with clouds covering up most of the mountain, it may be a good time to try one of your longer focal lengths and hone in on some detail shots.
7. Hike the mountains
The mountains offer a copious amount of beautiful scenes to document from just a few steps outside of your car door. But for the more adventurous, hiking these mountains opens an amazing door for your photography.
Getting on the mountains can be rewarding, but make sure to hike safely. Use a GPS device to make sure you know whether or not you are on the trail, carefully monitor the weather forecast, and always have a way to contact emergency responders for help (consider a satellite phone).
If you plan on hiking, lighten your pack. You will most likely be using a wide-to-mid focal length lens, so leave the tele at the hotel. I also recommend investing in a lightweight carbon fiber tripod.
This reduction in weight goes a long way. Also, a solid backpack can do wonders for your back. The Atlas Packs are my favourite camera backpacks to hike with.

In conclusion
While there are a variety of landscapes out there to photograph, nothing is as opportunistic as the mountains. With endless compositions provided through every focal length possible, and varying scenes throughout the year, one could spend a lifetime in a single mountain range creating a diverse portfolio of images.
When you venture out to shoot, remember the small details as well as the large. Take in the scene before you click that shutter, and embrace the moment without the viewfinder in front of your eyes.
As John Muir once said, “the mountains are calling, and I must go.” So go, get out there, and shoot away!


