
Back Button Focus: When and Why to Use It

Back button focusing has been a hot topic of discussion amongst nature photographers for quite some time. Many photographers swear by it, whilst others resent it for various reasons. I fall into the former group, believing that back button focus is one way you can quickly improve your photographic technique in the field.
It is definitely a technique that takes some getting used to, however. Anyone who hasn’t used back button focusing before will have a muscle memory that tells you to half-press the shutter to achieve focus. This technique separates the focus and shutter firing functions into two separate buttons, allowing you to control each independently.


There are a number of benefits to this, and hopefully by the end of this article you will be ready to at least give it a whirl and make up your own mind on this sometimes divisive mode.
What is back button focus?
Once enabled, back button focus will mean that half-pressing the shutter no longer has an effect. All the shutter button will achieve is firing the shutter once fully depressed. Instead, the action of focusing is moved to a button on the back of the camera – usually the AF-On button.
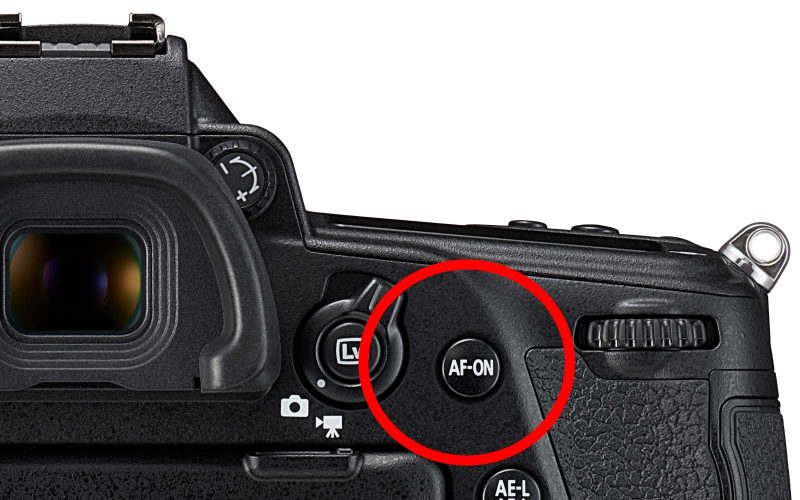
This button is operated with your thumb and will quickly feel natural to you with a little bit of practice. Now, when AF-On is depressed, the camera will focus. This means that you can simultaneously hold down the AF-On button, continually focusing the shot, whilst firing images off at your leisure.
Now we know what exactly it does, let’s take a look at some of the benefits of back button focus.
The benefits of back button focus
1. Back button focus combines all focusing modes
One of the greatest benefits of back button focus is the ability to combine manual focus, single, and continuous focusing modes together. This is particularly useful for wildlife photographers, as our subjects are often erratic in their movements. For example, a subject will often go from a sitting position to one that is moving at some point during a shoot.
Usually, you would need to choose either single or continuous focus mode and quickly change depending on the situation developing in front of you.
Single focus mode is good for subjects that are not moving too much. It allows you to lock the focus and then recompose the shot before firing the shutter. Continuous focus means that you are constantly adjusting the focus as the subject moves, but if you recompose the shot then your focus is very likely to change as well as the focus point will move over another element of the scene. With back button focus, you have the benefit of both modes (as well as manual focus mode).

To achieve manual focus, simply do not touch the AF-On button. You can adjust the focus ring as you see fit, and then press the shutter button knowing that it will not adjust the focus for you (even if your lens is not in manual focus mode).
To achieve single focus mode, you hold down AF-On until you have achieved proper focus in your shot, and then release the button. You can then recompose the frame, knowing that the focus will not change further.
To achieve continuous focus mode, keep the AF-On button held down and the camera will continue to track and adjust the focus until you release it.
Therefore, back button focus eliminates the need to frantically fiddle with the focus mode dial – something that will save you precious seconds in often fast-paced situations. Ultimately, it makes you more flexible and adaptable to situations as they develop.
2. Focus is no longer prioritised over the shutter release
Without back button focus enabled, when you fully press the shutter of your camera your camera will prioritise achieving accurate focus before firing the shot. This can cause an element of delay that is far from ideal for nature photographers.
It is possible to override this in your camera’s settings, telling it to immediately take the image when fully depressed, but by default this is probably how your camera will prioritise things.

Separating the two functions means that neither function has priority over the other. You are able to hold AF-On down, continually focusing the shot whilst simultaneously firing frames as you see fit. This is ideal for wildlife photographers in particular, and I am sure those that have photographed birds in flight can see the benefits to this.
How to set up back button focus
Exactly how to enable back button focus on your camera will vary between brands and models. There is no back button focus mode to enable, but instead you will need to change a few settings to achieve the effect.
This guide should help you to determine what to do, with some variations expected for certain models. If the below guides do not work for your camera model, a quick search on YouTube will likely pull up a how-to guide specific to your camera.
1. Nikon cameras
- Open up the Autofocus custom settings menu, and scroll down to “AF Activation”. Switch this to AF-On only.
- If your camera does does have a dedicated AF-On button, you will also need to complete another step. Open the Controls custom settings menu and go to the “Assign AE-L/AF-L Button” option – choose “AF-On”.
- Set the camera’s AF dial to AF-C.
2. Canon cameras
- Open up your camera’s quick settings, and select the button as shown below. You should then see the menu on the right.

- First, set the function of the “Shutter button half-press” to “Metering start”.
- Next, choose the AF-On symbol and set that function to “Metering and AF Start”. Many Canon cameras are already set to this by default, but it is worth checking.
- Finally, set your camera to AI Servo mode.
3. Sony cameras
- Open your Custom Settings.
- Find AF w/Shutter and turn this to OFF.
- Next, set the AE-L Button to AF On.
- Ensure your camera is in continuous focus mode.
4. Fujifilm cameras
- Set the focus selection dial to Manual.
- Open your Menu and select AF/MF.
- Select Instant AF Setting and set this to AF-C.
- Open your Menu and select Set Up. Choose Button/Dial Setting.
- Select AE-L/AF-L Button Setting and set this to AF-L/AE-L.
5. Panasonic cameras
- Set AF/AE LOCK to AF-C
- Open the Custom Setup menu.
- Select AF/AE Lock and set to AF-On
- Select Shutter AF and set to OFF
In conclusion
Back button focusing is something that all nature photographers should at least try. Give it a chance and allow your muscle memory to adapt to the change before writing it off forever. I expect that most of you who try it out will stick with it, finding that it is beneficial to your photography.
It is not just ideal for nature photographers, though, and photographers of all genres are slowly moving to the back button focus camp.
Let me know what you think in the comments – what are your experiences with back button focus?


