
Long Exposure Photography: Creative Landscapes with a Slow Shutter
Long exposure photography may be borne out of necessity in low light situations such as at dawn or dusk. On a very heavily overcast day, or once the sun has gone down, long exposures can help you to keep shooting.
But at other times you may want to take advantage of low light conditions and seek out subjects that can be photographed in a creative way by using a long exposure.


Taking long exposure photos in these conditions is therefore often a technical exercise in keeping the camera steady and ensuring pin-sharp images.
Subjects such as water, clouds or foliage on a windy day allow movement to be captured over a period of time in the form of blurring, which can produce very creative results.

What is long exposure photography?
Let’s deal with some of the technical aspects of long exposure photography first.
In order to record an image, light needs to enter the camera through the aperture and strike the sensor. The length of time that the shutter is open for is the exposure time (or shutter speed). This can be anything from a very brief 1/8000th second, to a very long exposure of several minutes or even hours.
When taking photographs in bright light, an exposure time of around 1/60th to 1/1000th second would be typical, but this is directly correlated to the amount of available light as well as the aperture and ISO settings that you chose to use (see the exposure triangle).
In low light conditions, the exposure times will be much longer of course, and to obtain a correctly exposed picture it is necessary to either use a slower shutter speed (longer exposure) or increase the ISO (sensitivity of the sensor).
For optimal quality images, it’s best to keep the ISO as low as possible, which means a slow shutter speed is inevitable (although this also has consequences such as keeping the camera steady throughout).

Eliminating camera shake
Inevitably, shooting long exposures introduces a greater likelihood of camera shake – the camera moving slightly whilst taking the shot and causing the subject to be blurred. This is primarily a problem when hand holding the camera, something which is fine to do when you have a fast shutter speed but is likely to lead to blurred images when the exposures become longer.
For successful long exposure photography, you’ll need a tripod that is capable of adequately supporting your camera/lens set-up and is sturdy enough to withstand buffeting from the wind.
All too often I see people using flimsy tripods that have been purchased based on their (light) weight and they simply aren’t up to the job.
A good tripod and head isn’t cheap but you need one that is fit for purpose, so it’s worth the investment. Steel versions provide a more affordable option than carbon fibre if your budget won’t stretch that far.
Further Reading: A Guide to Choosing a Tripod Head
Whilst a good tripod is essential for long exposure photos, it’s equally important to set it up properly so that it won’t move during the exposure. If working on soft terrain or wet sand, push part of the lower legs into the ground until the tripod is rock steady.
In windy conditions, keep the tripod low to the ground and spread the legs wider to increase stability. Some tripods have a hook under the centre column for the purpose of hanging a camera bag to add further stability – providing it isn’t swinging around!
Having the camera securely mounted on a steady tripod is the first step to capturing sharp images, but you also need to prevent any vibrations when you actually take the shot. Using a remote release is good practice or as an alternative, and arguably a more reliable option, use the 2-second self-timer so you don’t have to touch the camera.
However, this won’t necessarily eliminate vibrations caused when the mirror slaps up and down at the start and end of an exposure unless you’re using a mirrorless camera, in which case you don’t need to worry.

Mirror vibrations are easily overcome, however, by using the camera’s mirror lock-up function (assuming it has one) – often this function is tucked away in the menu, although some cameras (e.g. Nikon) do have a specific button where this can be easily set. Refer to the manual or look it up online if you’re not sure if your camera has a mirror lock-up function, or where to find it.
If your camera doesn’t have this function then you can shoot in Live View mode instead, since this will lock up the mirror for as long as Live View is activated.
Bulb exposure mode
Exposures of up to 30 seconds are possible on most cameras and, for many situations, this may be long enough. But there are times when you’ll want or need to extend the exposure for longer, and to do that you’ll need to use the Bulb (B) setting.
Again, most cameras have this facility as indicated by ‘B’ accessible via the Mode button/dial. The Bulb setting allows the shutter to be held open manually for as long as is required, so it is therefore possible to make exposures of any duration.
The tricky part when using Bulb is establishing the correct exposure since the camera’s meter cannot be used in this setting. There is a bit of maths involved here, but it’s quite straightforward to work out with the aid of the camera’s meter in Av mode before you switch to Bulb.
If, for example, you want to shoot at f/16 using ISO 100 and the camera’s meter (in Av) is indicating that the exposure should be longer than 30 seconds, then you can temporarily increase the ISO by, say, 3 stops to 800 for the purpose of taking a meter reading. If this now indicates an exposure time of 15 seconds then you have a base reading from which to work out the exposure time for the desired settings.
In this example, you’d revert the ISO by 3 stops to ISO 100 and increase the exposure time (shutter speed) by the same number of stops. A corresponding adjustment of 3 stops gives an exposure time of 2 minutes, since 15 seconds at ISO 800 represent exactly the same ‘exposure’ as 2 minutes at ISO 100 (both at f/16).
Helpful Hint: A ‘stop’ is a measure of exposure. Doubling, or halving, the shutter speed or ISO is changing by 1 stop. If then you go on to double, or half, the value again, that’s 2 stops.

When using Bulb, the shutter button must be retained in the depressed position. So rather than stand with your finger on the shutter button for minutes at a time, use a remote release with a lock function.
It is then simply a case of pressing the button on the release to open the shutter and then lock it open for the required time.
Some remotes have a built-in timer for a precise exposure which can be pre-set (e.g. for 2 minutes), or alternatively the remote may display the number of seconds on an LCD, so you can keep track of the exposure time and then unlock the remote when the desired amount of time has elapsed.
Some cameras also display the exposure time in seconds on the top LCD panel. Alternatively, use the stopwatch on your phone or a watch to time the exposure.
Using filters
In situations where you want to use a long exposure to produce a creative effect such as blurry water but there is too much light to allow a slow shutter speed to be set, then it’s possible to increase the exposure time by using filters.
A polarising filter, for example, will increase the exposure time by around 2 stops – for example from ¼ sec to 1 sec. But to lengthen the exposure by more than 2 steps you’ll need to fit a neutral density (ND) filter. ND filters are solid ‘grey’ looking filters of uniform density that have no effect on how colours are recorded but are used to reduce the amount of light entering the camera. They can be either circular screw-on type or square/rectangular used in conjunction with a filter holder. The latter is more convenient when using multiple filters.
ND filters are available in different strengths and can extend the exposure from between 1 and 10 stops. There is arguably little point in owning a whole fleet of ND filters and anything less than 3 stops (0.9) is probably not worth having anyway.
Personally, I own a 0.9 (3 stops) together with LEE Filters Little Stopper (6 stops) and Big Stopper (10-11 stops). These together with the polarising filter allow me to adjust the exposure moderately to significantly and thereby achieve the exposure time required. Bear in mind that you have further control over exposure times by adjusting the aperture and ISO.

There is no great mystery to using low to medium strength ND filters as once fitted you can use the camera’s metering system in the usual way for exposures down to 30 seconds. For exposures longer than 30 seconds you’ll need to use the Bulb ‘B’ setting as discussed above.
Read more: The Essential Guide to Filters
These very long exposures are the norm with the strong 9 or 10 stop ND filters, but the technique when using these is slightly different. Firstly, the filter is so dark that you can’t see much, if anything, of the scene once it’s fitted! So you need to compose, focus and meter the scene before fitting the filter and then calculate the exposure based on this reading and set this in Manual or Bulb Mode. Some manufacturers supply an exposure conversion chart with their filter for this purpose. There are also apps available that will calculate the required exposure from your base reading e.g. Long Exposure Calculator.
Being creative with long exposure photography
Okay that’s the technical stuff sorted, so now it’s time to be creative. What exactly constitutes a long exposure is open to debate, but in a creative context it could be defined as the length of time required to blur the subject sufficiently to produce a pleasing result.
This could be as ‘fast’ as 0.5 seconds if the subject is moving quite quickly – a waterfall or receding wave for example. By contrast, to blur slow-moving clouds an exposure time of around 30 seconds or slower would be required. It is therefore somewhat down to experience in knowing how long to make the exposure as well as a little bit of trial and error.

Logic dictates that the slower the subject is moving, the longer the exposure required. However, there isn’t necessarily anything precise about this and it is often simply that a longer (or shorter) exposure time will give a slightly different effect. It is easy enough to shoot and then check results on the back of the camera to see if you are capturing the effect you’re after, and if not then the exposure time can be adjusted accordingly.
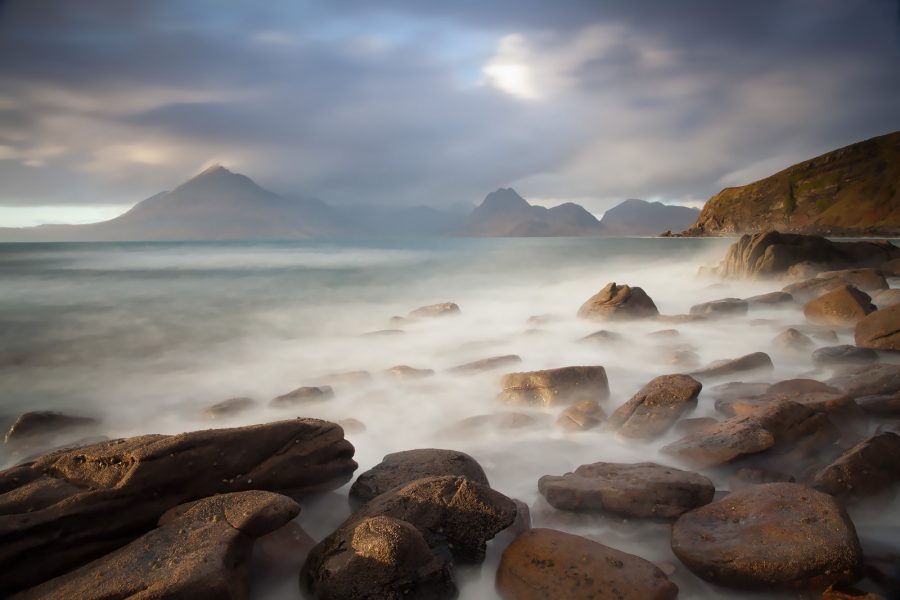
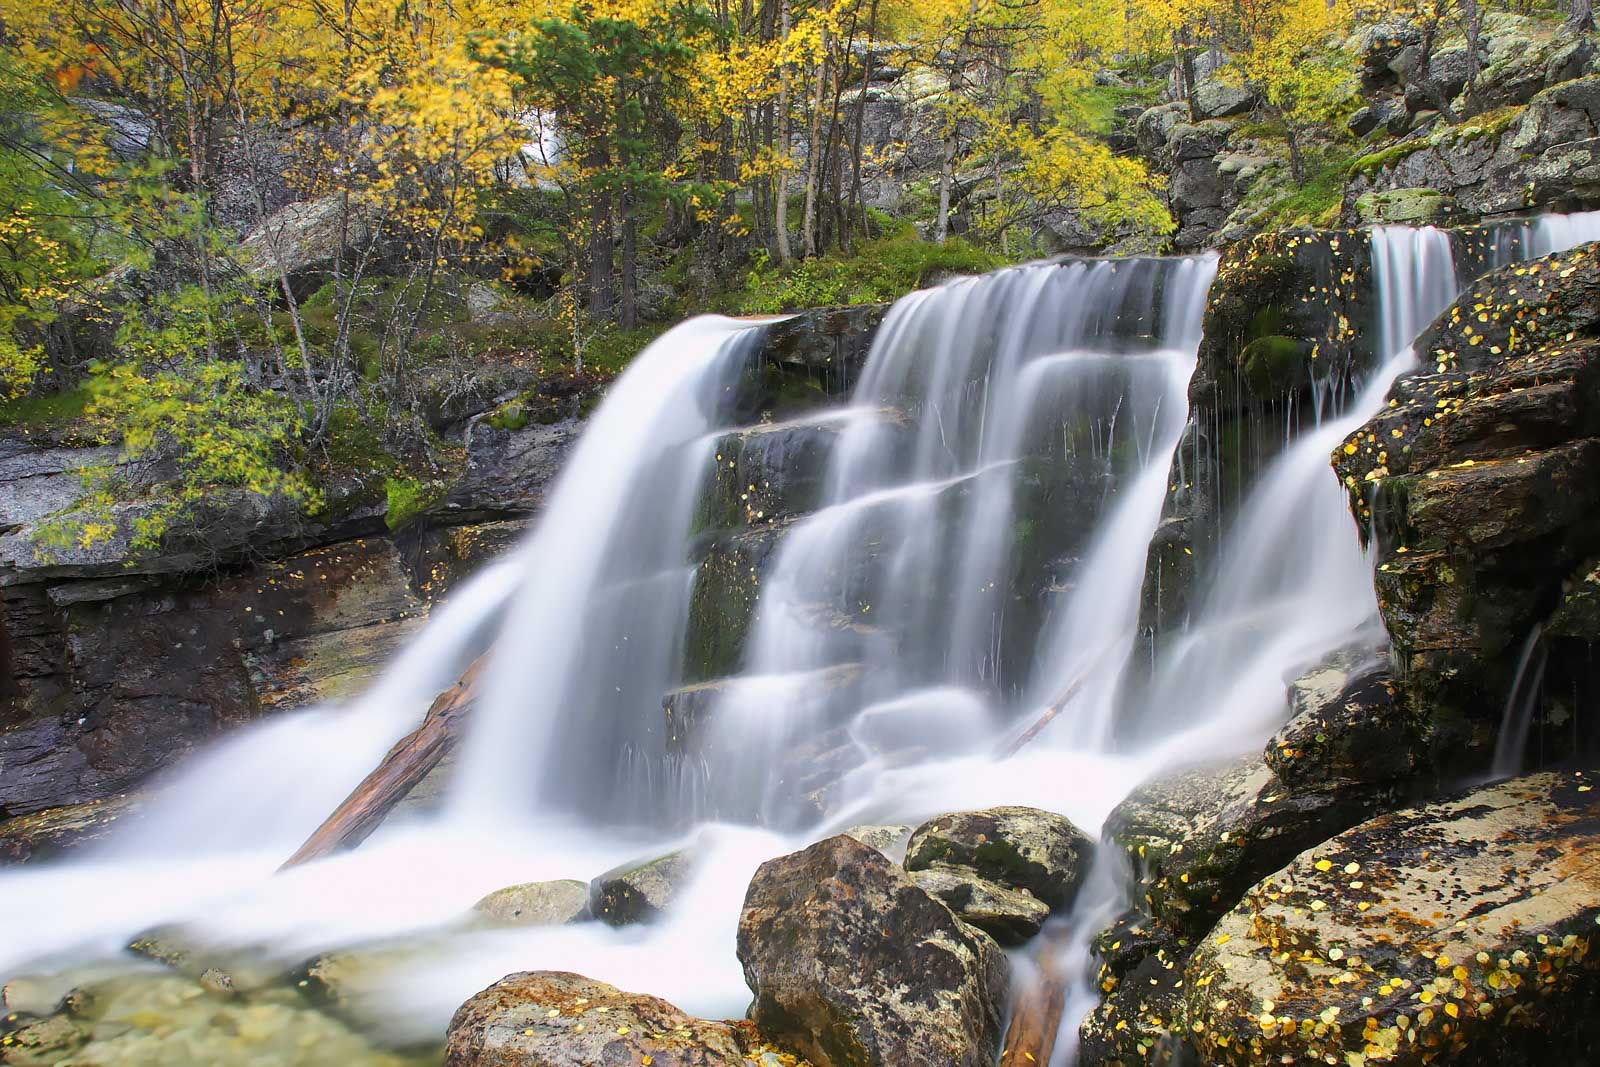
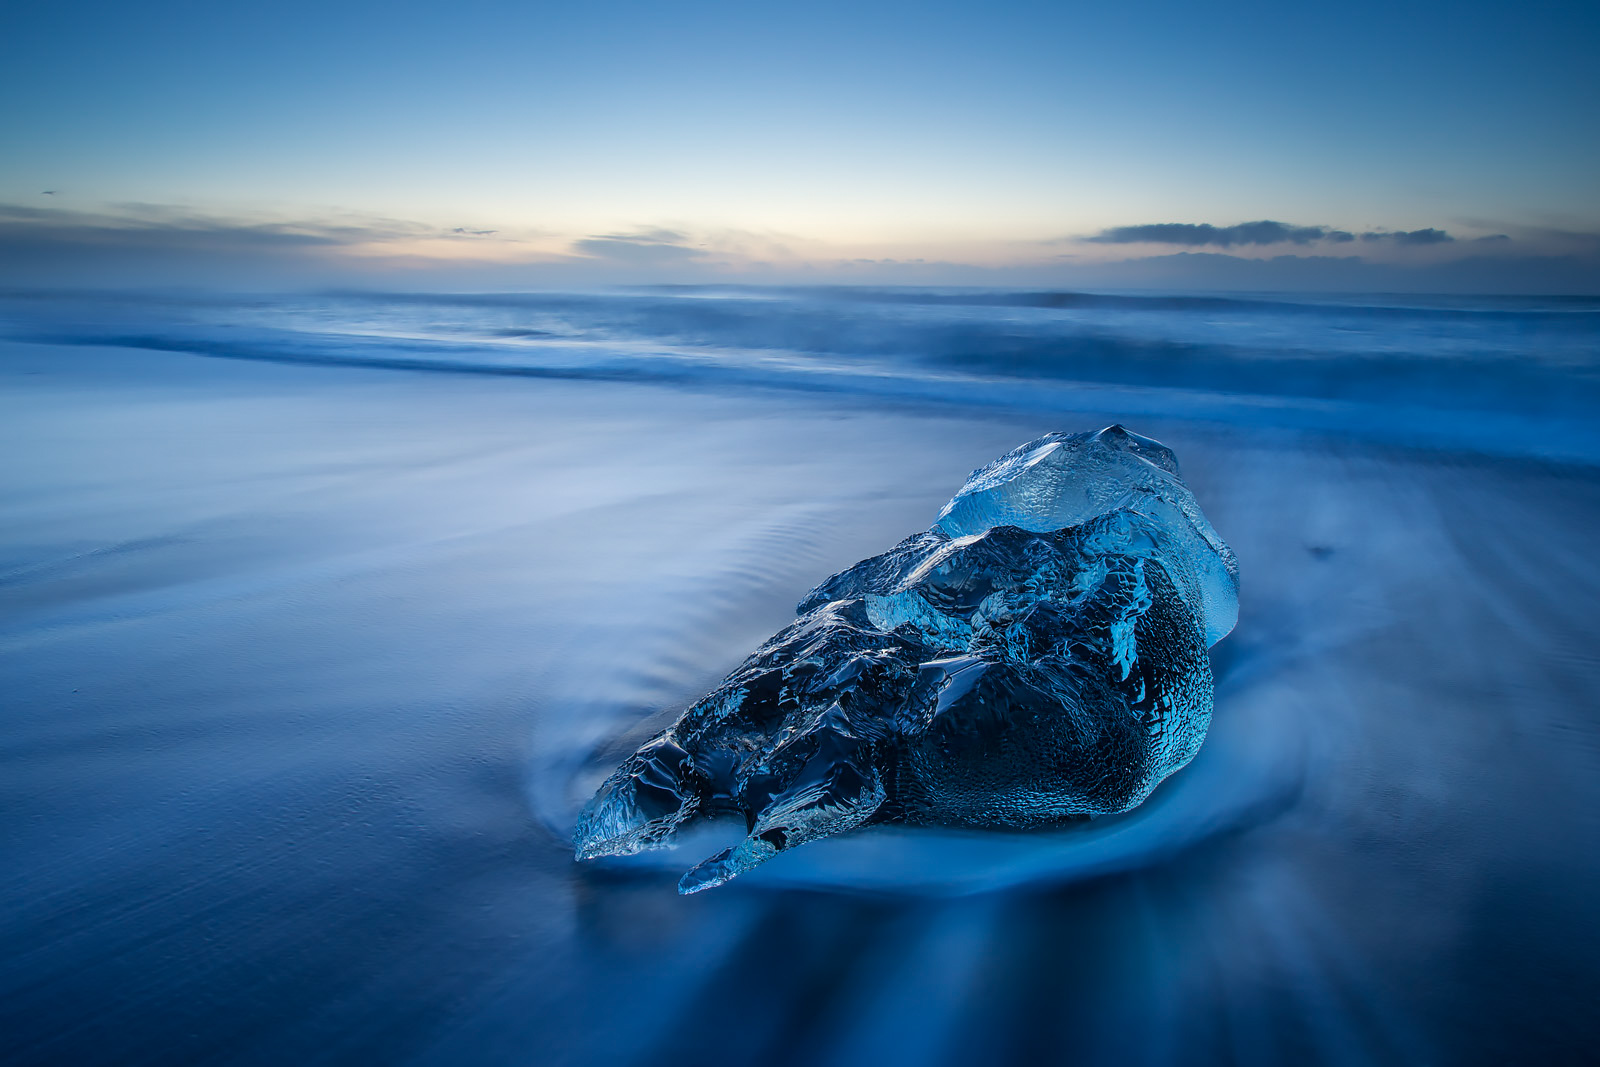
Moving water is certainly one of the best subjects for the long exposure photography treatment, and this might be anything from a tumbling mountain stream to waves crashing over a rocky coast. Waterfalls are also perfect for this treatment, but try to avoid ones with too much ‘white’ water, as this will be recorded as a featureless amorphous ‘empty’ space.
Instead look for water that falls in thinner rivulets or fans out and breaks up as it cascades over rocks. This will form a more pleasing pattern and will show up more distinctively against the darker surroundings. Often the most impressive looking waterfalls don’t make the best pictures.

One of my favourite subjects is waves on a beach as they form an infinite number of different shapes and patterns. Ribbons of white water streaming over dark sand look great with this treatment. As for most subjects involving water a polarising filter will cut out the glare and make the colours more intense – as well as increasing the exposure time.

Timing the release of the shutter is crucial to capture the wave patterns at their optimum so I prefer to turn off mirror lock-up and the 2 second delay when taking these shots and use Live View instead. This allows the shutter to be released at precisely the right moment.
This might be either as the wave is coming in or retreating back down the beach. I find the latter usually gives the best results, but again it’s worth experimenting and also taking lots of shots as they’ll all be different. Also experiment with the shutter speed and see how this affects the results.

Clouds require much longer exposure times. Depending on how quickly they are moving somewhere between 30 seconds and 2 minutes would be a good starting point. Although you’ll achieve a reasonable result with most clouds, some are better than others in terms of how they’ll be recorded. Look for clouds with some separation between them as well as interesting shapes.
Clouds moving directly towards the camera will often give the best result as they’ll appear to be fanning out across the frame. A wide-angle is good for this kind of shot so that you can include a wide expanse of sky along with an interesting foreground. Sunrise and sunset are an obvious choice as well for added colour. For double the effect, shoot long exposure cloudscapes over mirror-calm water.

As well as water and clouds, long exposures can be very effective when shooting foliage and trees on windy days. The movement of trees is quite different to that of water, which is following a set path that you can see and therefore have an idea of how the picture will look. With the more random movement of leaves, this is less clear and the movement will also vary quite considerably as gusts of wind come and go.
Ideally, try to avoid too long an exposure as the leaves or foliage can become too blurry and indistinct and you want to retain some structure to the picture. When shooting trees for example, the shot works well if the leaves are moving but the trunk or branches are reasonably stationary thereby producing a picture that has static elements, which forms the framework of the shot surrounded by swirling blurry leaves.
Further Reading: 10 Top Tips to Improve Your Landscape Photos

In conclusion
These are just a few ideas for long exposure photography, but there are plenty more.
They may not all work and you’ll probably find that you need to refine and adapt your technique to get the results you want but it’s great fun experimenting.
It’s also a good way to make use of low light conditions as well as adding another dimension to your landscape images on sunny days through the use of neutral density filters.


