
How to Use Water in Your Landscape Photos

Where would we be without water? Vital to our own lives, water also brings life to our landscape photography. Whether it is calmly reflecting or raging with fury, water is usually the most important element whenever it appears in an image. As such, it demands our respect and careful consideration.
Here are some tips and thoughts about photographing landscapes which include water.


Camera settings
For landscape photography I usually begin my thought process by selecting an aperture. I aim for about f/11 to get good quality from my lens and a reasonable depth of field. I might sometimes use a smaller aperture if I want to get very close to foreground, and therefore want to hyper-focus.
I don’t want to compromise on quality, so I invariably use an ISO of between 100 and 200. Any higher than that, there will be some noise, particularly if I want to add detail to the shadows in post-processing.
These two choices mean that I have a limited range of shutter speeds available to me. This isn’t normally a problem with landscape photography because if the shutter speed is fast, I can hand hold the camera. If it is slow, I use a tripod.

However, when it comes to photographing landscapes which include water, the choice of shutter speed is often very important. This is because it will determine how moving water appears in the image.
A very long exposure time will render moving water as a milky white blur; a very fast shutter speed will freeze the water, showing every droplet. A shutter speed between the two will show some movement in the water, but also some texture. This tends to be my preference for giving a dynamic edge to the photo.

So, I need to be able to alter my shutter speed, but I don’t want to change my aperture too much and I want my ISO to remain in the 100 to 200 range. What do I do?
If I want a faster shutter speed, there is no choice but to use a slightly larger aperture. This means a reduced depth of field, so it is important not to include any close foreground. More often I want a slower speed, and to do this I add neutral density filters (see notes on filters below).

It’s difficult to be precise about the best shutter speed because it depends on the amount of movement and desired effect. I will always experiment with a variety of shutter speeds, so I can compare and select the best results on the big screen of my computer.
For guidance, I recommend 10 seconds or longer for creative blur of rivers and sea. To freeze water, try to aim for a shutter speed of 1/250th of a second or faster. To get dynamic water with texture, I usually try between 1/10th and 1/2 of a second.
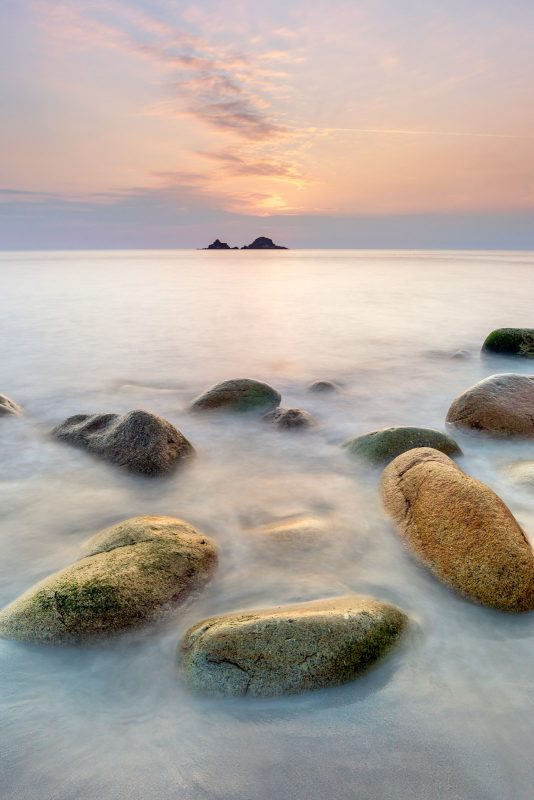
I will give a word of warning: slower shutter speeds tend to look better on the back of the camera, where the image is small. However, when we see a larger image, it’s the slightly faster shutter speeds, rendering some texture in the moving water, that often look better.
Read more: Long Exposure Photography Guide – Using Slow Shutters
Exposure
With moving water, we want to expose the scene carefully. Essentially, this means making sure the highlights are close to the right side of the histogram but not over-exposed. I use the histogram on my camera’s image preview highlight alert option to check for any over-exposed areas, and I recommend this tactic.
Having said that, if we opt for a very slow shutter speed when photographing moving water, the water might not show any detail, whether it is exposed correctly or not. I tend to find this undesirable, and therefore opt for a slightly faster shutter speed to show some texture. But ultimately, this is a creative decision.
Read more: How to Expose Correctly for Water
Composition
The rules of composition apply to watery landscapes as to all other images, but I will make a few specific points here.
When composing a photo, we often look for lead-in lines. These can be physical features such as paths and walls, but when dealing with water, we can also use the patterns created by it. These might not be obvious as we stand and admire the view.
For example, if we choose a fast shutter speed, a breaking wave will appear as we see it. If we choose a very slow shutter speed, it might appear milky white and without texture. But, if we choose something in between the two, we might get a streak of lines which can lead the eye into the scene.
This effect often works better with receding waves rather than breaking waves, so take a selection of photos just before and after the wave climaxes.

Rivers in woodland can be messy and difficult to compose. I like to get the camera low down and above the river (which often means wellies and a wet tripod), to get a dynamic image. I then compose the image so the disappearing point of the river is in the top third of the frame. This is where the eye tends to be taken in the image.
I will then experiment with ND filters and a polariser to vary the shutter speed and choose the most appealing image.
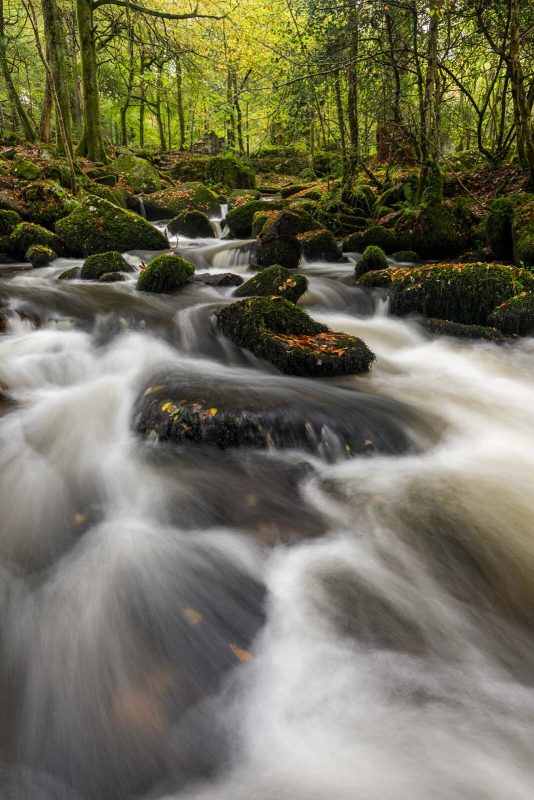
A word of warning: when we look at a photo, our eye is drawn to the brightest part of the frame. In river scenes this tends to be the most turbulent sections of water. For this reason it is best to have these positioned within the frame, rather than on the edge. Though I must admit that this is not always possible!

One specific break of the rules of composition comes when dealing with reflections. Instead of relying on the rule of thirds, it is usually desirable to put the line of reflection across the middle of the image. Our brains are tuned into symmetry, so we need to see the two halves match up. There are a few other tricks for getting good reflection shots, so read on.
Still waters run deep
As a proverb, this works well to describe someone who is calm on the surface but passionate underneath. When it comes to reflection photography, it tends to be shallower waters that are calmer on the surface!
Shallow pools on the beach, or even puddles on the street, are usually flat-calm and offer great opportunities for reflections. I also love wet sand. There are some beaches which have flat areas of wet sand in which we can get wonderful reflections that never get disturbed by the wind. Visit on a receding tide for the sand (or mud) to be gloriously wet and reflective.

When it comes to getting reflections in deeper water, we need a very calm day. It’s always worth checking the weather forecast and trying to get out when the pressure is high, and the isobars on the weather map are well spaced out. Even on calm days, it is best to get out early in the morning as it’s usually calmer before the sun gets high and starts warming the land.


I have a trick for when the water surface isn’t quite as calm as I would like: I put a Big Stopper (10 stop ND filter) on my lens and opt for a really long exposure time. This blurs the water, making it look flatter and improving the reflection no-end.
Another tip is to get down really low to the water, as this gives a strikingly different perspective, with much longer and stronger reflections (see the photos of boats at Mevagissey in my perspective article).
Useful filters for photographing water
There are some useful filters for photographing watery scenes, and it seems slightly ironic that the one filter we should all have in our kitbag is the one that we can use to make the water almost invisible!
1. Circular polarising filter
This filter removes the reflected light from the surface of the water, therefore allowing us to see through the water.

It might not be immediately obvious why we would want to see through the water. In fact, I’m not sure we always do. However, the polariser also reduces the light reflecting off the wet surfaces of leaves, stones, and mosses, etc., thereby revealing a much greater saturation of colour. This effect is nothing short of a miracle.

It is important to note that this filter can be rotated to increase or decrease the effect. We shouldn’t always aim for maximum polarisation and, if in doubt, it’s probably worth taking two or three photos with different levels of polarisation.
There is another element to consider when using a polariser, and that is a slight loss of light. Essentially, the polariser acts like a neutral density filter, cutting out up to two stops of light. There are times when we want to use slower shutter speeds for water photography, so a polariser can be utilised, but we also have filters designed specifically for this purpose.
2. Neutral density filters
Given my desire to use an aperture of around f/11 and an ISO of between 100 and 200 for all my landscape photography, it is only by using neutral density filters that I can achieve a variety of different shutter speeds.
I always carry two neutral density filters: the Big Stopper and the Little Stopper, which are 10 stop and 6 stop respectively. By using various apertures (close to f/11), an ISO of between 100 and 200, possibly a polariser, and one of the ND filters, I can usually find the shutter speed I am looking for.
3. Neutral density graduated filters
A watery foreground is usually quite bright, and this is useful because it reduces the contrast between foreground and sky, allowing us to capture photos without the need for a graduated filter.
However, when we look at a reflection of a distant landscape, the reflection is always a stop or two darker than the landscape. Some of the sun’s light is lost as it penetrates through the surface of the water.
For this reason I often like to use a graduated filter to darken the top half of the photo, with the aim of reducing (but not completely eliminating) this imbalance of light. I often use a 1 or 2 stop soft neutral density graduated filter for this purpose.
At the end of the day
The reflective quality of water is really useful for sunset photos. We all know that if we photograph into the setting sun, any landscape features tend to look quite dark, even silhouetted. Even though we can use graduated filters and photo processing to get around this problem, it sometimes looks false.

If we can get a sunset scene with sea or lake in the foreground, we will get the colourful light of the sunset reflected in the foreground water, therefore reducing our problems and making a more impactful shot.

The same is true of blue hour photography. I particularly enjoy the colourful contrast of cold blue skies with warm yellow lights of houses, cars, and streets. These all look best when there is a watery foreground, be that a lake, creek, river, or just wet streets.
In conclusion
Water is possibly the single most vital element for the landscape photographer. It can offer us a better composition, a more dynamic foreground, the possibility to play with shutter speeds, more creative opportunities, and, through reflections, double the bang for our buck. Without it we would be lost, impoverished, and very thirsty!


