
How to Expose Correctly for Water

Exposing for scenes that include large areas of water can sometimes be tricky, leading to images that are either too bright or too dark. There are several reasons why this happens but principally it’s down to the fact that water can take on many different tones, from pure white to jet black. It’s these extremes of tones that cause problems for a camera’s exposure meter. Water can also be highly reflective, especially in bright light, which may similarly affect the meter reading. Metering for water is not straightforward and it certainly presents a challenge. But as long as you understand how your camera’s meter operates and you apply the basic principals of metering, then consistently well-exposed results are very achievable in any situation.

In order to routinely produce correctly exposed images of water, it’s important to appreciate what’s going on with your camera’s exposure meter. In basic terms, your camera’s meter assumes everything to be a mid-tone – which to be technical is 18% grey – and will set an exposure based on this. This works for the majority of scenes because they are made up of a variety of tones from light to dark, which average out to a mid-tone. The problem arises when exposing for scenes that have a bias towards either light tones or dark tones, which can often lead to incorrectly exposed images.


This is true of water as a consequence of its variable tones and means that more care than usual needs to be taken when exposing for these kinds of scenes. It’s easy to assume that you can ‘fix’ exposure problems during RAW processing, but this isn’t always possible. It is also best to avoid making significant changes to exposure during processing as this can lead to noise and other artifacts, particularly in shadow areas. So, if you can get the exposure spot on at the time of taking the picture this will optimise image quality and avoid unnecessary adjustments during processing.
Exposing for white water
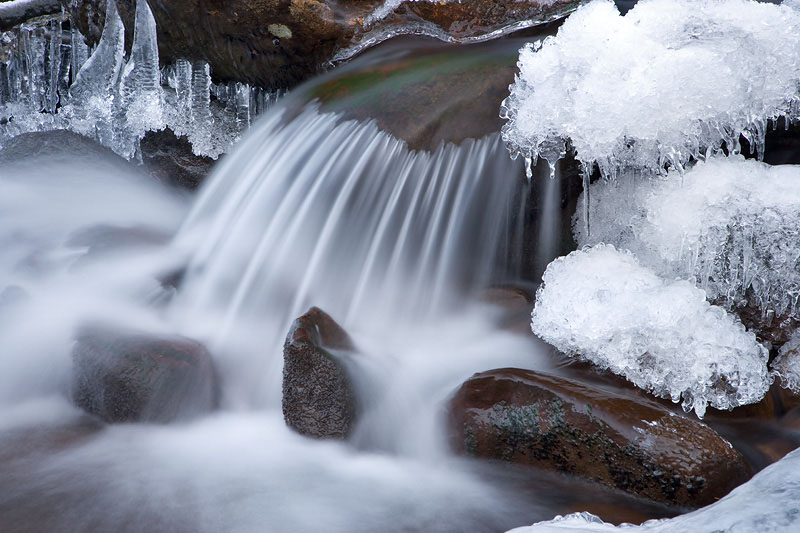
Scenes that contain a lot of white water, such as surf on a beach or a fast flowing river, can lead to under-exposed images. This is because the camera is reading the scene as if it was mid-toned when in fact it’s much lighter than mid-tone and the ‘white’ water therefore comes out grey instead. There are a couple of ways to avoid this, both of which effectively override the camera’s meter.

The most reliable way to expose for this, or any other kind of awkward lighting situation, is to use Manual metering. This is a lot more straightforward than you may think and once mastered it’ll allow you to take full control over all your exposures. Manual exposure takes advantage of the fact that the camera is programmed to correctly expose a mid-tone. Therefore if you point it at a mid-tone subject and take a meter reading the exposure will be correct for not only this subject but for any subject irrespective of it’s tone assuming it’s in identical lighting.
To use Manual metering, select ‘M’ on the metering mode dial / button. You can still make good use of the camera’s exposure meter but you’re in charge of what you meter. Next switch to spot or ‘partial’ metering so that you can take an accurate and specific meter reading from a small part of the scene. Set the aperture you want to use for the shot, typically f/11 or f/16 for landscapes, and line up the centre focusing point (i.e. the spot metering point) with a mid-tone in the scene. This relies on your judgment, but with practice you’ll soon recognise what constitutes a mid-tone. Of course, a mid-tone can be any colour, not just grey.

Press the shutter button half way down to take a meter reading. This will light up the exposure scale in the viewfinder. Now, adjust the shutter speed setting until the indicator bar lines up with the “0” in the middle of the scale. The camera is now set to take a correctly exposed picture of the scene.
There are a couple of caveats to this. It may not always be possible to record all the tones in a scene from pure white to black simply because the camera is unable to capture such as large range of tones (a camera’s dynamic range). In these situations, it’s still best to use the mid-tone manual reading and accept that the brightest highlights may be blown out. These are usually only small areas anyway, such as bright highlights on the water. The other thing to bear in mind is that if the light levels change, you will need to repeat the process of taking a manual meter reading.

An alternative to using Manual metering is to use the exposure compensation function, which allows you to increase or decrease the amount of light reaching the camera’s sensor. If, when photographing large areas of white or bright water the shot comes out too dark, you’ll need to brighten the image to make the water white. To do this dial in around +1 on the exposure compensation scale. In some situations you may need to increase the compensation to around +2. Overriding the camera’s meter like this is a quick and easy way to adjust the exposure, but there is an element of guesswork involved in terms of how much compensation is required. It can be a case of trial and error, making use of the histogram to confirm a correct exposure.
Exposing for dark water
Water can appear very dark when reflecting dark surroundings or when using a polarising filter to remove surface glare. Without your intervention, the camera’s meter (in an automatic metering mode) will again expose this dark water as if it were mid-toned and it will come out looking grey and over-exposed. To compensate for this, you need to reduce the amount of light entering the camera either by setting the exposure manually using the same technique as described above, or by setting the indicator on the exposure compensation scale to around -1 to -2. Again use the histogram to confirm correct exposure.

Metering moving water
A lot of coastal landscapes involve moving water, such as waves crashing up a beach where the tones in the scene are constantly changing. This means that the meter reading will also be changing depending on the extent of white or dark tones in the frame. For accurate exposures in this situation, it’s best to use Manual metering mode and take a meter reading from a mid-tone in the scene as described above.
Dealing with high contrast
Watery scenes such as waterfalls, rapids and breaking waves can be quite high in contrast, and this is heightened in bright sunny conditions where extreme light tones in particular can be difficult to capture accurately. In this kind of scenario the brightest tones in the scene can easily become blown out with no detail. But the problem is that by reducing the exposure to capture detail in these highlights, the other tones will also become darker and overall the image can look under-exposed.

In these kinds of high contrast situation when the camera is unable to record detail in both the highlight and shadow areas, you need to make a judgement on what tones / parts of the scene you want to be ‘correctly’ exposed. I tend to prefer to capture the shadow detail and allow the whites to burn out a little, provided this isn’t excessive, and then recover these highlights during RAW processing.
Alternatively, you could shoot using the High Dynamic Range (HDR) technique in order to capture detail in both highlights and shadows on different frames and then blend the images together. This can work well but is harder to do when the water is moving since the appearance of the water will vary between bracketed frames. A better approach is often to return in lower contrast conditions when the tonal range is much narrower. To our eyes a waterfall may not look as spectacular in overcast conditions compared to bright sunshine, but it will be recorded far better by the camera and with far greater detail due to the lower contrast light.
Further Reading: “How to Photograph the Coast“


