
The Use of Perspective in Landscape Photography

They say cameras never lie, but we all know they can at least bend the truth. Recently, I was struck by the deliberately misleading use of photography to show beaches on which it looked like people were crammed together, not following social-distancing measures. Clearly, these photos were taken from a certain perspective with a particular motivation in mind.


The above photo of a beach was taken specifically to make it look busy.
What is perspective?
Perspective, in an artistic sense, can be defined in several ways. Essentially, it considers how we choose to transform a 3-dimensional view into a 2-dimensional image. In a literary sense, perspective refers to an attitude, opinion, or point of view. I think our understanding of the term ‘perspective’ is probably a hybrid of the two.
In this article I will consider how our decisions when constructing a photo can affect the 3-dimensional appearance of the subsequent image, and how our choice of lens and viewpoint can have a considerable impact on the resulting image.
Read more: Composition in Landscape Photography – The Essential Guide
Types of perspective
There are a number of ways in which our minds interpret ‘depth’ in a scene. Without us necessarily being conscious of what is going on, our brains will apply the same strategies to 2-dimensional photos and drawings, fooling us into thinking we are looking at a 3-dimensional representation.
One of the classic examples of this idea at work is in an illusion created by the Italian psychologist Mario Ponzo in 1911. By drawing two converging lines, we are encouraged to feel a sense of depth in the image. This drawing looks almost as if there is a railway line heading off into the distance and the two yellow lines, one in the foreground and one in the distance, appear to be of different lengths, when they are actually identical.
1. Atmospheric perspective
We are probably all aware of the impact of atmospheric perspective without necessarily ever having thought about it. It is most obvious in scenes where we can see a long way. Picture a scene with rolling green hills, stretching off as far as the eye can see. The hills might all be comprised of the same vegetation, and they might all have the same amount of light on them, but they don’t all look the same! Notice how, in the above photo, the landscape features become less well defined as we progress into the distance.
On very clear days distant hills might look closer than normal, an illusion created by the clarity with which we can see them but, when compared to foreground, distant landscape features always look less saturated and have less contrast, giving them a slightly hazy, often blue, appearance.
Read more: Landscape Composition – Using Foreground to Create Depth
There is a natural gradation from near to far as the colours and contrast fade into the distant haze created by the various particulates in the air and, from this, we intuitively interpret depth in a photograph.
This type of perspective can be enhanced if the layers are separated by specific atmospheric conditions, such as mist, or maybe a mixture of light and shade on successive hills. Many landscape photos work better when the near foreground is dark, and this certainly helps to emphasise the depth of the view. Photo above: The successive headlands near St Ives were separated by sea spray. For the second image (below) I zoomed in to 400mm to make the image a little more abstract.
For this view (below) of Swaledale, the alternating layers of light and shade created by the low sun and scattered clouds have helped give separation between the interlocking hills, and therefore greater depth to the image.
2. Overlap perspective
Even without atmospheric perspective, we would still interpret interlocking hills as a feature of a 3-dimensional scene. We know that where one hill slope is broken by another we have an overlap of features, and one is nearer than the other.
But this type of perspective is often used to create illusions, such as having someone nearer the camera, effectively leaning against the top of a tall building or holding a distant object in their hands.
 By creating a sense of interaction between subjects in the foreground and those in the background we can, momentarily, make them appear as if they are in the same plane, a technique known as ‘forced perspective’.
Forced perspective is often used for fun.
3. Linear perspective
It’s fairly obvious, but still worth mentioning, that the closer things are to the camera, the bigger they appear in the image. We can use this simple fact to help make our images look more 3-dimensional, by including the same sized object near and far.
So, if we have a person near the camera, looking very big, and another person farther away, looking smaller, we will interpret the image as 3-dimensional. This is called linear perspective.

By including a Highland cow close to the camera and another one far away, we get a sense of depth in the photo.
Linear perspective is often interpreted architecturally. If we stand at one end of a terrace of houses and look down the street, the houses appear to get smaller. The gutters, rows of bricks, and the tops of the doors all line up and point to a distant vanishing point.
When we have a single vanishing point like this, we refer to it as one-point perspective. Whereas if we stand at the corner of a street and look at rows of houses heading off in two directions, there will be two vanishing points, known as two-point perspective.
Read more: Composition Tips – Leading Lines and Vanishing Points
We can also see this with a single building, such as a barn or church, in a landscape with one side of the building heading to a vanishing point to the right, and the other side leading to a second on the left.
More helpfully for our rural landscape photography, we can find the effect of linear perspective in a whole range of situations, such as when we stand on a jetty, track, in a field of crops, next to a wall, or maybe even rock strata. Anything long and uniform will disappear into the distance, giving us a strong sense of depth.

Above: a jetty appears to get narrower as it leads towards its vanishing point in the middle of the photo. Above: rows of daffodils lead the eye from each corner of the frame towards a vanishing point on the horizon where there are a few trees to act as a focal point.
This sense of linear perspective and depth can be enhanced using slow shutter speeds, in order to reveal the drag from waves on a beach, or the lights of moving traffic, and can be created artificially by using zoom-bursts. This involves zooming the lens in or out during an exposure.
Choosing your lens
There are a variety of lenses we can use in landscape photography.
1. Wide-angle
We can enhance the impact of linear perspective by using a wide-angle lens because, for any given size we choose to make the foreground subject, a wide-angle lens (when compared to a telephoto lens) will render distant subjects smaller. So, when we get very close to a foreground subject with a very wide-angle lens, we tend to find the resulting image has more depth, so it looks more 3-dimensional.
For this photo (above) of rock strata at Welcombe Beach, Devon, I used a 16mm lens and positioned the camera carefully to maximise the sense of depth, and used the diagonals to increase the sense of depth in the image.
Wide-angle lenses can introduce a problem which we refer to as ‘converging verticals’. This is more noticeable in urban settings where we photograph tall buildings with vertical sides, and is at its worst when we tilt the camera upwards. In this situation the sides of the building will not look vertical, and this can make it look like the building is falling over.
It can be corrected in post-processing, or we can use a tilt-shift lens to iron it out when taking the photo. However, there are plenty of occasions when a little bit of convergence looks acceptable, because the vertical sides of the building are disappearing towards a vanishing point, just as the horizontal aspects do.
This phenomenon is less of an issue for rural landscape photography. One place where we do see it is in pine forests, where the trees are tall and straight. Stand in the middle and take a photo looking upwards, and the trees appear to lean in. This can be used creatively, emphasising the height of the trees.
Looking up in a Caledonian pine forest with a wide-angle lens, the trees appear to lean towards the centre. I find this an appealing feature.
2. Telephoto
Given that wide-angle lenses increase the depth in an image, it should come as no surprise that the distorted view of the packed beach was taken with a telephoto lens. A longer lens will make distant subjects relatively large in the frame, so it effectively makes them look closer than they are. This makes the people on the beach look stacked together, very 2-dimensional in appearance.
That doesn’t mean we can’t get depth in an image taken with a telephoto lens. There will still be an element of linear perspective, and we can’t fool atmospheric perspective; this is why we see so many lovely photos of interlocking hills receding into the distant mist, or alternating light and shade. A telephoto lens will often rescue our landscape photography in the moments when we can’t find any desirable foreground.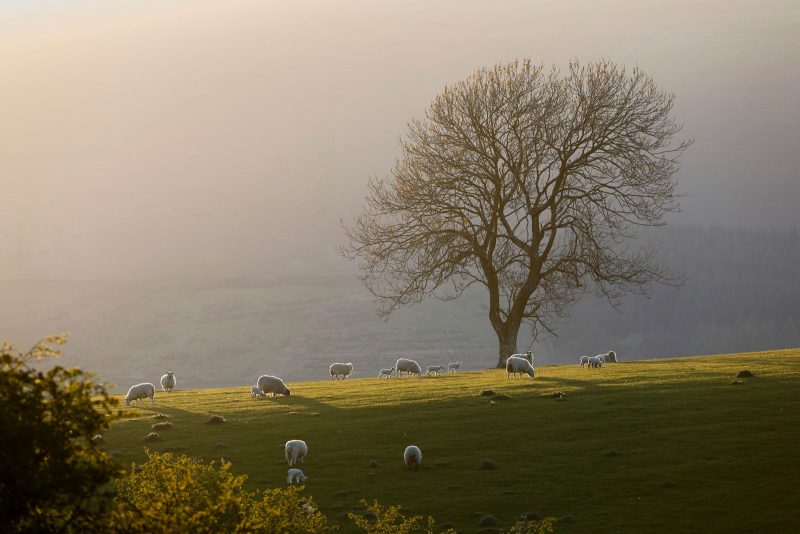
This photo of sheep and a lone tree in Bowland was taken with a 300mm lens. Though telephoto lenses tend to flatten the image, we have a sense of depth created by the pattern of light and shade, as well as the misty hillside beyond.
The packed beach exaggeration wasn’t just created by using a telephoto lens. There was another important factor: the choice of viewpoint, i.e., the perspective chosen by the photographer.
Read more: How to Take Landscapes with a Telephoto Lens
Choosing your viewpoints
When taking a landscape photo, it is incumbent upon us all to consider the viewpoint we choose, as it can have a massive influence on the resulting image. Too often, newcomers to photography will see a view and take the picture, with very little, if any, reflection.
As we gain experience, we all realise that we need to spend time ‘making’ the image. We are responsible for how the elements within the frame work together, and we have the power to change that by moving around.
1. The low-down
Too many photos are taken from a standing position with the camera held at eye-level. It might be that this is the best position for some images, but not for all. Holding the camera at ground level, and I mean at ground level (on the ground, not a few inches off it), can make the image completely different.
It will introduce new elements that otherwise wouldn’t be noticed, and can give a huge sense of depth to a photo. It will undoubtedly give the photo impact because people rarely see a view from quite so low, unless they’ve just fallen over!
The same view of Mevagissey, the first (above) taken from standing height on the quay, and the second (below) from water level, by descending the steps. The lower perspective of the second image makes it much more interesting.
Reflections can be particularly good from a low level, and it’s surprising how small pools can look like big lakes if captured with a wide-angle lens from water level. Ground-level photography has caught on really well for nature subjects, but remains less popular for landscape photography. Despite this, it is certainly worth considering.
These images of Robin Hood’s Bay (below) were taken from the same place, but for the second I rested the camera on the rock at the edge of the small rock pool. The second image is by far the more interesting of the two.


One thing to remember for low-level photography is that the foreground will be a lot nearer, so there might be problems with getting everything sharp.
For this we need to use the technique known as ‘hyper-focusing’, which combines a very small aperture and, usually, a wide-angle lens. Focus carefully on a point about one-third of the way into the photo (though this is simplifying the technique slightly).
2. Scale the heights
In contrast, it is sometimes better to get the camera up high. For example, I was recently photographing a stone circle and, from standing height, the foreground stones overlapped with those in the background. I wanted to separate them.
My other issue was that the circle looked like more of a line than a circle from my low perspective, so I wanted to get the camera higher up. Firstly, I looked for a bank or another stone to stand on. Then, I held my camera high above my head, using live view to help me compose the photo. Still, I wanted to get higher.
Two options sprang to mind. Firstly, to take a pair of step ladders (please don’t smirk, it has been done). Secondly, to put the camera on a fully extended monopod*, and raise it above the head like a flag-bearer.
(*The same height could be reached with a fully extended tripod that is lifted up, but this is roughly three times as heavy.)
When doing this I use manual focus and manual exposure. I set the ten second timer, lift the camera up, and wait. Composition involves a bit of guesswork but, if at first you don’t succeed, try again!
Two photos of Tregeseal Stone Circle in Cornwall – the first (above) was taken from standing height and the second (below) was taken by hoisting the camera above my head on a tall monopod. Not only have I managed to get more separation between the stones in the circle, but I have been able to get more foreground by tilting the camera down slightly.
Higher camera positions are often better in flat landscapes, because it’s possible to include more foreground by tilting the camera down slightly. If we were to take the height idea to its extreme, we would be taking photos from an aeroplane, or using a drone camera. But, we can sometimes find church towers or other tall structures from which to improvise.
3. Side by side
This is the simplest of all adjustments we can make to the perspective of an image. It’s amazing how much we can change the balance of elements in an image by moving slightly to the left or right. It might only require us to move a few metres, so there is no excuse not to try this out. 
For the above and below photos, I moved a few metres to find a foreground path to add depth and lead the eye into this photo of Burnham Overy Staithe windmill in Norfolk.

Imagine standing in a position where there is a footpath leading into a scene. By standing in the middle of the path, it’s possible to have the path lead in from the bottom middle, directly towards the top middle of the image.
Now move a metre to the right, and the path leads from the bottom left of the image diagonally into the photo. Either way, we get a sense of depth to the image because of linear perspective, and this can be emphasised by using a wide-angle lens, but the composition has changed dramatically.
It might be that there are two barns in a scene and, from the initial viewpoint, the further one overlaps slightly with the nearer one. Move a few metres to the left or right and a gap will appear. This might improve the composition by allowing the eye of the viewer to wander through the gap into the distant landscape.
I often move side to side to find a different foreground subject, or to adjust its placement in relation to the distant view. There have been times when I have raced frantically from one spot to another to get a rainbow to frame a lighthouse or other landscape feature, and others when I have wanted to micro-adjust the camera by a few centimetres to get diagonal features to lead in symmetrically from both corners of the frame.
I had to move quickly to get into a position from which I could photograph Fair Isle South Lighthouse inside the rainbow.
In conclusion
We all intuitively consider perspective when we use a camera but, by being aware of it whenever we hold the camera to our eye, we should all create more considered images. For me, the key is to remember that we don’t ‘take’ an image, we ‘make’ it.
The first implies little effort, the second implies that we search for the elements in the scene and try to maximise their potential, whether our aim is to be more creative with our art-form, or to be creative with the truth!


