
How to Master Exposure in Your Wildlife Photography

You can’t expect to capture consistently good images of nature until you’ve mastered the mechanics of exposure. Until you fully understand the roles of f-stops, shutter speed, and ISO, and know how to confidently review and adjust exposure, you will struggle to work efficiently or creatively.
Nature photographers must often work under pressure and be able to quickly adapt to their subject’s behaviour, movement, or changing light and conditions. The best picture-taking opportunities are often brief and unexpected so, unless you can use your camera intuitively, you risk missing ‘the shot’.


An incorrect exposure can ruin an otherwise great nature image.

Put simply, exposure is the process of a photosensitive material being exposed to light, and it is controlled by aperture size, shutter length, and ISO sensitivity. A correct combination of these three variables is required to produce the photographs you envisage.
If you have already read ‘How To Master Exposure in Landscape Photography’ you should already understand the mechanics of exposure, but do not worry if you haven’t: I will go on to explain exposure in more detail and discuss how to apply it your nature photography to capture the very best results.
What is exposure?
Cameras and technology may have changed dramatically since the very first photograph was captured over 200 years ago, but the three key parameters controlling exposure remain greatly unchanged.
The aperture is the adjustable size of the hole in the lens that allows light to pass through and reach the camera’s sensor. The shutter speed is the precise amount of time (typically a fraction of a second) for which the sensor is exposed.
ISO refers to the sensor’s sensitivity to light. A low ISO rating is less sensitive to light and requires more exposure, while a higher ISO is more reactive to light and therefore requires a shorter exposure.
A correct exposure is achieved by selecting a suitable combination of these three controls. But, hang on a minute. What exactly is correct exposure?
This is an excellent question with a very simple answer. It is simply an exposure that captures the scene or subject just the way you intended when you squeezed the shutter button.
 If the photograph is too light, it is overexposed, and if it is too dark, it is underexposed.
While exposure can be adjusted using photo-editing software, if an image is badly over or underexposed, image quality will suffer. Therefore, nature photographers should be aiming to achieve ‘correct’ exposure in-camera, and should not rely on correcting things in post-processing.

While achieving the right combination of aperture, shutter length, and ISO might sound quite complex at first, it is not as daunting as you might think.

Cameras are hugely sophisticated and boast through-the-lens (TTL) metering systems that accurately read the light and will help you produce beautifully exposed images time and time again.
However, metering systems are not infallible, and cameras can’t predict the effect you wish to achieve. Therefore, a good understanding of the exposure triangle remains essential.
Read more: Understanding the Exposure Triangle
Aperture choice
As a nature photographer, your choice of aperture – also referred to as f-stops – will have a significant effect on the look of your images.
Altering the size of the aperture adjusts the speed at which image-forming light can pass through the lens. Select a large aperture, and the resulting shutter speed will be faster. Set a small aperture, and it will take longer for sufficient light to enter the camera to achieve correct exposure.
Apertures are stated in numbers, known as f-stops, and the aperture range varies depending on the lens, with some optics having more or fewer settings.
Lenses boasting a maximum aperture of f/2.8 or f/4 are typically larger and more costly due to being faster, while telephotos with a maximum aperture in the region of f/5.6 are slower, but more compact and affordable.
A fast shutter speed is often desirable when photographing wildlife and action but, if you can’t afford a fast lens, you can generate extra speed through your ISO choice – which we will discuss later.
To help achieve a rapid shutter speed, nature photographers will often find themselves selecting their lens’ largest (maximum) aperture. However, aperture choice also helps determine depth of field: the amount of your subject that will be recorded in focus. This is a key visual tool.

At large apertures like f/2.8 and f/4, depth of field is shallow, throwing foreground and background detail quickly out of focus. At smaller apertures, like f/11 or f/16, more of your subject will be recorded in focus, but the corresponding shutter speed will need to be longer. This may not be practical if your subject is moving, or when you are shooting handheld.
While aperture choice is the overriding control dictating depth of field, focal length and the subject-to-camera distance will also have an effect. For example, longer focal lengths appear to produce a narrower zone of focus.
Meanwhile, if you are physically nearer the subject, you obtain less depth of field – as you may already know if you have ever attempted macro photography.
There is no golden formula when shooting wildlife. Your choice of aperture will be dictated by the subject, situation, available light, and the effect you desire.
But typically, nature photographers rely on large apertures in the region of f/4 to generate a sufficiently fast exposure, while the resulting shallow depth of field will help isolate subjects from busy surroundings. Remember: with the zone of focus often being shallow, pinpoint focusing is essential.
Read more: Choosing the Best Lighting for Wildlife Photos
Shutter length
Having based your aperture choice on the speed and/or depth of field you require, you now need to set an appropriate shutter speed to achieve a correctly exposed result. The exact length required will depend on the light available and the aperture and ISO being used.
Thankfully, your camera’s metering will do all the hard work for you. When you press the shutter release button the camera’s metering is activated and, depending on the exposure mode you are using, it will either automatically set (or suggest) the corresponding shutter speed.
If the shutter is too long, too much light will enter the camera and the image will be overexposed. If the shutter speed is too short, not enough light will reach the sensor and the result will be dark. Depending on the model, cameras offer automatic shutter speeds ranging from 30 seconds up to a rapid 1/8000th of a second.
In bright sunlight shutter speeds will be faster, while in poor light, speeds naturally lengthen. It is important to keep a close eye on shutter length, as it plays a pivotal role in how an image will look.

While its primary purpose is to ensure the correct amount of light reaches the sensor, shutter length also controls how motion is recorded. A fast shutter, upwards of 1/500th of a second, will freeze movement, while a slower exposure will blur it.
Again, there is no set formula – the speed you require is relative to the subject’s movement, and the effect you want to achieve.
Wildlife rarely stays still. Faster moving subjects require a faster shutter speed to suspend their movement. Therefore, unless you desire a slow shutter for creative effect, prioritise a fast shutter to not only freeze your subject’s movement, but eliminate camera shake– a common problem when using heavy telephotos handheld.
Changes in shutter speed – and aperture and ISO – are referred to in ‘stops’, with a doubling or halving of light being equal to one stop.
ISO (International Standards Organization)
ISO refers to the sensor’s sensitivity to light and completes the exposure triangle. It is a term adopted from film photography, where a low ISO rated film would be less sensitive to light. It would therefore require more exposure, but have a finer grain and produce the highest image quality.
Today, we can handily alter ISO speed from one frame to the next to change the length of exposure. Some cameras go as low as 50 and have a top ISO rating of over a million.
Although your camera’s lowest (native) ISO will produce the best image quality, it also requires the most light. Most cameras today boast excellent high-ISO performance, meaning image quality remains high even when the ISO rating is increased to generate a faster shutter, or compensate for a lack of light.
The excellent ISO performance of modern cameras is one of the most useful camera developments over recent years for nature enthusiasts, allowing photographers to shoot in dull light, use slower lenses, or just generally generate faster speeds at the push of a button.
While files do get progressively noisier at higher ISO speeds, noise reduction software, like Topaz Labs DeNoise AI, helps reduce the image degrading effects of high ISO noise.
While you should always use the lowest practical ISO speed, don’t be scared to push your ISO rating. Most cameras now perform very well up to at least ISO 6400. Assuming your aperture is already wide-open, increasing ISO is often the only practical method to increase shutter speed and capture sharp results.
Auto-ISO
For some subjects, such as landscapes, it is recommended you switch off Auto-ISO, but for nature photography it can prove a useful function. Rather than you manually setting ISO, in Auto-ISO mode the camera sets the sensitivity automatically, varying speed depending on the light and the shutter speed you wish to use.
This is ideal when shooting in rapidly changing light, or when photographing unpredictable movement. For example, when shooting a bird in flight, you may decide that you don’t want your shutter speed to drop below 1/1000th of a second, as it wouldn’t be fast enough to capture the action.
However, if you select Shutter Priority mode and then dial in the shutter speed you require, the camera will automatically adjust the ISO speed to generate and maintain the speed you require.

Alternatively, if you select Manual exposure mode in combination with Auto-ISO, you effectively switch manual exposure to auto-exposure. Set the f-stop you want and the minimum shutter speed you require, and the camera will adjust the ISO accordingly.
This set-up can produce the perfect balance of user control and automation, and will allow you to quickly adapt to the unpredictable nature of wildlife photography. It allows photographers to react faster to changes in light or behaviour than when working manually.
Many wildlife professionals now rely on the flexibility of Auto-ISO. If you are worried about your camera selecting an ISO that is too high to maintain image quality, don’t worry – you can select a maximum value for Auto-ISO, and the camera will only adjust exposure within these limits.
Read more: Digital Camera Modes – What Do They Mean?
Histograms
Wildlife photographers should regularly consult their photograph’s histogram. This is a two-dimensional graph (resembling a mountain range) that illustrates the tonal distribution.
The horizontal axis represents the picture’s tonal range from pure black (0, far left) to pure white (255, far right). The vertical axis shows how many pixels have that value. Use this graph to guide your exposure. While there is no such thing as a perfect histogram, you should avoid sharp spikes on either edge.
If pixels are falling off the left side, the image is probably too dark and underexposed. If pixels are grouped up on the right edge, the photo is overexposed and highlight detail lost.

Pixels recorded as pure black or pure white record no information at all, so you will be unable to recover any shadow or highlight detail in those areas during editing. This should normally be avoided unless it is for creative purposes.
For example, you might want to produce a low or high key effect, or silhouette your subject against a bright sky for drama. In instances like this, expect the histogram to be skewed.
However, ordinarily, if the graph is bunched to the left, select a longer exposure to make the image lighter. If the graph is pushed over to the right, select a faster exposure to reduce the overall brightness of the shot.
If your subject is static – flowers or roosting insects, perhaps – you can use LiveView and activate your camera’s live histogram, which will allow you to review and adjust exposure prior to taking the photo.
However, when shooting with the viewfinder to your eye, digital SLR users will need to review exposure between shots. However, users of mirrorless cameras can pull up a live histogram in the electronic viewfinder (EVF), and keep an eye on exposure while shooting.
Most cameras also have a highlights warning or zebra pattern to alert you to exposure error. When replaying and reviewing photographs, blown highlights will blink. You may then decide to apply compensation and reshoot.
Read more: Understanding Histograms and How to Use Them
Exposure modes
Cameras have a choice of exposure modes. It is normally best to ignore the pre-programmed Picture or Subject modes, in favour of either Manual, Shutter, or Aperture Priority modes. These three modes offer varying degrees of control, and whichever you opt for will depend on the situation and personal preference.
Shutter Priority (S or Tv) mode is a semi-automatic mode in which you set the shutter speed you desire, and the camera selects the corresponding f-stop. It is a good option for wildlife photography where a fast shutter is often required.
Aperture Priority (A or Av) works in the opposite way, with the photographer manually selecting the f-number and the camera then setting an appropriate shutter length. This is the best mode when depth of field is the key consideration, and shutter speed is of lesser concern– for example, plantlife and stationary subjects.
In full Manual mode (M), the photographer must select the correct combination of both aperture and shutter length. It is the mode that requires the most input from the photographer. However, as previously mentioned, it is a great, versatile option when used in combination with Auto-ISO.
Try using all three modes at different times until you feel confident with how they each work. Then simply select the mode suited to the subject or situation. There is no right or wrong choice, as long as you are in control and able to work quickly and intuitively.
Read more: Choosing a Camera Mode: Which is Best?
Exposure compensation
Metering systems are sophisticated, but not unbeatable. Mixed lighting, and subjects with very dark, light, or snowy backgrounds, are among the shooting scenarios that are most likely to deceive your camera.
Your histogram will immediately highlight exposure problems, but the more you shoot and the more experienced you become, the more you will recognise the types of scenes that are likely to cause problems.
To correct exposure error, apply exposure compensation. This is designed to allow photographers to override the camera’s settings and make subsequent frames lighter or darker.

Most cameras have a dedicated exposure compensation button, which is indicated by a +/- icon. By depressing this button and rotating the control dial or wheel, you can quickly apply positive (+) compensation to make images lighter, or a negative (-) amount to make images darker. It is best to do this using either 1/3 or 1/2-stop increments.
Compensation isn’t only useful for corrective purposes. You may wish to intentionally make your images light and bright, or dark and dramatic, for creative effect. However, remember to return the level of compensation back to 0 once you have finished, otherwise you will continue to apply the set level of compensation to all subsequent shots.
Metering patterns
Cameras have a choice of metering patterns, usually spot, centre-weighted, and multi-zone (typically called evaluative or matrix).
Your choice will determine how the light is measured. In most situations, the camera’s default multi-segment metering pattern is the most reliable choice. It works by taking luminance readings from zones all over the image space, and calculating an average.
This is a good choice when the frame is dominated by mid-tones, and is a favourite among landscape photographers.
However, if your subject is contrasted against a very light or dark background– for example, a bird in flight against a white sky– your camera will likely misjudge exposure, biasing settings toward the backdrop rather than the subject itself.
Some cameras assign greater importance to the metering zone containing the active focusing point, which helps alleviate this potential problem.
If you want more control over where your camera meters from, consider switching to centre-weighted or spot metering. Centre-weighted assumes the main subject is positioned centrally, and biases approximately 75% of its light reading to the centre of the frame. This is useful for portraits and many wildlife subjects.
Spot metering is more precise, and is favoured by many wildlife photographers when shooting in mixed lighting. This mode bases overall exposure on just a very small portion of the image space, typically 1-4% of the frame. As a result, readings are not influenced by light or darkness in other areas.
Spot metering gives optimum control over exposure, but it does require the photographer to place the metering spot with great precision, or exposure values may vary wildly.
Read more: Understanding Different Metering Modes
Exposing to the right
This is a raw-only technique you may have come across, where photographers are encouraged to expose their photos so that the histogram is pushed as far to the right of the graph as possible, without clipping the highlights. Doing so captures a raw file with more tonal information and less noise.
During processing the photographer needs to reduce exposure and edit the image so that it looks correctly exposed. While the technique is valid, modern cameras now produce very clean files without practising ETTR.
For wildlife photography, ETTR is rarely practical as it requires the photographer to use a longer exposure to effectively overexpose their images. Doing so enhances the risk of camera or subject movement.
Instead, nature photographers should aim to achieve a normal, ‘correct’ exposure in-camera. But do try to avoid underexposure as, if you need to brighten the image in processing, you will reveal extra noise.
High and low-key photography
Exposure is not simply about recording your subject correctly, or as our eyes see the world. Once you understand the mechanics and principals of exposure, you can manipulate it for creative effect.
You may decide to opt for a slow exposure and pan the camera to imply motion, or practise ICM (intentional camera motion) to create more impressionistic results. Or, you may wish to capture high or low-key results.

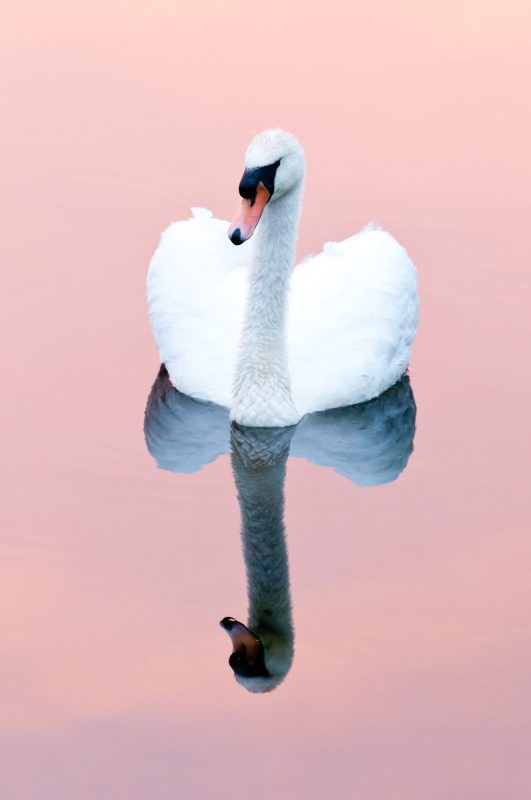
High-key images are light and bright: for example, a mountain hare against a snowy backdrop, or a mute swan shot in misty conditions. This style can convey a positive mood and create attractively clean, simple results that will highlight a subject’s shape, form, and design.
While high-key results are easy enough to create in a studio environment, nature photographers need to use light, natural backdrops, like the sky, snow, water, and mist. For the most graphic results, push exposure to the point of overexposure using positive compensation.
In contrast, low-key results are moody and dramatic, and boast dominant dark tones with few highlights. This approach works best when combined with a subject whose shape and outline is highlighted by back, rim, or side-lighting.

Careful positioning is important. Try to align yourself so that an area of deep shade forms your subject’s background and creates an inky-black backdrop. Negative exposure compensation is often required to achieve correct results in-camera. You may need to refine exposure during processing.
When shooting more creative exposure styles, expect histograms to show peaks to the left or right of the graph. In this instance, the graphs are reflecting a creative style rather than poor exposure.
In conclusion
Poor exposure can ruin once-in-a-lifetime nature photographs, and a lack of understanding will result in missed opportunities.
Exposure is not a topic you can afford to neglect, and complacency may prove costly. However, with practise you will soon master exposure and understand how it can be best and most creatively applied to your nature shots.
Good luck!


