
Panning Technique: Conveying Motion in a Photo

When you first started learning about photography, you were probably told that blur is bad and you should use a fast shutter speed to get rid of it. But animals move, and as wildlife photographers we should try to capture nature in action. Perhaps it’s easier with video, but it is definitely possible in stills too – and the resulting feel can be very different.
Motion blur can be your friend. It doesn’t have to be that annoying imperfection that ruined a perfectly good photo. Instead, harness its power as a creative tool and use it to make artistic imagery.


The Panning Technique
We’ve covered it before in our photographing birds in flight tutorial, but panning deserves its own write-up. Panning is most regularly used with birds in flight, but it can be done with anything that’s moving. It’s a technique that I have been using more and more now myself, and I just love the results when it goes right.
The idea of the panning technique is to use a slow shutter speed, of perhaps 1/30th second, and shoot whilst moving your camera with the target’s path. You need to keep the camera level, tracking at the same speed as the subject, and hold down the shutter. Oh, and keep your fingers crossed for some results!
It’s definitely hit or miss, but sometimes good panning technique will render key parts of the image sharp. Your target is to keep the head of the animal sharp, whilst the limbs will blur as they move more ‘erratically’. Take a look at these two shots from one panning sequence – they’re both shot at about 1/30th second.
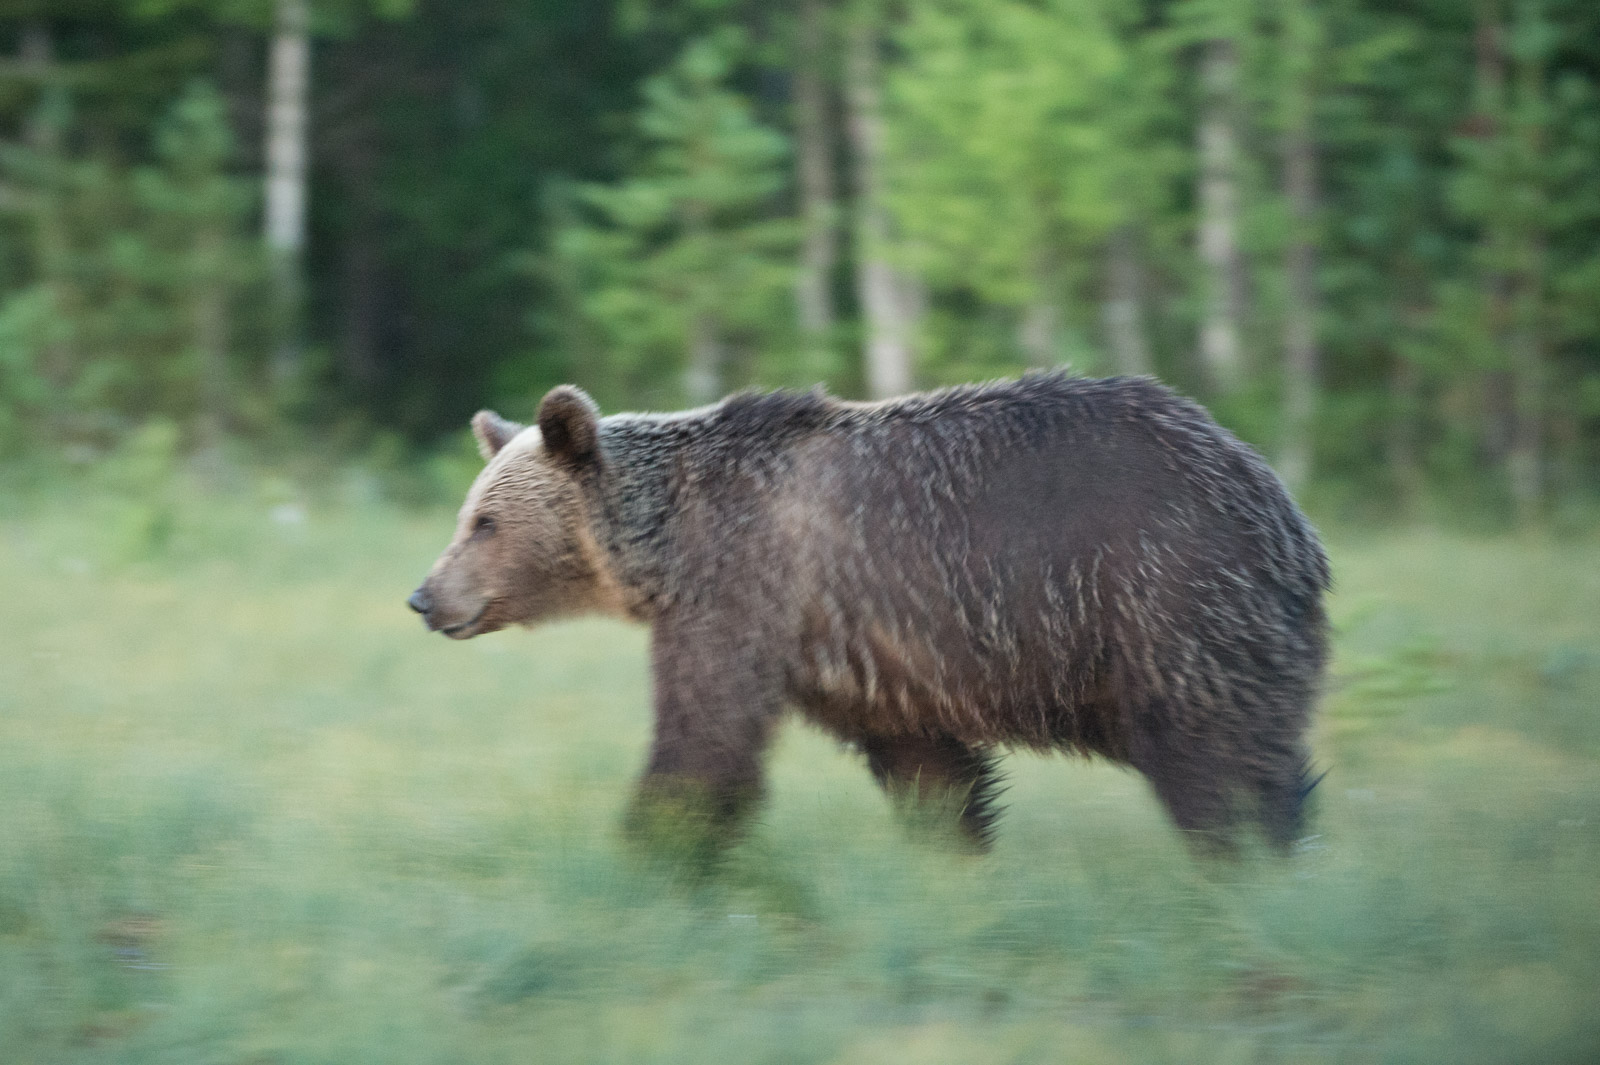
The first one is blurred all over. The motion was just too much and I probably didn’t keep the camera level with the bear at this point.

The above shot has the head pin sharp, with the rest of the body and the background blurred. This is great for conveying motion, as instantly you know the bear is stalking through the marsh. If I had used a fast shutter speed to freeze the bear, then it may seem like it is standing still.
You don’t need to go super slow, though. 1/30th of a second works for bringing loads of motion, but if your subject is moving particularly quickly then you’ll need to move the camera faster too. This means that you can increase the shutter speed and still get that motion blur. This photo of a puffin zipping past was taken at 1/160th second.

The wings are totally blurred, as well as the background and the foreground, but the head and body is pin sharp. With the puffin moving in a very straight line, I matched its speed and angle of movement with my panning motion and this is the result.
Tips for Panning
You really need to keep your camera level, moving on a horizontal with the animal. If you start to move on a vertical, and the animal doesn’t, then you’ll blur the head too. So, using a sturdy tripod with a decent tripod head (such as a ball head or gimbal) is highly recommended. If you were to try this technique whilst handholding the lens, you’d probably find that your movement would be all over the place – this would introduce plenty of camera shake and blur.
You can also use a beanbag, although the panning motion may be more awkward as the lens could be restricted from twisting around by the bag. Sometimes a tripod isn’t suitable though, so this is definitely a good backup. Whatever you do, just make sure you have some kind of support for your lens, especially if you are using long telephotos.
Other Advantages of Panning
Apart from the creative blur you can introduce, panning has other benefits for your photos. The slow shutter speed means you can let in a lot more light, shooting into fairly dark conditions. This wolverine was taken at twilight, at about 1am, in Finland.

It’s a great technique to keep shooting past when you would usually be packing up your kit. You can slow the shutter further if you like, 1/30th second is use a guideline. The slower you get, the harder it is to keep the head sharp, but the more light you can let in.
Trying this in bright conditions? Then decrease your ISO speed or narrow down your aperture to reduce the exposure of the photo so that you don’t overexpose the shot.
In Conclusion
It is definitely a bit of a lottery when it comes to panning. Even a ‘panning expert’ will get blurred shots ready for the bin. You might take 50 frames, with only one that you can use. But it’s worth it because they look so different and creative.
Have you tried panning? Share your successes, or failures, in the comments below!


