
6 Tips for Photographing Flowers

Throughout the year, particularly during spring and summer, flowers provide great photo opportunities. There is such a vast choice of blooms, varying in size, design, and rarity. Many flowers are exquisitely delicate and colourful, so it is hardly a surprise that they are such popular subjects to shoot.
They are ideal for honing your close-up skills and developing creativity – after all, flowers are not going to run or fly away. You have time and control to get your picture just right.


Flowers inhabit practically all environments, but woodland, meadows, coastal clifftops, heathland, and moorland are among the best places to search. Your own back garden can be home to subjects too, particularly if you leave an area unmown to encourage pollinators.
So, what are you waiting for? Read my top tips for taking better flower photographs now!
1. Use the right kit
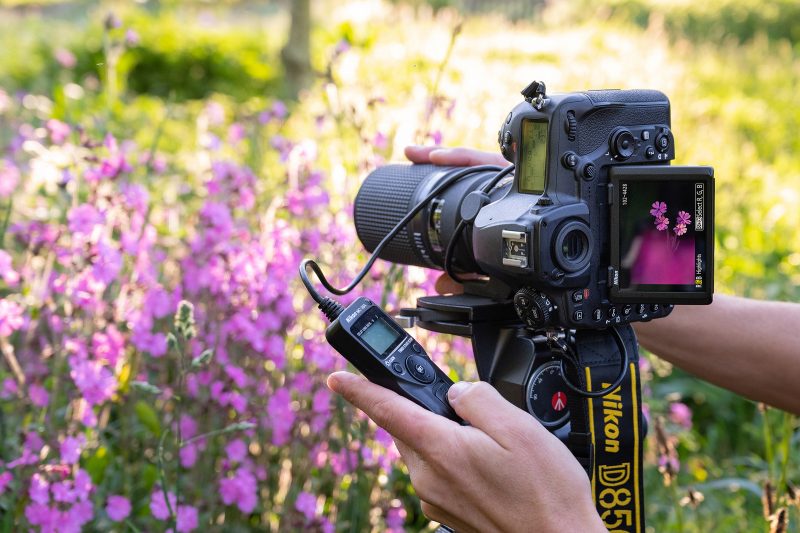
For flower photography, almost any focal length can be useful, but you will often want to fill the frame with your subject. To do this, you will need a close-focusing lens capable of a high degree of magnification.
The long end of a tele-zoom may suffice for larger blooms, but the best choice for flowers is a dedicated macro lens, which is optimised for close focus and has a reproduction ratio of 1:1 (life-size).
Any macro lens will do, but I recommend a focal length in the region of 100mm, as this will provide a good working distance. A cheaper alternative is to buy a close-up filter or auto extension tube.
Don’t overlook using a wide-angle lens – they often possess a close focusing distance, and their wide perspective can produce interesting environmental views of flowers in context with their surroundings.

A tripod is a great aid for flower photography, allowing you to fix your camera in position to assist focusing and framing – use one whenever it is practical to do so. Ideally, opt for a design with low-level capability.
However, you may find it is easier to use a beanbag to support your camera when shooting at ground level. A groundsheet can be handy to protect your kit and clothing from getting wet or dirty when lying on the ground.
Meanwhile, a Wimberley Plamp is a useful accessory when shooting flowers. Basically, it is an adjustable arm with clamps at either end that you can attach to your tripod to hold a reflector in place, stabilise a stem, or just generally act like an extra hand.
Finally, consider carrying a small garden spray bottle or atomiser to add droplets of water to petals and leaves. Doing so will mimic dew or rainfall, and add sparkle and interest to your flower close-ups.
Read more: Introduction to macro photography equipment
2. Take your time

This is a simple, and perhaps somewhat obvious, tip, but important nevertheless – take your time. When shooting flowers, there is rarely any rush, and few excuses for getting things wrong. Study your subject from all angles before deciding your approach.
Use a tripod when practical – this will help slow you down, make you think, and identify any errors before you press the shutter. A support will also allow you to place your point of focus with greater precision – depth of field will often be shallow when shooting flower close-ups, so there is no leeway for error when focusing.
Review your shots and scrutinise exposure, composition, and sharpness, before you feel entirely satisfied that you’ve got the shot.

3. Time it right

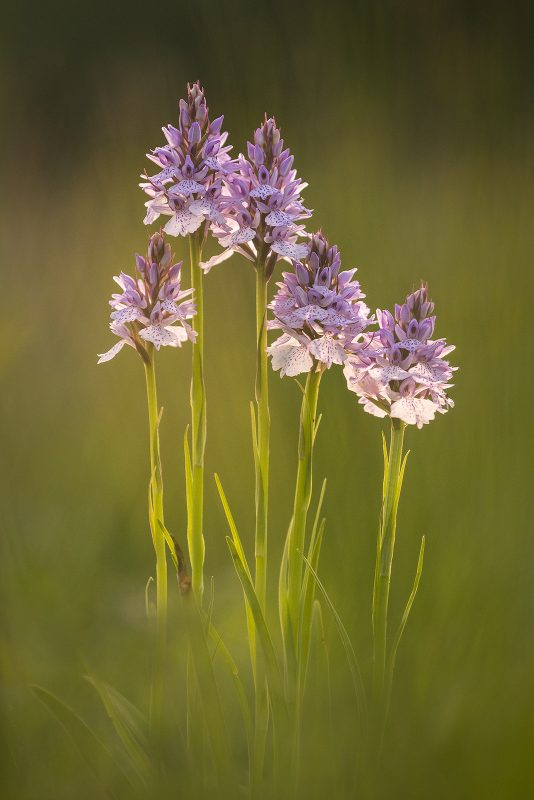
Blooms are best shot when they are in pristine condition – in close-up, even the tiniest flaw or imperfection will be highlighted and appear obvious in your shots. Flowers are ephemeral things, though, so planning and timing is important.
If you miss their peak flowering period, you may have to wait until the following year for another opportunity. Therefore, it is important that you either do a little homework or legwork before you begin taking photos.

Either research specific flowers to discover just where and when they will bloom, or regularly visit habitats that you are familiar with, so that you can begin taking photos at the optimum time. Be aware that the weather may accelerate or delay the flowering period – for example, a cold spring may setback some species by several weeks.
Keep an eye on the forecast too. The best days to go out and photograph plants is when it is still. Wind movement can make precise focusing and framing a challenge. A wind-speed below 15kph is best – if it is windy, it is best to retreat into woodland where you will find more shelter.
Early morning and late evening will provide the most dramatic, warm, and attractive natural light. However, even and diffused light will often suit flowers, so bright overcast days can be ideal for shooting blooms.
4. Go low

Your choice of shooting angle can make or break your flower photos. A worm’s eye view will suit many subjects, particularly orchids and woodland flowers, like wood anemone and bluebells.
By shooting with your lens at ground level you will create a more natural and intimate perspective, and obscure almost all recognisable detail either side of the plane of focus of the lens.
Why? Well, when you lie down, you place more distance between the subject and its background. Messy grasses or foliage will be rendered out of focus, and appear as an attractive wash of colour. This approach will help your subject ‘pop’ from its surroundings.
Read more: How to create beautiful bokeh
Longer focal lengths, upward of 300mm, generally work best, together with a large aperture to generate a shallow zone of focus. If your telephoto won’t focus close enough, attach an extension tube to reduce the lens’ minimum focusing distance.
Shooting from a low angle can be awkward and fiddly. Use a beanbag (or even a crumpled-up jumper) to support your set-up – this will allow you to achieve a lower angle than a tripod. Cameras with an articulated LCD screen are advantageous for capturing low-level shots, as you don’t have to peer through the eyepiece itself to frame and focus.
5. Manipulate the light
When photographing close-ups of flowers, you have a huge amount of control over light – a key ingredient that will either make or break your photo.
Therefore, always study your subject closely and ask yourself, could the lighting be enhanced? When photographing small flowers, it is easy to alter or influence the light’s quality and direction.

Outdoor photographers are often told to avoid shooting in strong, direct midday light, but by using a diffuser you can soften its quality, reduce contrast, and remove ugly highlights. You can buy small, collapsible diffusers that fit in your camera bag – Manfrotto (formerly Lastolite) is among the leading providers.
Dark, ugly shadows are normally undesirable, but by placing a reflector close-by (angled in order to bounce natural light onto your subject), you can quickly relieve dark shade. A piece of white card or tin foil will do a similar job.
Small LED lights (or even a torch) can be used to add light. LED devices are most effective when used in low light – in bright sunshine, their effect will be overwhelmed. One of the advantages of using a continuous light source is that you can see its effect immediately.
Adjust the light’s intensity by moving the light closer or further away. Backlighting will often prove the most dramatic type of light, highlighting shape and form and the translucency of petals and leaves.
Quite simply, flower photographers should take full advantage of the control they possess over light.
Read more: A guide to using flash with wildlife
6. Be different
Conventional flower close-ups will look stunning, but there are lots of different ways to capture blooms. So, be thoughtful and creative with your approach to ensure your shots stand out. For example, try different shooting angles, and experiment with focal lengths and depth of field.
Use other surrounding flowers to create a ‘frame’ for your subject, or consider using a wide-angle or fisheye lens to create a distorted perspective. For an artier approach, play with creative techniques like Intentional Camera Motion (ICM).

Most modern cameras have a multiple exposure mode that allows you to capture and overlay two or more frames in-camera. This can be a great function for creating ethereal and dream-like flower photos, by layering together images that are either framed or focused differently.
Keep things simple to begin with. Start by sandwiching a sharp frame with a second, defocused shot. By doing so, you mimic the Orton Effect, which adds a dream-like glow and softness to photographs. It is best to switch on Auto Gain so that your camera automatically adjusts exposure for each image, and produces a correctly exposed final image.
As with any creative technique, be prepared to experiment. You will normally have to capture a series of shots to achieve one you like. As you gain confidence, you might decide to be more experimental and combine a double exposure with some camera motion, to create more artistic results.
By applying a creative approach to your flower photography, you are more likely to capture memorable and original photos.
In conclusion
Flowers are such abundant and accessible subjects, why wouldn’t you want to take photographs of them? I hope my tips help you have a ‘blooming’ good time.


