
How to Use Ultraviolet Light for Creative Nature Photography

Every photographer reaches a point where they want to get out of their comfort zone and try something new. Unfortunately, many of those new techniques require travel or significant financial investment, which may not be feasible. In this article, I’ll introduce you to a photography technique that produces wild, otherworldly results – and requires nothing more than your camera and an ultraviolet flashlight.
You’ll also need to pack safety glasses, and something that can support your camera during long exposures, such as a tripod, a backpack, or a beanbag.


What is UVIVF?
Ultraviolet-induced visible fluorescence (UVIVF for short) is the easiest way to experiment with photography outside of the visible spectrum of light, since it requires no modifications to your camera and only an ultraviolet-emitting light source.
If you’ve never heard of this, don’t worry – you’re not alone. UVIVF photography has a small but growing community, made popular by Craig Burrows, who was featured on a number of photography websites (including National Geographic) for his work photographing flowers using UVIVF techniques.
Ultraviolet photography can be divided into two main categories: UVIVF, and reflected ultraviolet. Reflected UV photography is essentially the same as visible light photography, but in the ultraviolet part of the spectrum (from 400nm down to 10nm), and requires modified or custom cameras designed to detect only ultraviolet wavelengths.
Many plants and animals have hidden patterns and features that become visible when viewed with UV-sensitive cameras. Flowers can have patterns that lead bees to the pollen and nectar, and many birds have bright UV patches that are thought to be a part of mating rituals.

Reflected UV has some uses in the human world as well. Dermatologists use reflected UV photography to monitor skin health, and it is also used by forensics teams to reveal hidden evidence at crime scenes.
UVIVF, on the other hand, occurs when ultraviolet light is directed at an object, which absorbs it and then emits it as fluorescence at a longer wavelength that is in the visible spectrum. To put it simply, this means that objects will glow with a variety of colours when exposed to ultraviolet light.
Safety procedures
Anyone who has gotten sunburnt is aware that ultraviolet light is harmful to humans (and many other living things). The radiation emitted from many UV light sources is actually stronger than what reaches the ground from the sun, so use your best judgement when choosing a subject.
Damage from UV light is cumulative over your lifetime and the effects can be severe, so protecting yourself and your subject is a must. As such, there are a few precautions you should take before experimenting with this technique.
Ultraviolet light is particularly damaging to the eyes, so glasses or goggles that block UV light are essential. However, not all UV blocking eye protection is made to the same standards, so be sure that you are investing in a quality pair of safety goggles.
In addition, avoid extended exposure to exposed skin. You should also take steps protect your subject from harmful UV exposure. Most importantly, never shine UV light into the eyes of any living animal. While UV light is known to have a harmful effect on the eyes of animals, it’s unclear how much of a negative impact it has on insects and other invertebrates. As such, it is still advisable to avoid exposure so as not to harm your subject.
Above all, keep the welfare of you and your subject in mind.
Equipment for ultraviolet photography
As mentioned previously, ultraviolet photography requires very little additional equipment. In addition to your safety equipment, here’s what you need to get started.
1. Camera
Because the fluorescence is in the visible spectrum, your camera is already fully equipped to capture the results of your experiments. Even cell phone cameras can be used, although better results will be gained by using cameras with better low light sensitivity.
To ensure your camera isn’t picking up any ultraviolet light, you can use an ultraviolet filter that cuts out all wavelengths below 400nm. Lens choice is up to you, as interesting photos can be created with everything from an ultra-wide to a macro lens.
2. Ultraviolet light source
While you may be tempted to pick up the most inexpensive blacklight available, this is one instance where avoiding the cheapest option is a necessity. Cheap UV lights usually have massive light leaks in the visible spectrum, which results in an overwhelming purple or blue tint to your image that covers up most of the fluorescence.
The best light sources have filters that block all wavelengths except the target range, which ensures that the images you are capturing contain pure fluorescence and not visible light projected onto your subject from your light.

Look for lights that emit at 365nm, which are in the UV-A range of the spectrum and fairly easy to find.
Avoid anything in the UV-B or UV-C range, which aside from being far less common, are much more dangerous and not useful for what we’re trying to do. The most recommended lights tend to be the Nichia 365nm or LG UV LED chip. For better results, you can also purchase a ZWB2 or Baader UV filter for your light, which blocks all wavelengths except a narrow band centered around 365nm.
For my work, I’ve been using a Lightfe UV-301 purchased from Amazon, which does have a small visible light leak but not enough to negatively impact my photography.
A quick way to determine if you have any light leaks is to set up some metal ball bearings or a metal spoon in a totally dark environment and photograph them lit only by the UV light. If you see a bright, shiny reflection, either your light requires additional filtering to allow only 365nm light escape, or your camera is picking up some UV light and requires a UV-blocking filter.
Note that not all UV filters are equally effective at blocking UV light, so you should purchase one that has documentation depicting the wavelengths it blocks.
3. Darkness
Generally speaking, you want conditions as dark as possible to see the full range of fluorescence. A lot of fluorescence is fairly dim, and can be overwhelmed by stray light sources.
When setting up a home studio, you should be particularly careful to eliminate both light leaks and glowing objects in the background. A lot of man-made materials contain brighteners that glow with supernova-like intensity under UV light, so make sure your background is free from any objects that will distract from your subject.
Also, be aware that a lot of dust fluoresces very brightly, so keep your studio area as dust free as possible to minimize the amount of clean-up you will have to do when editing your images.
4. Tripod
Photographing fluorescence tends to require long shutter speeds, so a tripod is necessary to ensure that your camera stays still while the shutter is open. Tripods with legs that lock in multiple positions and the ability to get close to the ground are extra helpful, especially when trying to get that perfect composition on uneven terrain.

What to photograph under ultraviolet light
Now that you’re fully equipped, it’s finally time to get out and start finding things that fluoresce! One of the best parts about experimenting with UVIVF is shining your light around and seeing the unexpected colours shining back at you.
Here are a few suggestions to get started but, since the fluorescent colours seem to vary significantly between species, the best thing to do is to just get out in your local area and see what looks good.
1. Plants
Leaves will generally fluoresce red or blue. There seems to be some evidence that monocot plants (most herbaceous plants) fluoresce blue, while dicots (woody-stemmed plants and some other herbaceous plants) tend to fluoresce red. The sap or pitch of a variety of plants can also fluoresce.

2. Flowers
Unsurprisingly, flowers can be some of the most colourful parts of the plants under ultraviolet light. Many flowers have pollen that fluoresces strongly, and the petals of the flowers can glow with shades of blue, red, green, and more.
Flowers are a great subject to start with, since you can purchase a bouquet of flowers from your local florist at any time of the year and get excellent results from the comfort of your home.
3. Lichens, mosses, and fungi
The forest floor can be a rewarding place to shine your light. Lichens can be surprisingly colourful, adding splashes of orange and other colours to otherwise dull rocks and tree trunks.
Mosses frequently fluoresce red, but can also contain shades of green and blue. Fungi can fluoresce with a wide range of colours, including orange, yellow, blue, and green.

4. Seaweed and algae
Seaweed and algae win the award for most vibrant and dazzling arrays of colour that I’ve found. The most dramatic results come from the intertidal zone along the coast, where the receding tide reveals algae-covered rocks and exposed seaweed.
Large, stationary rocks that don’t get moved by waves generally have the best variety of species and, as a result, the widest variety in colours.

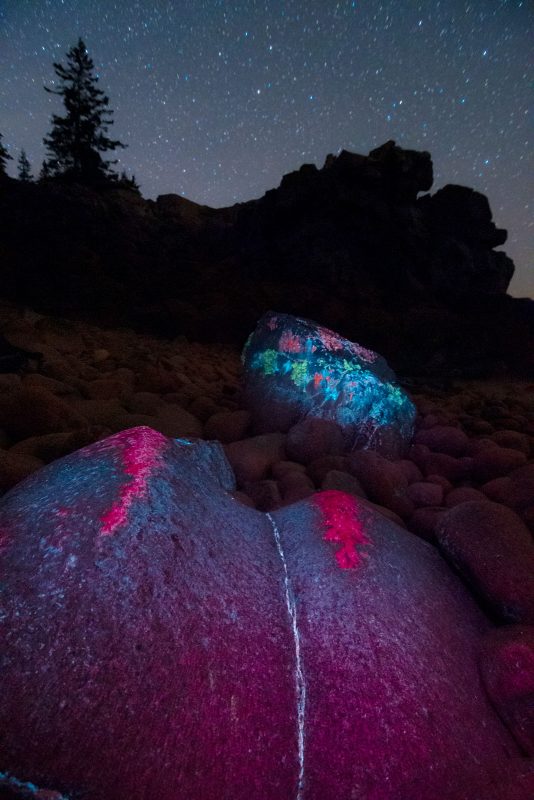
5. Rocks
Many minerals fluoresce, some in bright and dramatic ways. Minerals will actually fluoresce differently under different wavelengths of UV light stretching into the UV-C band, but as mentioned earlier that is beyond the scope of this article due to the hazards of UV-C light.


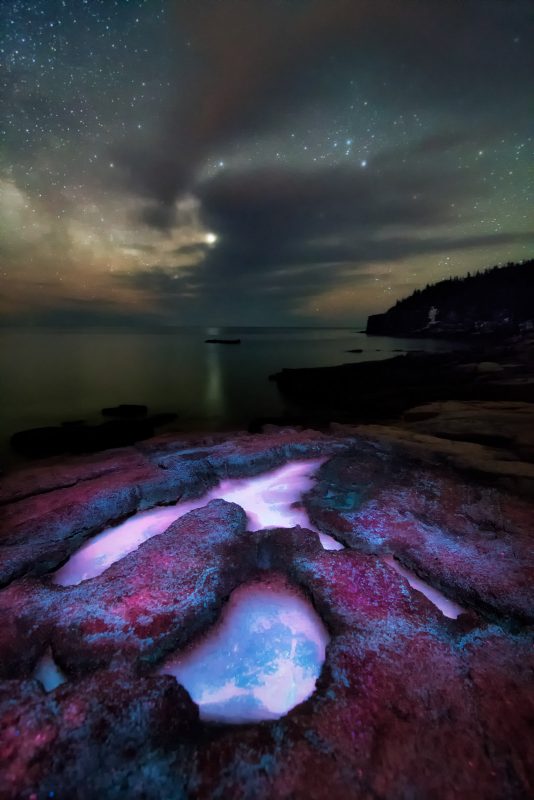
6. Water
Water tends to glow bluish under UV light, which can add splashes of interest to your images. Areas where water drains can be rewarding places to photograph, since the moisture allows for a variety of mosses and algae to grow and the build-up of dissolved minerals can create interesting textures.
Objects under the water’s surface can also affect the colour of the glow, and create interesting effects in your images.

7. Household objects
While not strictly nature photography, a lot of fluorescent materials can be found around the home. These can be great to practise with to get comfortable with the technique before going out in the field.
Those fortunate enough to have houseplants can see them in a whole new light, and start to get a feel for the exposure times that will be used in the wild.


How to photograph fluorescence
Now we have the kit and the ideas, your first step is to find a subject. This is harder than you may think (especially on rough terrain), as it entails walking through the dark shining a light that you can’t actually see your footing with and hoping something glows.
1. Setting up
Strongly fluorescing subjects will be visible from a good distance away, but the dimmer (and often more rewarding) subjects frequently require a lot of bending over for closer inspection.
Once you find a subject with potential, shine your light around the area to see if there is anything that will create a distracting bright spot in the background, and keep it in mind when you are setting up your composition and lighting the scene.


Next, decide how you want to photograph your subject and set your camera up. Do you want to take a close-up macro shot to show the details, or do you want to put on a wide-angle lens and show it as part of the landscape? The answer to this will largely depend on the environment that you find yourself in.
A forest that looks chaotic under normal light will also look chaotic under UV and will be better suited for close-up images, whereas an open beach or rocky outcrop makes it much easier to simplify the scene and include a wider view.
Also consider whether you will need to utilize advanced techniques like focus stacking or noise reduction stacking, since you may be shooting at very wide apertures and high ISOs to capture as much light as possible.
2. Lighting
Now that your camera is set up, it’s time to light your subject. You can either mount your light on a stand or clamp, or hand-hold it and manually shine it around. If you don’t mind carrying an extra stand into the field, using one will allow your lighting to be consistent over multiple exposures, at the expense of not having as much flexibility over the shape of your illuminated area in the frame.
For close-up and macro images this may not matter, but in wider angle landscapes you may end up with a spotlight effect and a sharp drop-off in fluorescence within the frame. Hand-holding your light and using it to light-paint your subject offers much more flexibility and the opportunity to highlight specific parts of the image at the expense of potentially significant variation between images.
Be sure to shine your light past the edges of the frame when shooting close-ups to avoid a dark vignette.


Some subjects, like some kinds of moss or seaweed, may fluoresce quite strongly. However, many subjects will be rather dim and require high ISOs, longer shutter speeds, or both to accurately expose.
Your actual settings will vary depending on the strength of your light and how large an area you’re trying to light with it, so be prepared to do some experimenting when you first go out. The best results come from the darkest conditions, but you can add interest to the scene by including moonlight or man-made light sources, provided they are dim enough to not overpower the fluorescence.

For camera settings, I frequently use ISOs from 1,600 up to 12,800 and shutter speeds from 5 seconds to 30 seconds, and sometimes both focus stack and stack for noise reduction to get the highest quality final product.
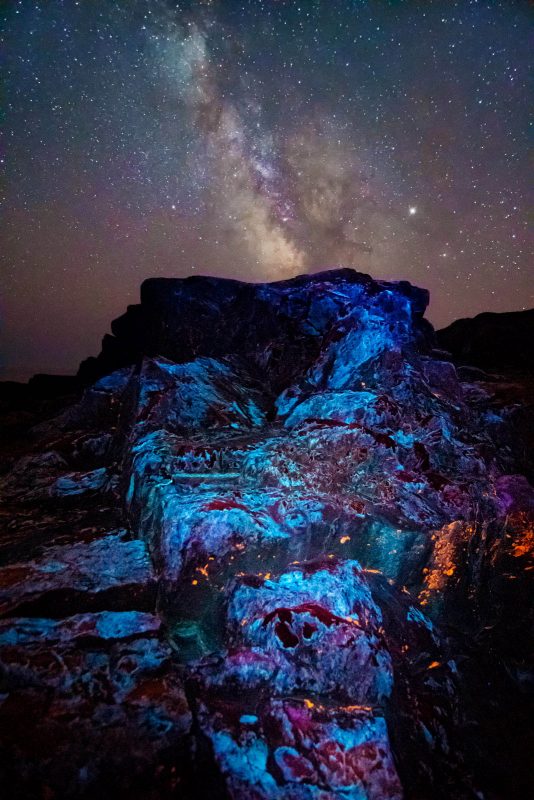
If I’m including the night sky, I shoot additional frames of the sky to be stacked and blended into the final product to ensure my stars are in sharp focus.
I shoot in raw and leave the white balance set to daylight, then tweak it in my raw editor to remove any tints. Sometimes I dual-process a raw image with one white balance for the sky and another for the fluorescence and blend them in Photoshop, since the fluorescence tends to have a slight blue tint and the sky tends to have an orange hue at that white balance setting.
Finally, have fun and be creative! Watching vibrant colours pop out of nondescript areas is half the fun of ultraviolet photography, and figuring out ways to create engaging photographs is an exciting challenge for those looking to try something new.
In conclusion
For more information, take a look at the forum at Ultraviolet Photography. There is plenty of information about every aspect of ultraviolet photography, including UVIVF. This thread is also highly recommended read for anyone looking to get started.
To see a gallery of very high quality images of flowers photographed using UVIVF, please visit the website of Craig Burrows.

If you’re looking for a new photography technique to get creative with, experimenting with ultraviolet-induced visible fluorescence photography is a great way to create otherworldly images straight out of camera.
You can use this technique anywhere from inside your home to the top of a mountain, and at any time of the year. Best of all, it requires very little initial financial investment.
So good luck, and have fun!


