
How to Photograph Plants
I give talks to a number of photography groups, and I often hear that “photographing plants I easier than birds or mammals.” Apparently this is because plants don’t fly or run away, but I don’t agree. Sure, it is very easy to take a photograph of a plant, but doing it creatively can be extremely challenging.
This article will look at my top tips for photographing plants, and hopefully you will see that it is a very enjoyable and creative field of its own!


Recommended camera kit for plant photography
Before we take any photos, we need to have the appropriate gear to do the job.
It is essential to have a tripod which enables you to get down to ground level. There are a variety of these on the market and, having experimented with a few, I favour a simple tripod with a central column which lifts out and hinges to a horizontal position.
A cheaper alternative (but not the most practical) is to take a cheap tripod and use a hacksaw to remove the neck of the centre column. This then allows you to bring it much lower to the ground.
On my tripod, I always use a good quality ball head, because it is so much easier to use in tricky situations than a three-way pan and tilt head.
Read more: A Guide to Choosing a Tripod Head

The market is full of convenience-driven zoom lenses, but they are not as good as specialist lenses because they don’t focus as closely and they don’t have such wide maximum apertures (plus, the glass quality isn’t as good). So it’s worth saving up for the most appropriate lenses if you can, even if that means buying second hand or limiting yourself to one or two lenses.
For plants and flowers, I mostly use 100mm macro and 300mm f2.8 lenses; for occasions when I want a wide-angle, I tend to use a 16mm to 35mm lens. One thing I love about my Canon 100mm macro is that it also has a rotating lens mount which allows me to switch between landscape and portrait format without changing the position of the camera.
Recommended macro lens: Sigma 105mm f/2.8

Also in my kit bag, I carry a pair of scissors which enables me to snip off any dead bits of bramble or grass which are in the way of the shot. I also have a reflector – you can buy reflectors, but I prefer my old Christmas table cloth which is gold on one side and white on the other. It folds down to nothing, can be manipulated into tight spaces, and was otherwise destined for landfill.
How to Photograph Plants: The Basics
I always think that before you can get creative with a subject, you need to be comfortable with the basics. Learn how to take a pleasing photograph of a subject, and then start to bend the rules. So here are the rules that I start with, and will give you a great foundation to work from.
Firstly, decide which part of the subject you want to photograph. With plants, this might be the flower itself but it could equally be a seed-head or leaf detail.

Make a pleasing composition. This involves the usual rules such as looking for lead-in lines, using diagonals, the rule of thirds etc. Remember also that the parts of a plant might face in a certain direction. For instance, a flower definitely “looks” in a particular direction, so off-set the flower to one side of the photo and have it facing into the frame.
If possible, I like to have the stem of the flower or seed-head out of focus where it leaves the frame. Therefore I try not to position the camera perpendicular to the flower and stem, and often I will use a wide aperture or hide the stem behind some other vegetation to throw areas out of focus.
Read more: Depth of Field for Beginners – Bokeh, Focus, and more

Soft light is often best for plants, so I like photographing them on dull, calm days. However, a low sun can also work for either front- or back-lighting.
Generally, with backlighting, I will consider using a reflector as well, just to add a bit of light onto the camera-facing side of the plant. I also use reflectors if I ever find myself needing to take a photo of a plant in the middle of a sunny day, as they can be used to reduce harsh shadows and even shelter the plant from the wind (helping to reduce motion blur).
I mostly avoid distracting backgrounds and often like them to be out of focus because this helps draw attention to the main subject. To do this, I use quite wide apertures (between f2.8 and f5.6) but more importantly I position myself in such a way that the background is a long way away behind the subject; this often means getting down low.
Getting more creative with plant photography
Having mastered the basics, it’s time to start to look for something a little different – that extra element of creativity.
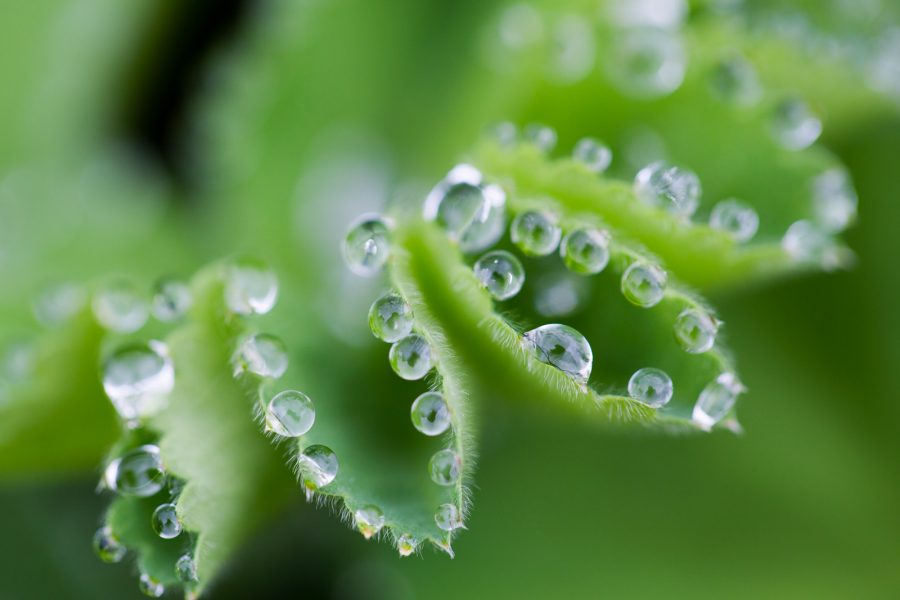
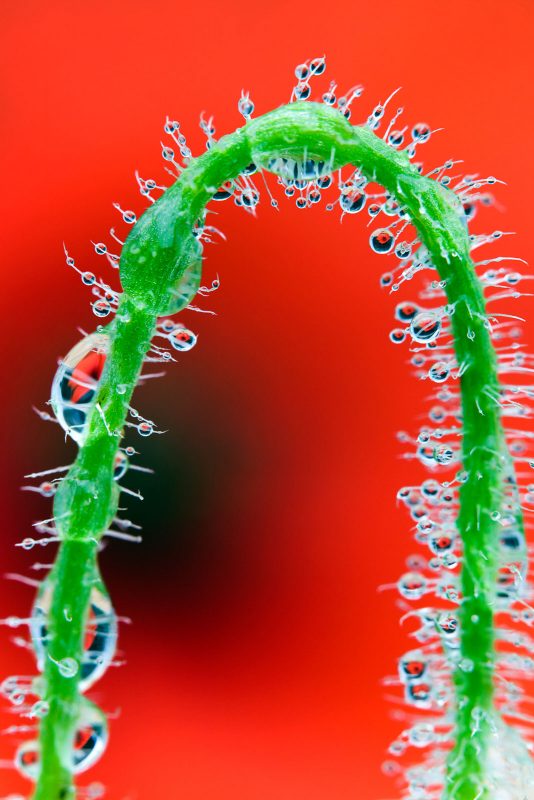
One good option is to get up early when there is a dew, or after rain when water droplets have formed on leaves. Lady’s mantle is a great plant for holding water droplets, as is mullein.
Sometimes water droplets can hold a world of information within them: a refracted, distorted, reversed view of what lies beyond. Get up close and examine the droplets using a macro lens and live-view. Try focussing through the subject to see what comes into focus.

Don’t be afraid to get your macro lens very close to foreground vegetation. I often shoot with bits of grass and flowers obscuring the lens because it can create a wonderful blurred effect, particularly when using a wide aperture. My aim is usually to find a gap through which the main subject can be seen clearly, whilst remaining sharp, but the rest of the frame can be completely out of focus and sometimes surreal.

Though I tend to avoid distracting backgrounds, there are times when the background can become the raison d’être for the image. Points of strong light behind the subject can become dazzling kaleidoscopes. Telephoto lenses are best for getting this type of bokeh, and it is worth experimenting with various apertures to increase or decrease the size of the highlights.

Experiment with colour temperatures
A medley of colourful flowers will obviously lend itself well to photography, but colours can vary according to the lighting conditions. I love the warm light at the end or start of the day. It’s quite striking how the colours change as we enter the ‘golden hour,’ producing a wonderland of warm colours, rim-lighting and deep shadows.
The shadows increase in length as the sun sinks lower, so more of the landscape is actually in shade and this can be an issue when it comes to photographing plants.

Traditionally, I tend to position myself so the subject and background are both bathed in the same warm sunlight. Maybe for backlit shots I might go for a darker, more shaded background. But recently I have started to enjoy the challenge of photographing subjects which are in the shade against backgrounds which are lit by the sun.
I particularly enjoy using the 300mm lens for this purpose because it enables me to shoot from a distance away from the subject, hence keeping my shadow out of frame, and crucially it allows me to select a smaller area of background against which to set the subject.

Experiment with movement
Movement can be used to add a level of creativity in an image. I have already said I prefer to shoot on calm days for traditional plant photographs, but if it is windy then there is a dilemma. We then have two options.
To get a sharp photo, we might increase the ISO so we can use a faster shutter speed. I sometimes carry a piece of wire and a bread bag tag to attach to the stem of a plant to keep it still. If it is still blowing around then I sometimes use continuous autofocus and take a blast of photos and I can usually get one sharp.
Alternatively, embrace the wind and be creative. Set your camera on a tripod and use a low ISO combined with a slower shutter speed. I sometimes even put a neutral density filter on as well. This way the plants will move during the exposure, creating a blurred effect.
This could be applied to an abstract close-up shot which is full of movement, or it could be a field of blurred grasses with a sharp distant view.

Slow shutter speeds can also be used with deliberate camera movement. I think we have all grown accustomed to the images of trees in which we pan the camera up or down during the exposure, and landscape shots panned horizontally have also become quite popular. Why stop there with this “Intentional Camera Movement”?
We can apply any type of movement to the camera during the exposure, so allow yourself to be inspired and informed by the subject into choosing the movement that you think is appropriate. One simple example of what I mean is to try spinning the camera around a fixed point when photographing a circular flower (having a lens mounted on a tripod is useful for this).

A less obvious interpretation of this technique is to allow yourself to be influenced by your surroundings. For example, when I found myself in a field of blue and yellow flowers near the sea I thought the combination of colours in the field was somewhat reminiscent of sunlight on water, so I moved my camera in a small arc whilst taking the photo to mimic the shape of a wave.
Out of season
When we think of plants we tend to think of flowers in spring and summer, but there is always something to photograph throughout the year. Through autumn we have the gloriously rich colours of our trees, and in winter we see ferns with their statuesque shapes and fractal-like fronds.
Plants that lie dormant through the winter can be enhanced by frost and snow, whereas by early spring some trees, such as the hazel, unfurl their wonderfully intricate catkins which have a delicate beauty that demands a closer look.

In conclusion
So there’s no need to pack up the plant photography just because winter is approaching. Get out and enjoy the low angle of the winter sun. Look for back-lighting, contrast, textures and shade to help bring out the best in their intricate shapes.
Practising through the winter will better prepare you to make the most of the burgeoning growth and blossoming colours of spring and summer. Why not begin to develop some ideas for a creative style of plant photography of your own?
There can be no doubt that plants do make a good subject for creative imagery. You can practise on them, revisit them, experiment with them, and they never fly away!


