
Macro Photography: How to Photograph Frost & Ice

Freezing weather creates some fantastic opportunities for close-up studies, so don the thermals and explore the world in miniature. Autumn colours are an obvious and rewarding subject to tackle at the right time of the year, but what is perhaps a little less obvious is the photographic potential that the colder nights bring. As the nights get longer the chance of overnight temperatures dropping below zero degrees Celsius increases day by day, and so does the prospect of a magical covering of frost. This miracle of nature that coats everything in ice crystals transforms even the most mundane of subjects into something of real beauty. But what makes frosty mornings so special is that very often the day dawns clear and sunny, so not only are there a plethora of subjects to train your lens on but the light is fantastic as well. What’s not to like?
Ironically, frosts are most likely to occur in periods of calm sunny weather when the temperature plunges at night without a fluffy blanket of clouds to hold in the warm air generated during the day. On evenings like this the air temperature drops like a stone, and so long as it stays clear during the night you can be pretty sure that you’ll wake up to frost in the morning. Keeping an eye on the local weather forecast will also help you to plan your photography for the next day. Get yourself geared up and ready to go out early to catch the best of the frost and the light.


So what are the kinds of subjects should you look for? Here are a few examples and some details about how I took each shot.
Sycamore Leaf
This sycamore leaf immediately struck me because of its simplicity. It’s not the most colourful leaf in the world, but the coating of frost had accentuated the structure and form of the decaying veins, and it was this detail I wanted to record.
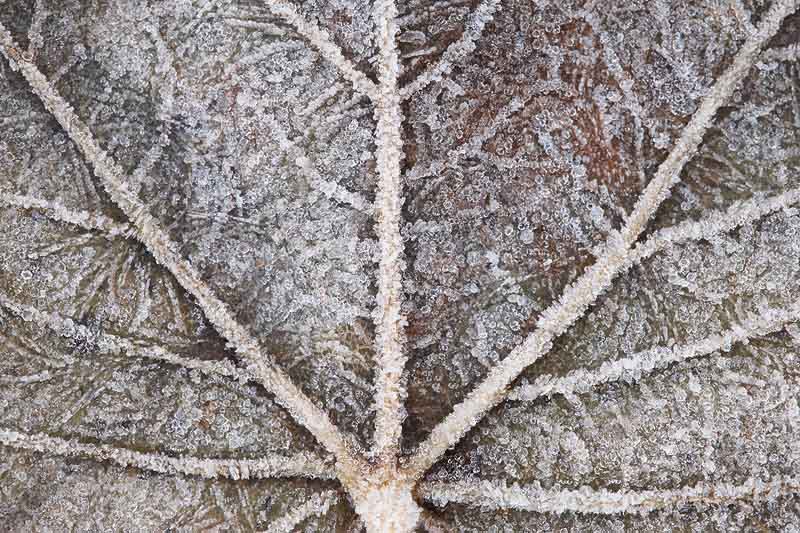
I composed the shot making use of the natural symmetry of the veins, with the central vein running up the middle of the frame. An alternative approach would have been to place the central vein diagonally. The camera was on a tripod and positioned vertically above the leaf so that it was in the same plane of focus. It’s worth spending time to get the camera position spot on so that as much of the subject is as sharp as possible. This can be a bit fiddly to get right and involves checking all corners of the frame until you get it right.
The reason for doing this is that at these close working distances depth of field is really minimal: just a few millimetres even when the aperture is stopped down to f/16 or f/22. So, even though a small aperture will maximise depth of field, and therefore how much of the subject is in focus, it may not be enough to bring all parts of the subject into focus if the camera’s sensor isn’t square to the subject. The other thing to bear in mind is that if the subject is as sharp as possible to begin with, then it may not be necessary to stop the lens down to such as small aperture. This means you can use f/8 or f/11, which are often the sweet range of many lenses giving optimum image quality.
Frost-laden Rose Hip
Whilst it’s possible to get some subjects perfectly sharp when shooting close up – because they are essentially flat – this isn’t always the case irrespective of camera position or aperture setting. This can be frustrating, but you can’t do anything about the physics of using optics at this close range. So you either try to get as much of the subject as sharp as you can and live with the fact that it won’t all be tack sharp, or you take a different approach altogether and shoot at your widest aperture so that only a very small part of the subject is in focus. By using this selective focusing technique on these frosted rowan berries, I was able to isolate just one of the berries and throw the others out of focus, which I felt was the best option for this particular subject. This also helped with composition, allowing me to frame the shot with the sharp berry placed on one of the ‘compositional thirds’.
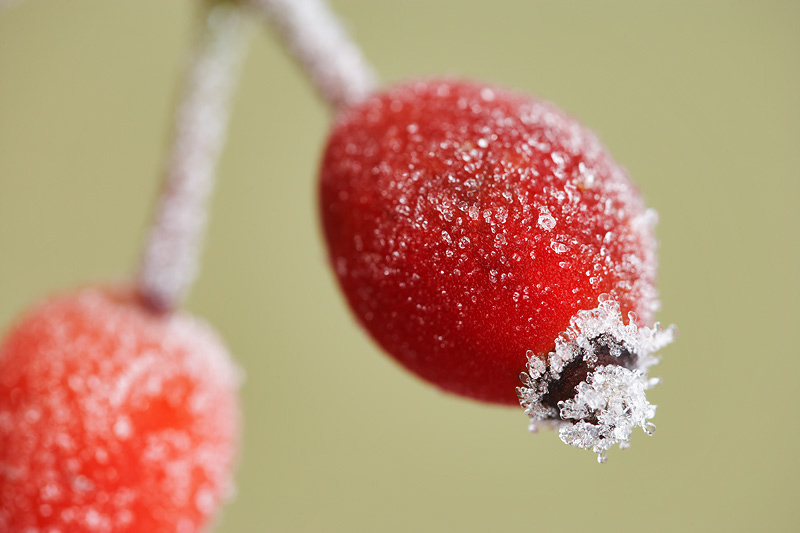
Depth of field is absolutely minimal at wide apertures, so focusing has to be very precise. One way to ensure that the focus point is exactly where you want it is to use Live View. I’ve started using this function more and more for macro work, and I find it very useful as it allows me to zoom in at 5x or 10x magnification and tweak the focusing until it’s spot on. I also use Manual focusing for all my macro work as I find it a lot more accurate than autofocus and it gives me full control over how I want the subject focused.
The lighting for this shot, and the previous one of the sycamore leaf, was overcast, which produces a soft and even light with no shadows. This is good for recording fine detail. Direct sunlight can work well for these kinds of subjects, but you need to watch for burnt out highlights – something that can be hard to avoid with frosted subjects without underexposing the overall picture. Weak sunlight is easier to control with less risk of high contrast.
Bracken Frond
Although soft light is easier to work with, there are times when direct sunlight really brings a subject to life and this is never more pronounced than with backlighting – one of my favourite forms of lighting. Frosted leaves and foliage look fantastic backlit by early morning sunshine and this bracken frond was an ideal subject for this treatment. As always with backlighting, I had to work quite quickly while the sun was low in the sky producing a strong backlit effect with gorgeous warm light. This is especially the case when working with a frosted subject because the frost soon melts once the warming rays of the sun strike it.
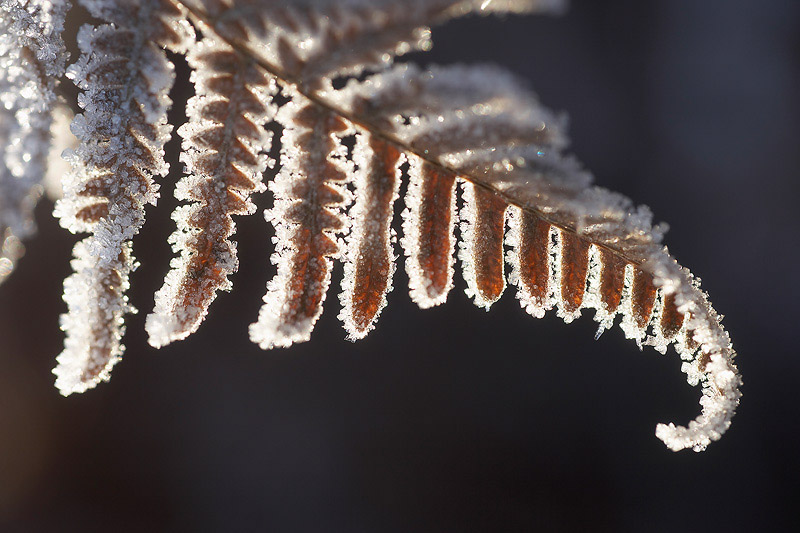
I tend to prefer to shoot backlit subjects against a dark background as this accentuates the rim lighting effect and makes the subject stand out well. Shooting into a shaded part of the wood provided the ideal backdrop and because it was several stops darker in tone than the subject, and it came out almost black in the final image. The shape of the bracken frond lent itself perfectly to this slightly diagonal composition with the curl at the end adding an extra bit of interest.
Exposure can be tricky with backlit subjects because there are more extremes of tones and a greater likelihood that the cameras meter will be ‘fooled’ into either under or over-exposure if there are a predominance of light or dark tones in the picture. If there is an obvious mid-tone in the picture, then I’ll use spot metering to take a precise exposure reading to avoid this problem. In this case though, there was a mixture of tones in the frame so I used evaluative metering and set the exposure in Manual mode. I prefer this to one of the automatic metering modes as it gives me full control over both aperture and shutter speed and also allows for very quick adjustments if the shot needs more or less light.
Whichever way you choose to meter, always check the histogram after taking your first shot and evaluate the exposure, make sure that the graph displays a good range of tones from black (left hand side) to white (right hand side) and that it doesn’t extend off of either side. With backlit subjects it may be necessary to compromise a little because the camera may not be capable of recording all the tones in the shot if the range is too extreme. A little burn out of the highlights is acceptable if it means keeping detail in the darker areas, but if in doubt I tend to bracket the exposure around what I feel is the best compromise and make a proper judgment when looking at the RAW file during processing. And remember it’s possible to recover some detail in shadows and highlights during processing in software such as Adobe Camera Raw or Lightroom.
Further Reading: “Why You Should Be Shooting in RAW“
Ice Patterns
The day before this would have been a dull looking puddle, but following a hard frost it was frozen solid forming fantastic patterns in the process. I was actually out shooting a wide vista, but after taking my shots I started to pack up and saw the wonderful blue colours reflected in the ice from the clear sky above.

The pattern in the ice was fairly random but there was a cohesion formed by two distinct curves and so I used these as the main focus of the composition. With this kind of shot it’s not always obvious what to include and what to exclude, and I find the best approach is to work the same section from different angles. It can also help to start with a wider composition and gradually move in closer to finally include just the strongest features.
Often when photographing ice there can be an issue with exposure because of its light tone and reflective surface, which can adversely affect the cameras meter reading, leading to underexposure. In this case that wasn’t a problem because the ice was reflecting the mid toned blue from the sky, so I simply used evaluative (average) metering without any compensation and the exposure was spot on.
Even though this was a completely static subject I still adopted my standard practice for macro work of using mirror lock-up to avoid camera shake. Some people use a remote release for this kind of work, but this doesn’t help eliminate internal vibrations caused by the mirror slapping up a fraction of a second before the picture is exposed.
The remote is good for preventing vibrations caused from pressing the shutter but mirror slap is a bigger problem when working at slow shutter speeds. The most reliable and only certain way of eliminating mirror vibrations is to lock it up before taking the shot. The way I do this is to use the 2 sec self-timer in combination with mirror lock-up. That way when I physically press the shutter (you could use a remote if you wanted but there is little point) the mirror flips up and is locked in position 2 seconds before the picture is actually exposed. This leaves enough time for any vibrations to subside so that at the moment the shot is exposed the camera is completely still.

Here are a few more examples of the kinds of shots mentioned above for further ideas of what to shoot, but there are plenty more besides these. Getting outside on a frosty morning will provide all the inspiration you need and once you start you’ll find fresh potential at every turn. You may not even need to leave your back garden! Have fun – feel free to post your frosty photos in the comments below.


