
8 Ways to Improve Your Forest Photography
Forest photography can be challenging on the best of days. It’s a busy environment, making it difficult to find strong compositions and creating tough conditions for photographers.

Sometimes, a simple compositional switch, a different aspect ratio (or panoramic crop), or a change in conditions is all that’s needed.


In this tutorial, we’ll explore different ways to improve your forest photography.
1. Misty forest photography
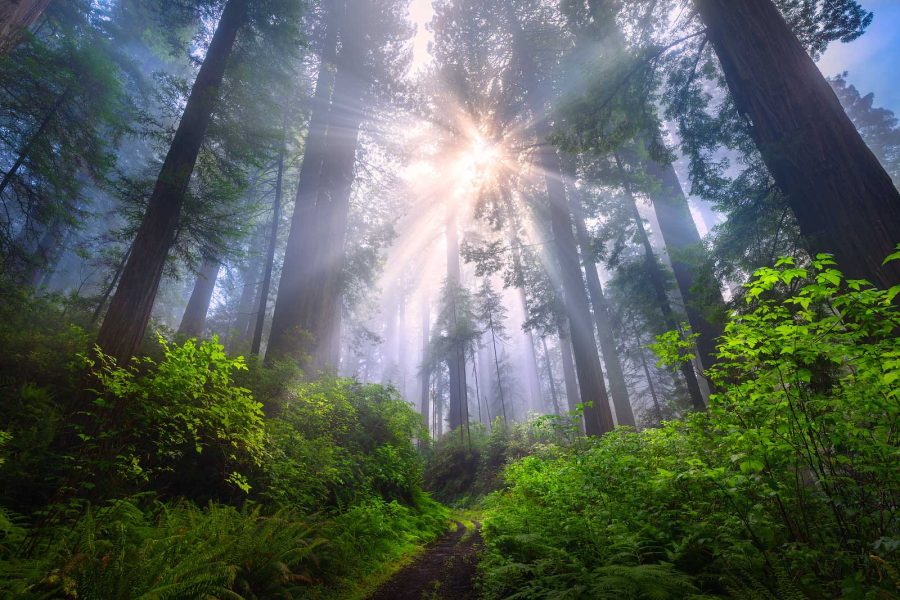
Getting to photograph in a foggy or misty forest is like a cheat code for capturing great forest images. It is incredibly rare to be in a forest when fog is happening, and it can become something of an obsession!
Besides the general beauty, mood, and atmosphere that fog/mist creates, one of the main reasons it works so well in forest photography is that it helps to simplify a scene.
Forests are typically very chaotic by nature, presenting a ton of details, textures, and patterns that don’t always photograph well when the conditions aren’t at their best.
When everything in the image has lots of texture and contrast, the visual flow becomes obstructed, and there can be too much tension in the scene.
Fog and mist in forest photography create much more visual ease, smoothing out and simplifying the overabundance of textures, especially seen in the background.
Creating a transition between the more detailed textures in the foreground and simplicity in the background (or vice versa) allows for better visual flow for the viewer, and this is much easier to achieve on a misty or foggy day.

When planning for misty or foggy forest photography, it is imperative to get to know the area and be able to predict the weather that causes fog to form, as well as the seasons that are conducive to foggy conditions.
Fog is often most prevalent in fall and winter, but this is not a hard and fast rule; I planned a 2022 spring trip to the California redwoods because spring typically brings in an abundance of coastal fog into the redwood forests that are within miles of the coast.
You don’t always need to know the technical reasons why fog appears, but you should determine what seasons yield the best fog results in the area you’re photographing in, and try to plan trips or visits around that time.
It’s also worth knowing that dawn or near night are the best times to see fog.
Top tip for processing misty forest photographs
It is generally a good idea to process these images anywhere between a relatively neutral to blue-tone white balance.
If you process this type of photo with a warm cast, it can create some odd colors and effects that aren’t pleasing to the eye. Colors become muddy and brown and lack color separation when the balance becomes too warm, so just be aware of this while working on your image files.
Read more: How to Use Mist to Improve Your Landscape Photos
2. Combatting undergrowth
Every individual forest and region has certain pitfalls that may challenge your photography skills. One of the main issues that has plagued the composition of my photos is not being cautious enough about undergrowth.
In general terms, undergrowth is the plants, shrubs, etc., that are growing (or are dead) on the forest floor. In the area where I live, almost all our forests have thick and tall undergrowth.
Much of the undergrowth here is very visually chaotic (picture a bird’s nest-like appearance), and this type of growth can have a strong negative impact on the visual flow of a photograph.
If this is the case for the forests that you are photographing in, try to find an area where there is less undergrowth.
Look for an area where there is a more controlled height of growth and search for some repeating patterns in it to make it less distracting. Also, if possible, shooting from a higher location will minimize the visual impact of it too.

Also, watch out for any random sticks, growth, vines, etc., that appear to “jump” into and above the horizon line of the image – I have had too many times where a single piece of growth can draw too much attention.
In general, having undergrowth that is more uniform and beautiful in nature will obviously allow for a better photograph, so train your eye to look for these areas. When you practice looking for these details, you get better and find them quicker, too!
Read more: How to Photograph Trees and Forests
3. Flowers in forest photography
On the topic of undergrowth, the addition of flowers in forest photography can produce an incredibly dramatic difference.
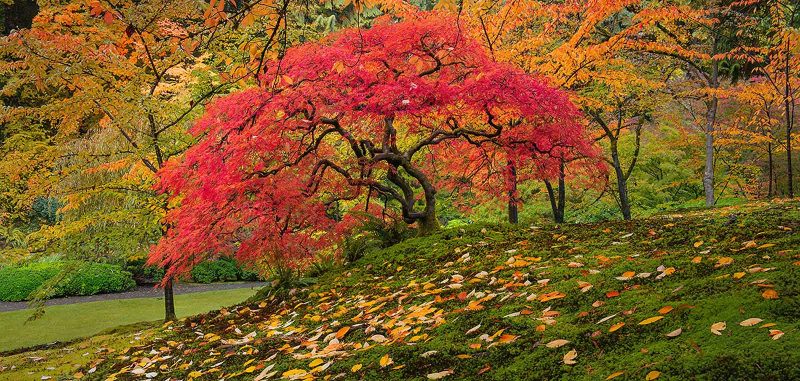
In certain types of forests, the addition of flowers growing on the forest floor can completely transform an area from a relatively boring photograph into something spectacular.

Flowers can really help organize the composition of a photograph and allow for a beautiful color contrast between the greens of the forest and whatever the color of the flower is.
This is something that you can use sparingly in a photograph where you only have a few “pops” of color, or you can let the flowers completely dominate a scene where they are lining the forest floor.
When incorporating flowers, one thing to creatively choose from is what scale/impact you would like the flowers to have on the image.
Getting low to the ground and very close to the flowers can have a very dramatic appearance since the scale of the closest flowers will be large compared to the rest of the scene.

This introduces some compositional issues, though, and typically your midground composition will suffer as a result, but that largely depends on the type of scene that you are photographing.
Setting the tripod closer to waist height (depending on the scene) can also be a great option. This will allow for the closest flowers to gently transition into the midground flowers and ultimately lead to the horizon line.
This will help create a very harmonious and full composition, which is something that takes a lot of practice, but it will show a mastery of composition when performed well!
Read more: Flower Photography Tips – Taking Beautiful Flower Photos
4. Waterfalls in forest photography
Forest scenes that incorporate waterfalls can range anywhere from a huge waterfall that dominates a scene to a more intimate scene where there is a small amount of flowing water or a small cascade.
If you decide to incorporate a waterfall into your forest photography, make sure that you are doing so with intent.

As with many things in photography, the addition of extra items in a scene doesn’t always make a better photograph, so you need to be just as mindful of excluding elements as you are when including them.
Here are three of my favorite ways to compositionally incorporate a waterfall into a forest scene:
1. Have the foreground elements/lines of the water traveling directly through the middle of the composition and leading right to the main visual draw of the photograph.

2. Let the water lead in from one of the corners of the photograph. Balance this with a different type of foreground element on the other side of the bottom corner of the photograph. Sometimes I will do so by using a fern, mossy object, a rock, etc.

3. My absolute favorite is to create an X-frame pattern in the composition. To do this technique, you want to have the water leading in from both of the bottom corners of the composition, directly leading into the middle of the photo.
The trick is to have a “blank” spot in the middle between both of the bottom corners where there is no water (or there are no directional lines in this area). This has the effect of very strongly drawing a viewer’s eye into the middle of the photograph.
Read more: 6 Tips for Photographing Waterfalls
5. Experiment with light
All photographers know that light is truly the king of quality in a photograph. It can make or break your images, and it’s no different when photographing in forests.

If you are wanting to capture a forest during a cloudless day with full sun, a good rule of thumb is to typically avoid shooting during the middle of the day.
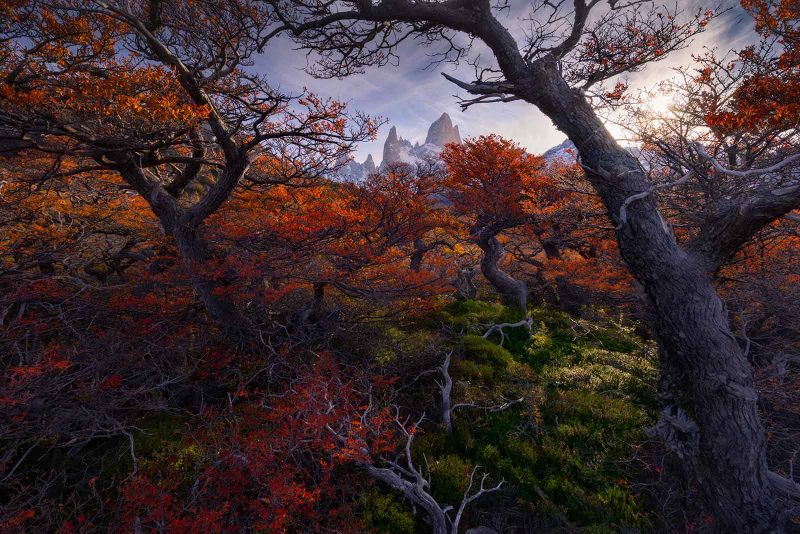
This isn’t an absolute rule, but having very harsh/full light in a forest is typically something that doesn’t translate well to getting good photographs. In these scenarios, it is usually best to wait until the sun is closer to the horizon.
When the sun is closer to the horizon, like during golden hour, the warm colors and tones of the sun will have a beautiful color contrast against the cooler tones of the greens on the trees.
One of my favorite techniques to use in these conditions is to photograph directly into the sun, which will let you capture some beautiful backlit leaves in the forest. You may even get a sun star in the process!

Getting a sun star in a photo can create a very prominent additional focal point to the image (try experimenting with different aperture sizes to get different sun star effects).
A popular aperture size to begin experimenting with getting sun stars is f/22. Each lens presents a different type of sun star effect, and by viewing your composition in Live View, you can try changing the aperture size to see the effect it will have on the sun star.
Additionally, having the sun get partially cut off by a branch or leaf (or anything) will affect the thickness and sharpness of a sun star, so experiment in this way as well.
Read more: How to Create Sun Stars in Landscapes and Avoid Lens Flare
6. Cloudy and rainy conditions
Surprisingly, cloudy and rainy days are a great option for forest photographers!
While most people want to pack up their cameras on these days, if you have access to a forest, these conditions can produce some incredibly enticing photos – especially on rainy days.
The clouds help to soften the light, which is a great thing in forests, but the rain has the benefit of bringing out the colors of the greens of the plants and trees by turning up the saturation.

As an additional idea, try experimenting with getting close enough to the foliage (or using a telephoto lens) that you can bring out the textures and details of the raindrops in the greenery.
This will only add to the mood and feeling of the final image.
The great thing about forest photography is that you really can work with so many different types of light. If you find yourself shooting in a location where the light just isn’t working, try getting to a forest – more often than not, the forest will still be a great place for productive shooting!
Read more: Landscape Photography Settings for Cloudy Days
7. Different focal lengths
The other great thing about forest photography is that an amazingly wide range of lenses can work. While many people choose to use wide-angle lenses when they first begin learning photography, having a long focal length lens is also a great tool.
If you are finding that getting a compelling image is difficult when using a wide-angle lens, then using a longer focal length might be the ticket.

Not every forest is photogenic when using a wide-angle lens, and that’s fine – just hone your skills to recognize early on when photographing if this is the case.
As previously mentioned, if the underbrush is of concern to you, a long lens will be a good tool that allows you to compose an image with a focus on the middle section of a tree, without the need to include the base of it.
By finding a collection of trees that look interesting, zoom in on them without including the bottom of the trunk or the tops of the trees.
It will take some time to practice this technique, but spend time zooming in and out and setting up different compositions that form patterns to your eyes. It’s always fun to find a great composition by accident, rather than by intention.

Top tip
When using a long lens, you may also want to try zooming in so that only one tree, in particular, is the main focus of the final image. This is an especially good technique when you find a specific tree that is exceptionally interesting.
Whether it is because the textures or patterns on the bark are what makes it interesting, or perhaps the flowers or brush that are right next to it, being able to single out a very small section of a forest to photograph will showcase a high level of skill.
Read more: 8 Best Lenses for Landscape Photography
8. Editing for forest photography
While editing, in general, is an incredibly large and wide-ranging topic, I will try to cover some bases regarding editing for forest photography.
1. Avoid over-saturation
The first, and most common thing (in my opinion), that novice forest photographers do is add too much color saturation when post-processing.
Of course, you want those beautiful greens to be saturated with color, but there tends to be a fine line between the greens not being enough and looking neon.
We certainly want to avoid the latter and ensure that the greens aren’t processed to look completely unnatural.
Take some time and step away from the screen while processing, and come back a day later to get a fresh perspective on how the colors look.
I find myself often taking weeks or months to work on a piece, leaving it for days at a time, and coming back to it to get my “first impressions” again and see if something looks odd to me.
Finding the right balance of color saturation is a big step in getting the processing right.
2. Manage your greens
Some forest photos do well when they are very monochromatic green, but there is a lot of power in green forest photos where the photographer processes with a lot of color separation between the greens themselves.
While I find this challenging to do, it is incredibly rewarding when it can be pulled off.
Finding the right starting balance of colors is key to this technique, and you will want a raw file that begins with very neutral green tones.
As you bring it into Photoshop to begin your more detailed processing work, the point of this is to create a lot of variability in the greens.

In my case, I will choose to have certain greens that are dark green that is not very saturated, mixed with medium greens that are quite saturated, and lighter greens.
By starting with a neutral version of your image, you can look at individual plants and see if they look dark, medium, or bright in the image, and then edit each type of plant individually to maximize these characteristics.
For example, I find that most ferns tend to be on the darker side, so I will process them even darker relative to their starting point. Trees like big maples will be a brighter green, so I will make them even brighter.
Moss works well in the midrange of greens, so I will add a lot of saturation to them. Creating all of this color separation will add up to creating gorgeous color contrasts that look very natural to the eye.
3. Mixing colors
There are also some scenarios with pops of color.
If you are photographing an area of the forest where you are lucky to capture it with light fog, heavy fog, or light beams, then you can really take advantage of being able to process some very natural-looking colors into the final image.
Introducing cooler hues into the atmosphere of an image is an amazing way of utilizing color in forest photography, allowing you to color accent the prominent greens.
Good photographers will take advantage of these conditions and spend a lot of time dialing in the colors during post-processing.

The nice thing about green is that there are so many colors that can mix with it and look incredible. When you begin processing your images, try working in some blues, purples, magentas, or pinks, etc., into the atmosphere.
If you have an image with light beams in the forest, try processing the highlights with a lot of yellows, oranges, or golden tones, while keeping the greens on the cooler side of the white balance.
Green seems to be a bit of a visual palette cleanser and works well with so many different colors, so it can be extremely fun and creative to work with the colors in a scene to make something special.
Read more: Lightroom Colour Correction – Hue, Saturation, and Luminance
In conclusion
I highly recommend budding photographers view the work of other photographers they admire for inspiration and then get out there to try to put those ideas into practice.
Looking at forest photos by other photographers was one of the main reasons why I wanted to get into photography.
Seeing beautiful images that were dripping with green saturation and deep colors, with crisp compositions that pull you straight into the scene, was so inspiring, but forest photography can be more difficult than it first seems.
It took years of really honing my skills to figure out my own forest photography style. The best advice I can give is to practice; get out into the woods with your camera as much as possible!


