
10 Tips for Editing Landscape Photos for Beginners
Are you relatively new to either landscape photography and/or shooting in raw? If so, the task of processing your files might seem like a daunting one. Don’t panic, though, help is at hand. Yes, processing can be complex and involved, and if you search online you will find no end of tutorials. But if you are a beginner, much of this advice will be too advanced and can seem quite daunting. Try to take things one step at a time and master the basics before you consider more complex techniques.
You may decide you never want to do more than the basics to your raw files – and that is fine. To be honest, I have a very simple approach to raw processing and rarely make large adjustments to my shots. I try to keep the editing process quick and simple and rarely spend more than 5-10 minutes editing my landscapes. My philosophy is the less time I spend in front of my computer, the more time I can spend behind my camera.


Great landscape images should be the result of in-camera skills – great light, composition and creativity – not Photoshop wizardry. However, raws can look flat and lifeless when you first import them and, if you ignore the need to post-process, your files will never realise their full potential. But with a few relatively quick and simple tweaks, you can bring your landscapes alive.
These are my top 10 tips for editing your landscape photos. I use Adobe Lightroom to archive and process my Raws, and Adobe Photoshop for more advanced adjustments. However, most good raw converters and image-editing software will have similar tools and capabilities. I have assumed you have already imported your shots and selected the file(s) you wish to process.
Read more: Lightroom Tutorials – How to Use Lightroom to Edit Photos
1. Enable Profile Corrections
First things first, go to the Lens Corrections panel. This is designed to correct various common optical issues and is an obvious starting point when editing landscapes.
All lenses have their own unique characteristics and flaws, like vignetting and (barrel and pincushion) distortion. Luckily, software makes it incredible easy to correct; raw converters have a list of lens profiles built-in. By simply ticking the Enable Profile Corrections box, the software will identify the lens you used when you took the photo via the embedded EXIF data and then automatically apply adjustments to compensate for the lens’ characteristics. It really is that simple.

You will normally notice the biggest corrections with ultra-wide-angle shots. Some cameras – mostly mirrorless models – have these corrections already ‘baked-in’, so they are applied automatically.
Some photographers have Enable Profile Corrections automatically applied on import, but I don’t. Instead, I will toggle the corrections on and off to see which I prefer. Why? Well, in some instances, a subtle vignette can actually be attractive. Also, in order to correct distortion, software will typically ‘stretch’ the corners of the file and this can result in a slight loss of sharpness. Therefore, if Lens Corrections are not necessary, I wouldn’t apply them for the sake of it.
You also have the option to manually apply lens corrections should you so wish, by switching from Profile to Manual.
2. Remove Chromatic Aberration
Also within the Lens Corrections panel is a Remove Chromatic Aberration (CA) checkbox. CA is an optical discrepancy that typically appears as coloured fringing along high contrast edges. Magenta or cyan fringing is most common. You may not spot CA at first glance, but view your files at 100% and it will become obvious.

CA occurs when a lens fails to capture the wavelengths of colour on the same focal plane and is most common in photographs taken around sunrise or sunset, appearing around the edges of backlit or silhouetted objects.
Older and lower quality lenses suffer more from CA than top quality glass. Thankfully, software makes it an easy fix. You can correct it manually by using a dropper tool, but clicking the Remove Chromatic Aberration box Lightroom will do all the hard work for you and any CA will magically disappear.

There appears to be few drawbacks to having Remove Chromatic Aberration automatically applied on import, so you may opt to do this to ensure you never overlook this step.
3. Change the Aspect
Nature is a diverse and varied place, so it is unrealistic to think your camera’s native aspect ratio will suit every scene you take. Most cameras have a standard aspect ratio of either 3:2 or 4:3; some models allow you to alter the ratio in-camera, but many don’t. This is why cropping is often an important step when processing raw files.
Cropping can enhance the balance and harmony of a photo, place greater emphasis on the main subject, or remove distractions. Cropping is just about the most basic adjustment you can make to a shot, but it is an important step that can make or break your composition.

Click on the crop tool and crop handles will appear in each corner. Now, simply click and drag these to resize the crop box. You can adjust the handles unconstrained or enter the values you desire, for width and height, to create a custom crop. More commonly, you will want to retain the original ratio – or you can choose from a dropdown box of popular, standard dimensions.
Once you are finished, apply your selection – everything outside the box will be discarded. Do not crop photographs excessively, though – discarding lots of pixels will reduce image quality.

4. Adjust White Balance
White balance is designed to neutralise colour casts produced by various light sources. Cameras are programmed with a choice of presets to mimic common light types, like Daylight, Cloudy and Shade. Your camera’s Auto WB setting will normally do a good job of recording the light’s temperature accurately, but it is far from infallible. Besides, whoever said you have to record the light’s colour faithfully? You can use white balance to warm-up or cool-down a scene to influence mood and enhance the scene.
Read more: What is White Balance?
One of the advantages of shooting raw is that you can alter and refine colour temperature with impunity using software. The simplest way to alter white balance is via the dropdown menu, which (in Lightroom) gives you the option of nine preset values: As Shot, Auto, Daylight, Cloudy, Shade, Tungsten, Fluorescent, Flash and Custom.
These options are designed to mimic your camera’s white balance settings. Click on each in turn to preview its effect – you’ll notice the values for Temperature and Tint change as you do so.
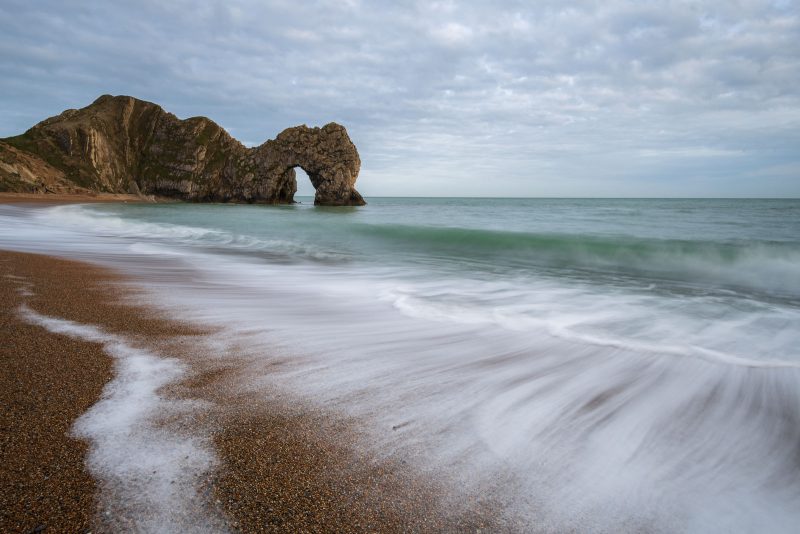
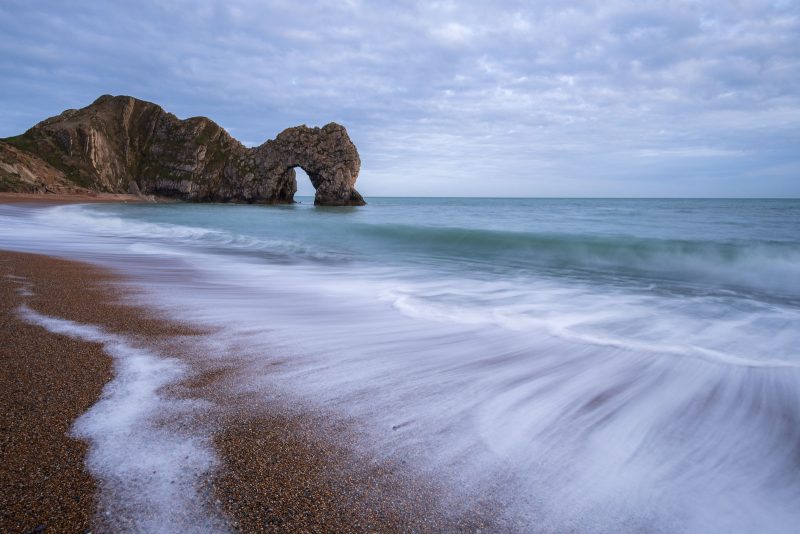
You may well find one of the preset values is a perfect match. The Auto setting can be surprisingly accurate and is often a good starting point. Here you can see a scene changing with the different settings applied:

A more precise (and creative) method is to manually adjust the Temperature and Tint sliders. The Temperature slider globally adjusts the colour temperature of the image. Sliding it to the right will warm-up the image, while clicking and dragging the slider left will compensate for a too-warm temperature by making it cooler. The Tint slider can be used to compensate for either a magenta or green tint.
Often, adjustments only need to be small, but occasionally a larger colour shift can prove effective. Play with both sliders to grow familiar and confident with their effect. Adjust sliders intuitively, until you achieve the most accurate or flattering white balance for the image. You may also adjust colour temperature using the eyedropper tool, but while this might help you achieve a neutral colour temperature, it will rarely produce the most visually pleasing one.
5. Watch Your Tone
While you hopefully use your camera’s histogram to guide exposure in-camera, you will normally still want to adjust exposure at the editing stage. Achieving the right exposure is key to any landscape shot, so the Tone panel is arguably home to most important set of sliders. While you can also adjust exposure using the Tone Curve, most photographers will find the sliders under the Tone tab more intuitive to use.

Raw capture allows you to refine and perfect exposure. For example, you can precisely adjust highlights and shadows (to recover as much detail as possible) or alter the overall brightness of your shot for either corrective or creative purposes.
You can make powerful adjustments quickly and easily. Although there is normally an Auto exposure option (which can do a surprisingly good job), there is no magic formula as to how much you adjust each slider. Only you know the “look” you wish to achieve, so treat every photo on an individual basis, adjusting each slider in turn as little or as much as you feel necessary. Intuition plays a key role in raw photo editing.
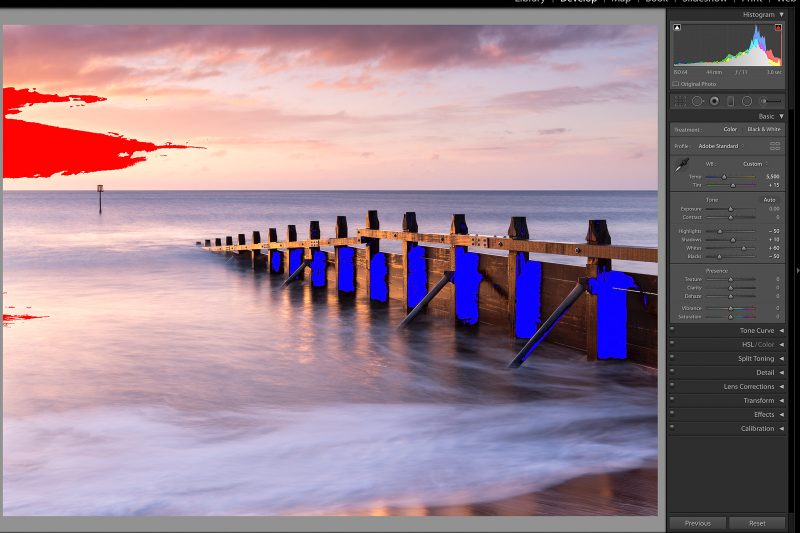
For most landscape images, you will want a full range of tones. To do this, you should first set your black and white points. By doing so, you will extract a full dynamic range without clipping (loss of detail in highlights or shadows) occurring.
You can do this in a number of ways. Using the histogram to guide you, drag the black and white sliders in turn to adjust contrast. Dragging the white slider right will ‘stretch’ the lighter parts of the image. In the top right corner of the histogram you will see a (triangular) white point clipping marker. Click on this to enable it. If it lights up, you have pushed the white point too far, so pull it back until the marker isn’t lit-up – you have set your white point.
Now do the same with the black slider. Enable the black point clipping marker by clicking on the triangle in the top left corner of the histogram panel. Now drag the black slider left until just before the point where the marker is illuminated. You have now set your black point.

For added precision, you can hold down the Alt (or Option) key while dragging either slider. This will give you a masked view of the image. When adjusting the white slider, the image will turn black, with bright pixels appearing through the black mask if you drag the slider too far. The opposite happens with the black slider to show which areas will clip.
In recent versions of Lightroom, rather than drag the sliders you can hold the Shift key and double-click on the word ‘Whites’ or ‘Blacks’ (to the left of each slider) and the point will be set automatically.
However, a word of warning. You will not always want a full range of contrast, so don’t do this as a matter of course. For example, some scenes are naturally low contrast – like a misty landscape – and too much contrast will create a rather false looking result. Personally, I still prefer to make adjustments to exposure and contrast intuitively, looking at the photo and making slight tweaks until I am happy.
Having set the black and white points, I would avoid the Contrast slider altogether, as you have effectively set this already. When you click on any of the other Tone sliders, the group of tones you are adjusting will be highlighted on the histogram in a lighter shade of grey to help guide you.
Raw files tend to capture a huge amount of detail and tone, which you can reveal using the Tone panel. But be careful not to get too carried away. If you recover too much shadow and highlight detail, your shot will resemble an HDR (High Dynamic Range) photo and be devoid of natural looking contrast. Personally, I want my images to look authentic and resemble the scene as I remember it when I trigged the shutter.
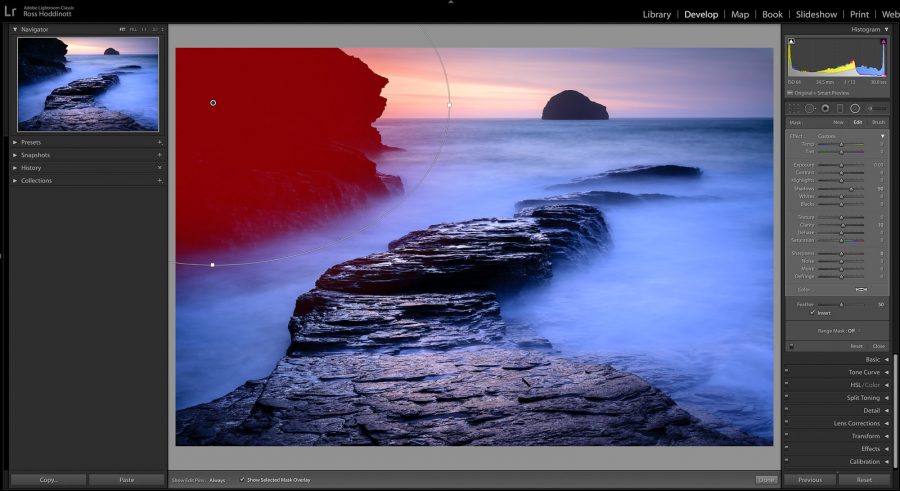
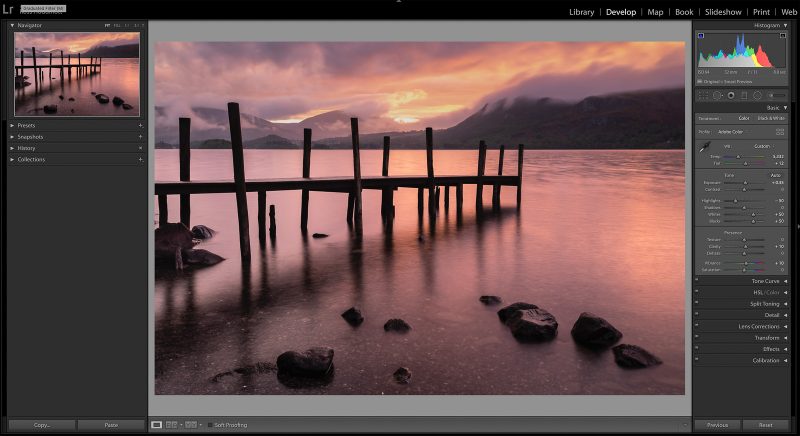
6. Graduated Filter Tool
Once global adjustments have been made, you can consider localised changes. The Graduated Filter Tool in Lightroom is excellent for enhancing skies – all landscape photographers should be familiar with this tool.
Despite what some beginners might think, this is not a substitute for a physical filter (or exposure blending). This tool will only work if you captured the full range of tones in-camera. For example, should your sky be overexposed and highlight detail lost, the Graduated Filter Tool cannot magical restore this data.
However, this tool is perfect for making adjustments to skies – to selectively make them lighter, darker, add contrast and to reveal texture in cloud.

This local adjustment tool allows photographers to apply a range of effects on a selected section of your photo in a gradual manner. Click on the Graduated Filter Tool (located just underneath the histogram) to open the panel of sliders. Now click and drag on your photo to create your adjustment.
You do not need to drag the filter from the very top of the image downward – just click on the image, close to the horizon, and drag your mouse down to create your filter. A handle and three lines will appear. The three lines simply indicate the filter’s transition – or feathered zone. By clicking and dragging the lines further apart or closer together, you make the filter’s transition softer or harder – effectively replicating a physical grad. By clicking the Show Selected Mask Overlay box below the image, you can see the area you are affecting.
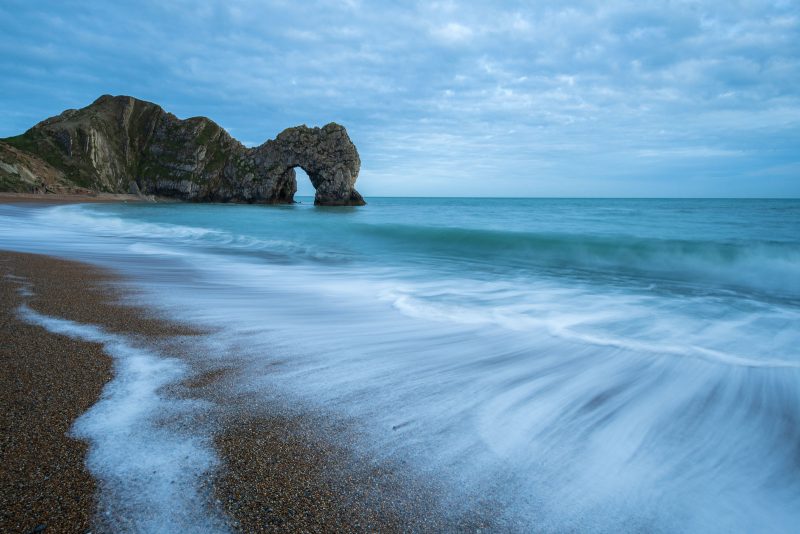
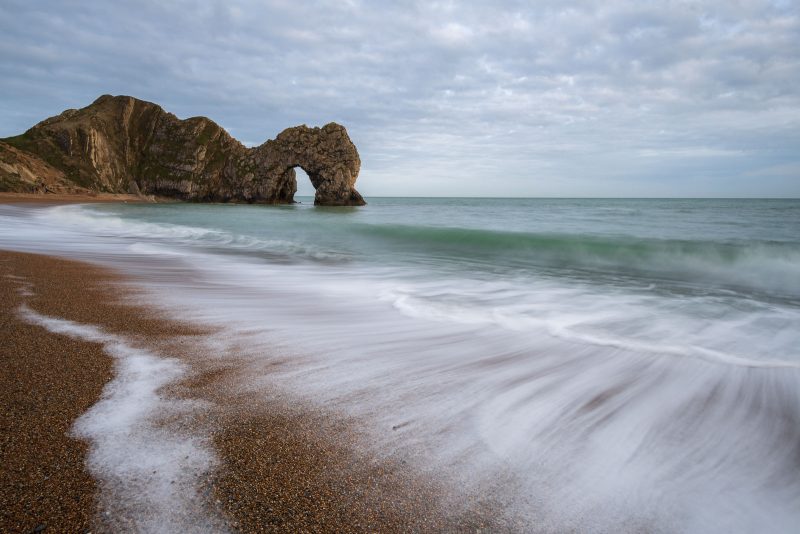
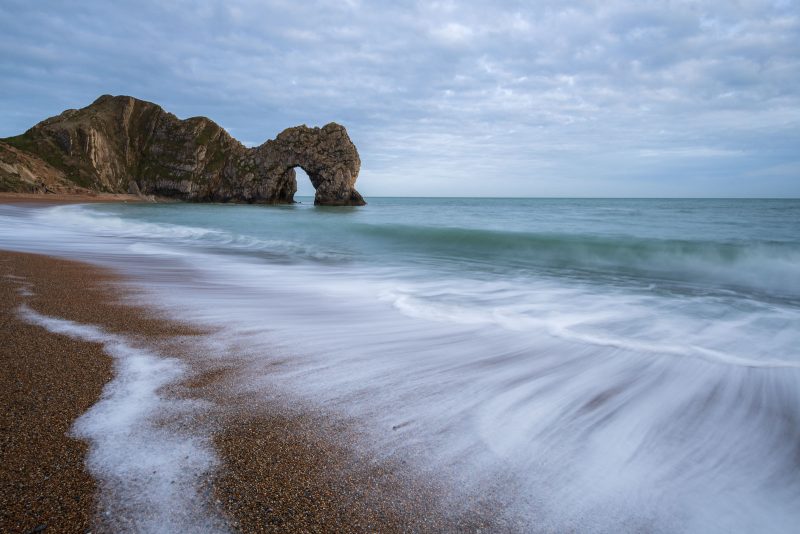
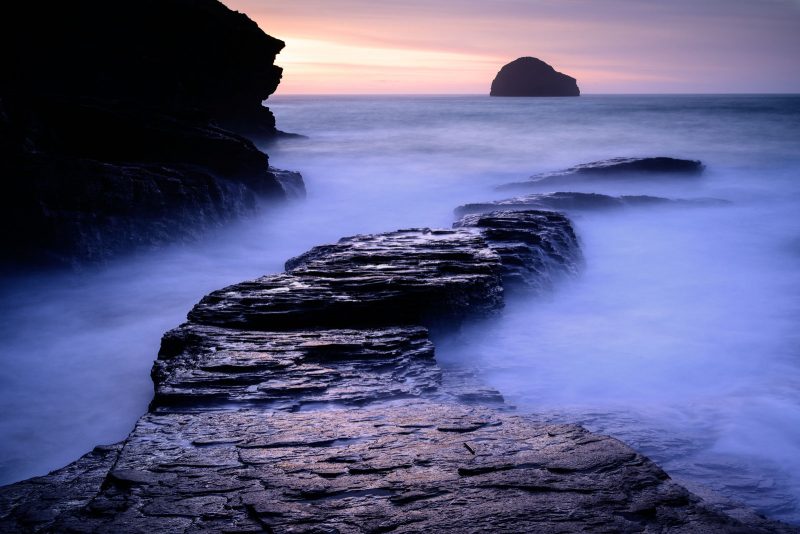
You can angle your grad, make the transition very soft, abrupt, or apply multiple grads. By clicking on the handle, you can reposition your filter – or just hit delete if you wish to start again. Here’s a before and after adjustment, showing what they can achieve:


You can also invert grads or drag them in from the side if you so wish. Once you have created your selection, you can use the sliders to adjust exposure, or any of the dropdown options, including Contrast, Clarity, Dehaze and Saturation. Your adjustments will only be made to your selection.
Often a touch of Clarity, Contrast or Dehaze will reveal fine detail in cloud, while you can make skies darker, more dramatic or reduce the brightness of highlights without affecting the foreground. Use the tool with care; don’t go crazy with the sliders and create false looking skies. You can quickly and easily enhance your shots using this tool.
One of the issues with using a physical grad is that it will darken parts of the landscape that stick up above the horizon. For example, mountainous scenes can be very tricky to filter. The same issue applies with using the Graduated Filter Tool, but – with a digital filter – you can click Brush (located above the Effect sliders) and use the Erase brush to rub out parts of your selection so that anything breaking the horizon remains unaffected by your adjustments. You can also use a Range Mask.
Applied well, the Graduated Filter tool will seriously improve the look of your scenic shots.
Read more: Master the Graduated & Radial Filters in Lightroom
7. Radial Filter Tool
The Radial Filter is another of Lightroom’s three localised adjustments tools. While not quite as useful as the Graduated Filter Tool for landscape photography, it remains a highly effective tool and one you should certainly be familiar with.
It is very similar to the Graduated Filter Tool in terms of the dropdown options and the sliders you can adjust. However, with the Radial tool, you can create elliptical masks instead, and you can opt to either work within or outside the area you select.
One of its main purposes is to allow photographers to create off-centre vignettes to highlight specific points in the photograph. However, landscape photographers tend to use it to ‘dodge and burn’ areas of their shot.
For example, if you have a particularly bright area of sky, you can draw a radial mask over this area and pull back the highlights to alleviate the problem. Or if there is a dark shadow area that needs relieving, use the Radial Filter Tool to select this area and increase shadow detail. You can apply multiple filters to the same image, but changes should be applied with a delicate touch – localised adjustments should not be obvious.
I use this tool regularly, but subtly, and I mostly only adjust highlights or shadows. However, you have a number of controls at your disposal, including Temperature, Exposure, Contrast, Clarity and Saturation sliders.
To help blend in your changes, feather your selection by an amount of at least 50 – you will find the Feather slider toward the bottom of the Tool panel. By default, the adjustments you make will be applied outside your selection, but you can quickly reverse this by clicking on Invert. To avoid any confusion, check the area you are working on by checking the Show Selected Mask Overlay box below the image.

You can quickly adjust the size, shape and orientation of your mask by clicking and dragging the four control handles. By clicking on the centre button, you can move and place your selection. Have a play with the Tool – you will soon recognise its usefulness for landscapes.
8. Add a Little Punch
Next, scroll down to the Presence tab – again found within the Basic panel. In the latest version of Lightroom, you will find 5 sliders – Texture, Clarity, Dehaze, Vibrance and Saturation. This is where you can give your landscapes a little extra pop. The lovely thing about the sliders in Lightroom is that they are easy to use, and you can instantly see and review their effect. As a result, this is a very intuitive piece of software to use and you don’t actually need a lot of outside guidance to get to grips with the Lightroom basics.
Play with each slider in turn and you will quickly understand what each slider does. The Texture and Dehaze sliders are more recent additions and have their uses, but for now we will focus on the Clarity, Vibrance and Saturation.
Clarity is a contrast tool. Drag the slider right to apply positive Clarity. It is designed to add mid-tone contrast, increasing apparent texture and sharpness. This can be a great slider for revealing texture within the landscape like wet rocks, sand and foliage. Use it sparingly, though – one of the most common mistakes photographers make when editing their raws is to get carried away with the Clarity slider. Overdo the effect and images look too contrasty and false.
As with every processing step, there is no golden formula or set amount that will work for every image – adjust the slider instinctively to suit the scene. However, I would rarely apply a Clarity value of more than +10-15. You can obviously apply Clarity locally using the Graduated or Radial Filter tools, and you can also apply via an Adjustment Brush.
Vibrance and Saturation are similar tools to one another, with a subtle difference. Saturation will globally saturate (or desaturate, if you apply a negative value) your landscape. Vibrance is a little more sophisticated, identifying and then boosting the less saturated colours within your photo faster than the already saturated tones.
Try and compare both sliders. Again, don’t get carried away with either. Apply only small values and typically only use one or the other, depending on which slider suits the scene best. Again, I would advise not increasing either slider beyond a value of +15, but (as always) adjust to taste.
9. Mask Sharpening
Sharpening is a huge subject and, at this stage at least, it is important to keep things basic – there is plenty of time for you to learn more about sharpening as you grow more confident with your processing skills.
For now, I’m going to keep my advice simple. Lightroom has created a dedicated sharpening preset, which you will find under Presets > Classic – General > Sharpen – Scenic. Click on this. Under the Detail panel, you will see the Sharpening sliders adjust. Amount will be set to 40, Radius 1.0 and Detail 25. These settings suit most landscape images.
Read more: How to Sharpen Photos in Lightroom

By default, your sharpening settings will be applied to the entire image, but you do not want to sharpen areas of smooth tone – like the sky or water – or noise. Therefore, it is recommended you mask your settings.
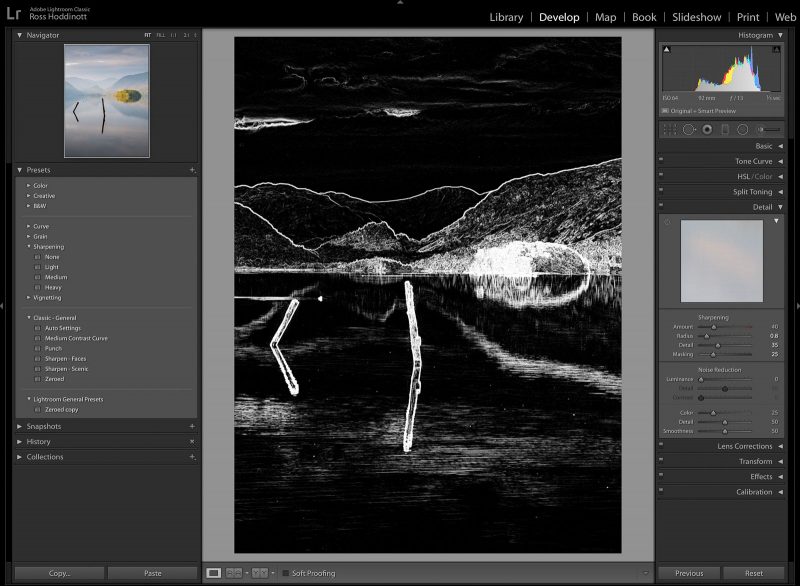
At a value of 0, sharpening is being applied globally. But by increasing the number, you can eliminate the larger bodies of similar pixels and instead only apply sharpening to the smaller, contrasting groups of pixels.
To create your mask, hold down the Alt key and drag the Masking slider (found at the bottom of the Sharpening tab) to the right. Your photo will turn white to indicate that sharpening is being applied to the entire image. As you drag the slider to the right, areas of smooth tone will be shown in black – only the white outlines are now being sharpened, while the black areas are masked off from being sharpened.
Simply drag the slider to the right until only the key areas of detail and outlines are white/sharpened. By masking sharpening, you ensure you only apply it to where you want it. Every shot is slightly different. Therefore, yet again, it is important to alter settings on a shot-by-shot basis.
10. Exporting Your Photos
Ok, so this isn’t really a tip, but it is obviously important that – having finished processing your raw – you export it as a universal, readable format. Lightroom – like many raw convertors – is a Catalog containing information about all the photos imported. It stores every single edit you make in the Develop module in a sidecar file – the raw always remains unaltered and it is only when you export your processed file that the changes are actually applied.
Click File > Export to bring up the Export window. The process should now be fairly self-explanatory. Select where you want to Export to – you can create a new subfolder if you wish. You can rename your photo. Lightroom gives you a range of options as to how you rename your photo via a dropdown menu. Personally, I opt for Custom Name – Original File Number. This allows me to name my photograph (typically the location of where the photo was taken) but include the file number to make it easy for me to locate the original raw file in the future, should I need it. Next go to File Settings.
Read more: Understanding the Lightroom Export Window
 Personally, I save my images as TIFFs, as they are a lossless file type, but many photographers archive their images as JPEGs as they are compressed and take up less space on your hard drive. I opt for Adobe RGB Color Space, as this is the industry standard. Go to Image Sizing if you wish to resize your image – maybe for web use or social media.

Otherwise, it is best to save your photo at its largest, native size. You can also apply Output Sharpening, control what Metadata is included with your exported file and add a Watermark (useful to help protect your images if you plan to share them on the web). Once you are finished, hit Export and your photograph will appear in your destination of choice. You can export more than one image at a time if required. You are done!
Remember, don’t delete your original raw files!
In Conclusion
Processing isn’t a dark art, so – if you are a beginner – don’t get intimidated by using programs like Lightroom. They are actually very intuitive to use, and the basics are relatively easy to apply. Hopefully my tips have helped, but obviously there is much more you can do, and many other tools and techniques to discover.
You will not need to follow all these steps for each and every photo you process, but they should give you the basis of a basic workflow. At first, it might take you a while to process your raw landscape photos, but with a little practice, you will find the process becomes quite quick and instinctive.
As you learn, you will discover lots of keyboard shortcuts and pick up other good tips and tricks along the way. Good luck!


