
10 Tips for Photographing Patterns and Textures in Nature

In frame-filling close-ups, nature can appear very differently to how we normally see and perceive it. Shapes, textures, and forms that might ordinarily go unnoticed are highlighted, and the most beautiful repetitions and patterns can be revealed.
Although nature photographers often strive to capture their subjects with a high degree of realism, animals and plants grow increasingly abstract, the more that they are magnified.


For example, fur, feathers, scales, leaf veins, or even the gills of a mushroom, look extraordinary and almost unrecognisable when shot in close-up. Woodland, wetlands, gardens, and the coast are excellent places to visit.
While good camera handling skills remain important for capturing eye-catching photographs of patterns and textures, a good, creative eye is more important than technique. Photo opportunities are often less obvious, and the subject itself less important. For this genre, form is primary. Content is irrelevant.
‘Seeing’ the image in the first place is the key to success. You have to train your eye to look at subjects differently: more closely and creatively. To help you get started, here is a handful of top tips and subject suggestions.
1. Choosing the right kit
Textures and patterns within nature can be any size, from dried-up riverbeds and salt marshes, to the intricate patterns of an insect’s wing. A drone is a great instrument for shooting larger areas, and discovering patterns from an elevated viewpoint.
Read more: How to Take Aerial Photos – Drones, Helicopters and Planes
However, most images of patterns and textures come from smaller subjects, captured at relatively high magnifications. Therefore, a macro lens or close-up attachment is often the best choice, although the long end of a 70-300mm tele-zoom can be useful too.

If you are new to close-up photography and are unsure about the kit available, read our Introduction to Macro Photography Equipment.
Other than a close-focusing lens, you won’t need much. A tripod will be useful for precise framing and focusing, while a small diffuser and an LED device will allow you to reduce or create shadows, in order to alter how texture appears in your final shot. However, it is your vision and imagination that provide the key to success.
2. Get close… and then get closer
Get close to subjects, and then get closer again. The most compelling, impactful shots are often tightly framed, and shot at a high level of magnification.
Shoot handheld at first. A tripod can confine and restrict your movement – working without a support will give you the freedom to move, explore, and examine your subject from different angles, while unhindered.

Once you have discovered the best composition, set up your tripod and precisely refine your shot. Don’t be scared to fill the entire frame with your subject.
The word ‘pattern’ is derived from the French word ‘patron’, which describes recurring elements. The repetition of shapes, lines, and textures will often form the basis of your shot.
Read more: How to Take Abstract Macro Photos
3. Get parallel
When shooting textures and patterns, you will often want the subject to be sharp throughout, from edge to edge, to maximise impact. There are several ways to achieve this. The most obvious is to select a small aperture- in the region of f/16- to generate a larger zone of focus.
Although doing this will create a slower corresponding shutter speed, this isn’t normally a concern when shooting patterns: subjects are normally inanimate, and you will likely be using a tripod.

If you are shooting at a very high magnification and you can’t achieve sufficient depth of field to record your texture sharply, consider focus stacking to extend the zone of focus. However, the key to achieving edge-to-edge sharpness is often to position your camera parallel to the subject.
This is because there is only one geometrical plane of complete sharpness, and you will want to place as much of your subject as possible within this plane of focus. Many textures and patterns occur on relatively flat surfaces, for example, a leaf, ice, tree bark, or feathers.
So, if you carefully and precisely align your camera, you should achieve results where the sharpness doesn’t fall off toward the edges of the frame. A tripod will help you to position your camera accurately.
4. Wings
Feathers, plumage, and insect wings all provide incredible details, textures, and repetitions to photograph. Just an individual feather and a high level of magnification will suffice.

However, if you sadly find a dead bird – roadkill perhaps, or a bird that has died after flying into a window – take the opportunity to photograph the beauty, design, and colour of its plumage. Diffused lighting often works best, and will help you capture minute detail and accurate colour.
Butterfly and dragonfly wings also create photogenic patterns, but you will need to shoot at a reproduction ratio of 1:1 or greater in order to achieve frame-filling shots. A still, cool morning is best, when subjects are inactive and will allow you to get close enough to isolate wing detail.
It should go without saying that you should never kill, damage, or refrigerate insects for the sake of a photograph.
Read more: Photography Ethics – Freezing Insects for Macro

5. Trees, leaves and bark
Trees can be a great source of photogenic textures. Begin by taking a closer look at bark, visiting an arboretum for the widest variety. Bark can be smooth and glossy, or rough and textured. Smooth barks, such as Tibetan cherry, can be quite reflective, so a polarising filter can be handy for restoring natural colour saturation.
To highlight patterns or shapes in the bark’s surface, opt for a parallel viewpoint together with a small aperture.

Leaves of all shapes, sizes, and designs provide some of nature’s most beautiful and photogenic patterns. Just a single leaf holds a great deal of photogenic appeal and potential.
It is easiest to photograph fallen leaves and, in autumn, carpets of overlapping leaves on the ground can create interesting patterns.

Look for the most interestingly shaped leaves, like maple and beech. Dew or rain will leave glossy leaves smothered in tiny water droplets, each acting like a tiny magnifier and creating a pattern of their own.
Try placing a leaf on a lightbox – backlighting will highlight the intricate patterns of its veins. You could even arrange leaves into a pattern of your own making.
6. Fungi
Fungi are hugely photogenic subjects. If you’ve not shot them before, read How to Photography Fungi.

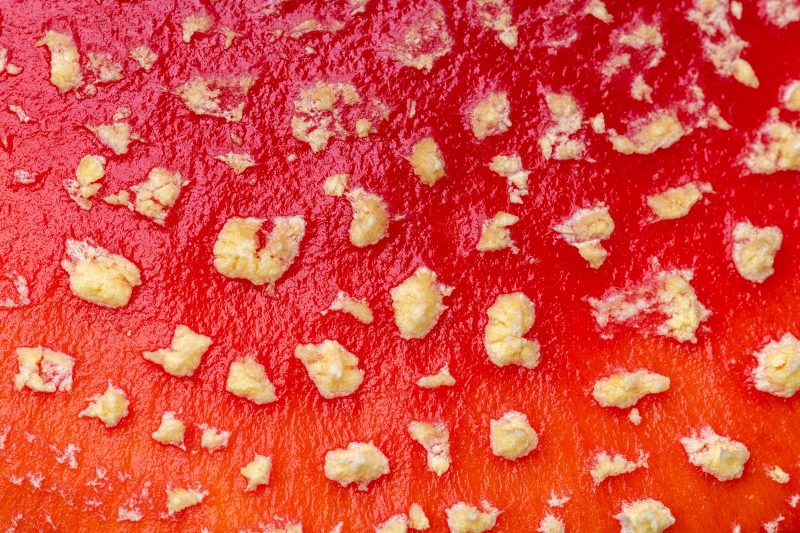
They can be colourful, textured, and patterned, so, rather than always photographing them in their entirety, get closer still, and isolate areas of particular interest. For example, the crimson caps of fly agaric create a striking pattern in close-up, while the gills of many species look especially eye-catching when backlit.
Autumn is the best time to find and photograph fungi – ancient, deciduous woodlands tend to be the best places to search for subjects. Light will be in short supply under a canopy of leaves, so a tripod that can be used at low-level is an essential accessory.
7. Water
Rain and dew create tiny droplets of water that form captivating patterns on such things as flowers, leaves, insect wings, metallic objects, and spider webs. Droplets act like tiny lenses, reflecting and refracting nearby objects.

Meanwhile, still water can create colourful and abstract looking reflections, particularly where there are buildings or colourful boats nearby. Visit urban waterways and harbours, and use a tele-zoom to isolate colourful, abstract-looking patterns in the water.
Running water can be photogenic too. Water streaking over weirs can create interesting patterns. Try using a slower shutter speed, in the region of 1/2sec, to create a degree of subject motion.
8. Winter
New patterns and fresh photo opportunities are created within nature every day, and winter can prove a particularly productive time of year for discovering and photographing natural patterns.

During freezing temperatures, plants will be encrusted with glistening frost, which can completely change and enhance their appearance. Look for patterns among dead grasses, reeds, fallen leaves, and ferns.
Read more: How to Photograph Frost & Ice

Frozen spider webs are highly photogenic, creating a wonderful wintry pattern. Also, look for beautiful, intricate frost patterns that have formed on windows, glass, and metal. In freezing conditions, pools, puddles, lakes, and canals will turn to ice.
This has to be among my favourite natural textures to photograph. Look for trapped air bubbles, lines, and swirly details on the surface of the ice that you can isolate and use to create strong, engaging compositions. An overhead viewpoint is good for revealing shapes and detail.

Be sure to place tripod legs carefully, however, and tread with caution – otherwise you may crack the ice and ruin your shot.
Intentionally using a cooler colour temperature, in the region of 4,500-5,000k, will give your images an attractive, cool, blue hue.
9. Moss and lichen
Designs are everywhere within nature- the trick is to recognise them. Plants such as moss, lichens, and liverworts may seem uninspiring at first glance. However, many form interesting patterns that photographers can reveal in isolation.

When viewed up close, lichens can resemble some sort of miniature alien landscape, providing a rich variety of shapes, colours, and textures. Lichens can be found growing on trunks, branches, old wooden benches, rocks, walls, and gravestones.
Look for colour contrast and fruiting bodies to add interest to your close-ups.

Mosses form dense, green ‘cushions’ on woodland floors, rocks, and tree stumps, often creating attractive natural patterns that are large enough to photograph using almost any focal length. Mosses often grow in dark, damp places.
Therefore, use a tripod for stability and trigger the shutter remotely, using a remote cord or device, to eliminate any camera vibration that might soften image quality.
10. Slow down
Don’t rush the picture-taking process. When shooting patterns, you will mostly be photographing static subjects, with a large level of control over set-up, lighting, and composition. Take advantage of this.
Spend at least an hour in any one area, closely studying your surroundings and allowing compositions to evolve over a number of frames, until you achieve just the result you envisaged.

In conclusion
Quite simply, there is no better source of exquisite, intriguing, and fascinating details than nature.


